Homogeneous System Copy using Online/Offline Database Backup
Reasons for Copying a SAP System
SAP recommends that you make a system copy in order to build a test, demo, training or standby system (Oracle and Informix: standby systems cannot be created with a system copy). You should perform upgrades in a test system first. This way you can identify customer specific problems which might result from modifications. Thus, we can sort the general needs for a system copy as follow:
- To create a new training system for end-user or project team education
- To create a DEMO system
- To create a Test system for upgrade or other purposes.
- To recover a system on another machine with the same platform after a crash.
- To copy large clients. If a client very large to export/import, it is better to do a system copy rather than client transport.
If a system copy takes place between systems with same platform ( operating system and database system), we call this HOMOGENEOUS SYSTEM COPY.
If The system copy takes place between systems with different platforms ( at least one of the component must be different, OS or RDBMS ), we call this HETEROGENEOUS SYSTEM COPY.
There 3 ways of a Homogeneous System Copy in R/3 Systems.
- Homogeneous System Copy using Online / Offline Database Backup.
- Homogeneous System Copy using R3LOAD Procedure.
- Homogeneous System Copy using R3COPY Procedure.
The procedure described tested on AIX 4.3.3/Oracle 8.1.7, AIX 5.1/Oracle 8.1.7, AIX 5.1/Oracle 9.2.0 and Win2K/Oracle 8.1.7 platforms.
The command reference given in this guide is taken from a homogeneous system copy done on AIX 4.3.3/Oracle 8.1.7 platform. Differences of other platforms such as Windows will be shown in the same sections.
Homogeneous System Copy using Online/Offline Database Backup
This guide is prepared for a Homogeneous System Copy using Online/Offline Database Backup. Steps for a Homogeneous system copy are briefly as below:
- Preparations on Target System.
- Restore Online/Offline Backup of Source System onto Target System.
- Create CONTROLFILE creation script on Source System.
- Modification of CONTROLFILE script and creation of CONTROLFILEs of Target System.
- Recovery of Oracle Database on Target System.
- Completion of System Copy
Prerequisites
Following conditions must be provided to copy a system:
- Both Source and Target Systems must have Same Operating System and Database System. Also Patch levels must be same.
- You have sufficient free space for sapdata directories on target system.
- For Windows systems, you have to create all drives where datafiles resides on source system.
- Use most current database backup in order to shorten database creation time.
Procedure
1. Data and Log directories on target system must be cleaned before restoring source database. Here below are the commands to clean directories. Before this, you have to stop all SAP and Oracle processes.
# su -adm # stopsap all # exit # su – ora # lsnrctl stop # exit # cd /oracle// # rm –rf sapdata?/* # rm –rf origlog?/* # rm –rf mirrlog? # rm –rf sapreorg/* # rm –rf saparch/* # rm –rf saptrace/usertrace/* # rm –rf saptrace/background/* # rm –rf sapbackup/* # rm –rf sapcheck/*

-
- You have to resize the following file systems before restore process. Take into account sizes of source system.
- /oracle//sapdata1 /oracle//sapdata2 /oracle//sapdata3 /oracle//sapdata4 /oracle//sapdata5 /oracle//sapdata6 /oracle//saparch
- After cleaning necessary file systems/directories, you have to restore most current database backup to target system. For this, find the detail backup log (e.g. bdkxxsrh.anf) for that backup on source system. You can determine this from back.log summary backup log file or using DB12.
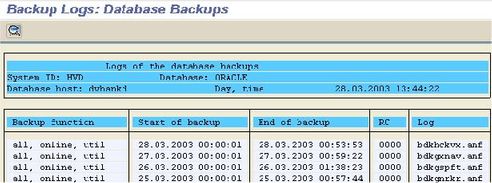
DB12 -Backup Logs
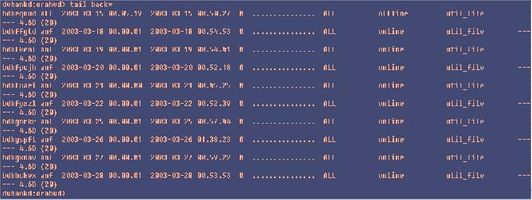
back.log File
Copy this detailed backup log file into /oracle//sapbackup directory on target system. Use BRRESTORE command below to restore the source database on target system. You can also restore datafiles and online redolog files (if you are using offline backup) using backup tools such as BACKFM tool of IBM TSM.

3.a. Mount the necessary backup volume on target system.
3.b. Use the following command to begin restore:
# su -ora # cd sapbackup # brrestore -m full -b -c (det_log_file= for example bdkxxsrh.anf)
At the first step of restore, system will recognize that the Oracle SID is different on target machine (where the restore command executed) and in backup. Also, Oracle_Home parameters in backup and in current system will be different and recognized by brrestore. But the restore command will restore the datafiles to match current systems file system. Here is a sample log of a restore.
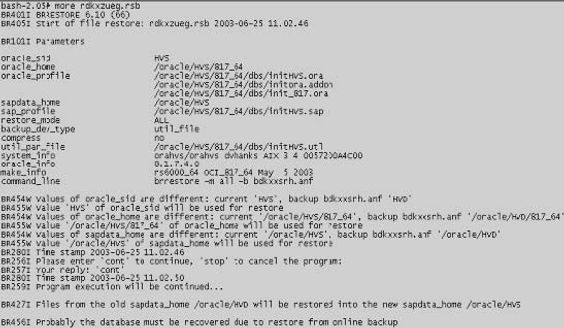
All the datafiles and online redolog files (only for Offline DB Backup) must be successfully restored.
At this step, there are 3 probability that must be take into account for the following steps.
You are using an online database backup of source system to create target system.
You have to find and put all archive files created during online backup into target systems archive directory to be able to recover database. You can also apply all the archives created from the online backup start time to latest available.
You are using an offline database backup of source system which is running in ARCHIVELOG mode to create target system.
You may find the archive files created after offline backup on source system to make database current on target system via applying during recovery.
You are using an offline database backup of source system which is running in NOARCHIVELOG mode to create target system.
You don't have any archive files created on source system so you don't need anything.
Those differences will be detailed in recovery step.
4. After restoring datafiles and redolog files, a scripts must be prepared on source system to create CONTROLFILE of target system. For this you have 2 option.
4.a. You can use R3COPY program which is under "/kernel/UNIX/COMMON" directory of Kernel CD. This program can be used only on UNIX systems. For Windows systems, "4.b" option must be used. Run this program by ora user on source system. After some confirmations, execute step "(a) Source system: Generating the script CONTROL.SQL". This will create a script named CONTROL.SQL under /oracle//sapreorg directory. Copy this script into target system (any directory). This file is ready for execution and doesn't require any modification.
4.b. SVRMGRL or SQLPLUS can create a scrpit to create controlfile using current CONTROLFILE content. Login to source system as ora user and execute the following SVRMGRL/SQLPLUS commands. To be able to execute following commands, database must be at least in MOUNT mode..
# svrmgrl SVRMGR> connect internal SVRMGR> alter database backup controlfile to trace; SVRMGR> exit
As a result of this command, a trace file (e.g. ora_54764_hvd.trc ) will be created under /oracle//saptace/usertrace directory. File can be determined by sorting according to modification/creation dates (UNIX: # ls –ltr). Most current file must be cheched.
You have to edit this file to be able to use for CONTROLFILE creation on target system.
- Rename file name as CONTROL.SQL
- Open file to edit using VI (UNIX) or NOTEPAD (WIN).
 Remove all lines before "STARTUP MOUNT" line. Delete all commented "#" lines. Also remove all lines after CHARACTER SET WE8DEC;" line.
- Change all Source SID's to Target SID via following commands.
UNIX (VI): :%s///g WIN (NOTEPAD): CTRL+H
Change the line
CREATE CONTROLFILE REUSE DATABASE ‘SSID’ NORESETLOGS ARCHIVELOG;
as follow
CREATE CONTROLFILE REUSE SET DATABASE ‘TSID’ RESETLOGS ARCHIVELOG;
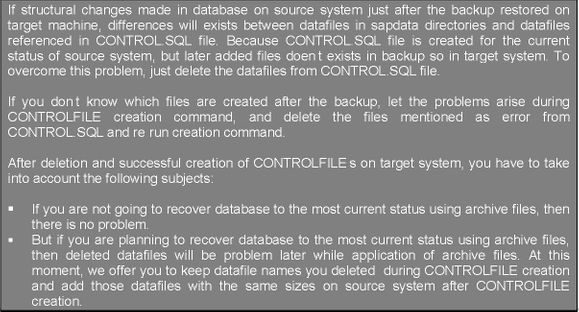
If you want to change datafile or redolog file destinations, first move the files on target destination at OS level, then edit CONTROL.SQL file for new destinations.
5. After CONTROL.SQL script preparation, following commands must be run to create CONTROLFILE of target system:
# su – ora
# svrmgrl SVRMGR> connect internal SVRMGR> @/ /control.sql
You have to guarantee the successful completion of this command as follow:
SVRMGR> @control.sql Statement processed. SVRMGR>
6. Database will be in inconsistent status after creation of CONTROLFILE. This can be viewed by trying to open the database.
SVRMGR> alter database open; alter database open * ORA-01589: must use RESETLOGS or NORESETLOGS option for database open SVRMGR> alter database open resetlogs; alter database open resetlogs * ORA-01195: online backup of file 1 needs more recovery to be consistent ORA-01110: data file 1: '/oracle//sapdata1/system_1/system.data1'
At this step, a recovery must be made in order to be able to use the database.
7. 3 type of recovery can be made, according to your status mentioned at the end of STEP-3. all the recovery types must be used by "USING BACKUP CONTROLFILE" as CONTROLFILE is created manually.
7.a. If your source system is runnig in NOARCHIVELOG mode, then you have to use the following command to recover database.
SVRMGR> recover database using backup controlfile until cancel;
7.b. If you restored an online backup on target system and put all the archive files created since online backup start time, use the following commands.
SVRMGR> recover database using backup controlfile;
After execution of this command, Oracle will ask for archive files to be consistent. As archive files contains only database changes commands, you will use source system archive file on new systems database recovery. Copy all archive files created since online backup on source system to archive directory of target system. Archive file names are different from asked during recovery session. You can change archive file names for target system via the following script.
cd /oracle//saparch for i in `ls|grep `; do
file_name=`echo $i |cut -dD -f2`; mv $i ${file_name}; done
Alternatively you can enter file names manually as required by recovery session as follow:
SVRMGR> recover database using backup controlfile; ORA-00279: change 44138924 generated at 03/26/2003 00:00:24 needed for thread 1 ORA-00289: suggestion : /oracle/HVS/saparch/HVSarch1_22746.dbf
ORA-00280: change 44138924 for thread 1 is in sequence #22746 Specify log: {=suggested | filename | AUTO | CANCEL} /oracle/HVS/saparch/HVDarch1_22746.dbf Log applied.
After application of all necessary archives (at least all the archives created during online backup must be applied. Archives from this point can be applied to make database current), next request for archive is cancelled via CANCEL command.
ORA-00279: change 44164157 generated at 03/26/2003 01:58:29 needed for thread 1 ORA-00289: suggestion : /oracle/HVS/saparch/HVSarch1_22754.dbf ORA-00280: change 44164157 for thread 1 is in sequence #22754 Specify log: {=suggested | filename | AUTO | CANCEL} CANCEL Media recovery cancelled. SVRMGR>
But recovery session must be started with the following command and cancelled again to ba able to start database.
SVRMGR> recover database using backup controlfile until cancel; ORA-00279: change 44164157 generated at 03/26/2003 01:58:29 needed for thread 1 ORA-00289: suggestion : /oracle/HVS/saparch/HVSarch1_22754.dbf ORA-00280: change 44164157 for thread 1 is in sequence #22754 Specify log: {=suggested | filename | AUTO | CANCEL} CANCEL Media recovery cancelled. SVRMGR>
Otherwise following error will arise during database opening.
SVRMGR> alter database open resetlogs; alter database open resetlogs * ORA-01113: file 1 needs media recovery ORA-01110: data file 1: '/oracle/HVS/sapdata1/system_1/system.data1'
To open database, use the following command:
SVRMGR> alter database open resetlogs; Statement processed. SVRMGR>
7.c. If you restored an offline backup on target system, you can recover database to the time of backup completed or you can recover database to the most current status using archive files. The archive application and statup of database is same as an online backed up database copy in "7.b".
8. after opening database, LISTENER process must be started.
# su – ora # lsnrctl start

9. To open SAP system, use the following commands.
# su -adm # startsap

- As your Hardware Key is not changed, you don't have to get additional License Key from SAPNET. You can use previous systems (on target system, if SID is not changed) License in new system created on target system.
- Logon to the SAP R/3 System and goto TCODE SE06. Select "Database Copy or Migration" and execute "Post Installation Processing".
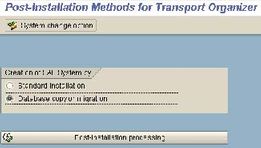
SE06
Change all of the Source System Objects to Target System Objects as asked.
- Delete old TMS configuration and make new configuration for TMS via STMS TCODE.
- After all of above steps, you have completed a System Copy using Online/Offline Database Backup.
You can also get information regarding SAP BASIS