Android is an open source operating system that is based on the programming language Linux. It is widely used in mobile devices that include smartphones and tablet computers. the Open Handset Alliance developed Android under the leadership of Google as well as other organisations. It enables an integrated approach to application development for mobile devices and thereby ease the job of the developers who can only develop their applications for Android.
What is Service in Android?
A service in Android is a module that can runs in the background in order to perform lengthy operations. They have no need to interact with a user and have the ability to operate even when an application is destroyed. There are two states of a service−
- Started- A service is started using the call startService() and it indefinitely operates in the background, even if the component starting it is destroyed.
- Bound- A service is bound when it activates with the call bindService(). They propose a client-server interface to allow interactions between the components and the service, send requests, obtain results, and interprocess communications (IPC).
What is IntentService in Android?
IntentService in Android is a base class for Services to handle asynchronous requests that are expressed in the form of Intents when there is a demand to do so. The requests are sent by the clients through Context.startService(Intent) calls to start the service. It handles each Intent one by one with the help of a worker thread and stops automatically when the work is done. All the requests are controlled using a single worker thread so they may be sometimes time-consuming. However, they do not interfere with the main loop of the application.
To offload tasks from the main thread of an application, the "work queue processor" pattern is employed. The IntentService class simplifies the pattern and handle the mechanics. This service can be employed extending the IntentService with onHandleIntent(Intent).
Use of IntentService in Android
The uses of IntentServices in Android are-
- Take care of asynchronous requests on the expression of Intent.
- IntentService allows the simplest ways of offloading “chunks” of processing from the UI thread of the application to a remote work queue without launching an AsyncTask every time processing is required.
- Data is easily sent back to an application by broadcasting the result in the form of an Intent object. A broadcast receiver catches the result for use within an app.
- An IntentService is executed on a separate worker thread.
- The service stops automatically when all the tasks are completed, eliminating the need to make a call to stop the service.
IntentServices in Android, although not a well-known Android service, has many applications. Offloading the work from the main UI thread into a work queue becomes incredibly easy and efficient using IntentService. It can also process several requests, although one at a time. IntentServices, therefore, helps to maintain the responsiveness of the main application without interfering with the users’ activity.
How to Create Android Service Using Intent Service
The good thing about Intent service class is that we can handle different requests in an asynchronous manner.
How does it?
It creates a worker thread to you automatically which can handle asynchronous requests. So let’s see how we can use Intent service class to create our services.
Please follow the steps below steps below in order to use the Intent Service class to create our services:
Step 1) First we have this button Start Service, Stop Service and added text
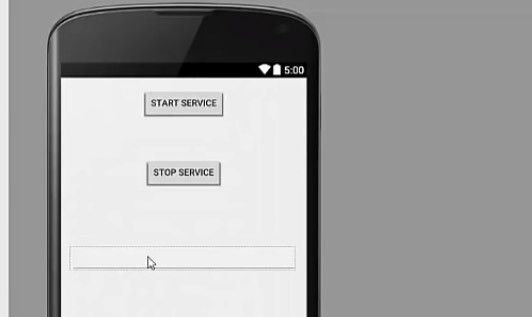
And also given an onClick() method here which is Stop Service for Stop button and Start Service for Start button.
<Buttono
	android:layout_width="wrap_content"
	android:layout_height="wrap_content"
	android:text="start service"
	android:id="@+id/button1"
	android:onClick="startService"
	android:layout_below="@+id/button1"
	android:layout_centerHorizontal="true" />

<Buttono
	style="?android:attr/buttonStyleSmall"
	android:layout_width="wrap_content"
	android:layout_height="wrap_content"
	android:text="stop service"
	android:id="@+id/button2"
	android:onClick="stopService"
	android:layout_marginTop="60dp"
	android:layout_below="@+id/button1"
	android:layout_centerHorizontal="true" />
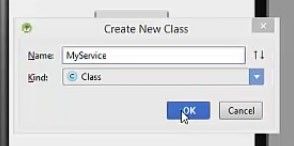
Step 2) Now go to the java folder and here besides my MainActivity.java class create a new Java class
.jpg)
Now we are going to name this new java class as, for example, 'MyService'.
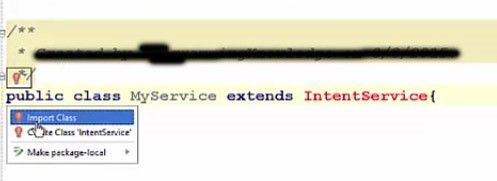
And it is going to create our MyService class and this MyService class we are going to extend it with IntentService class and it will give you this red bulb here, that means we need to import this class
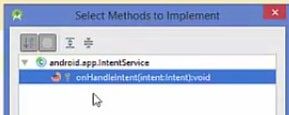
And second we need to implement a method which is called onHandleIntent() method so we need to override this
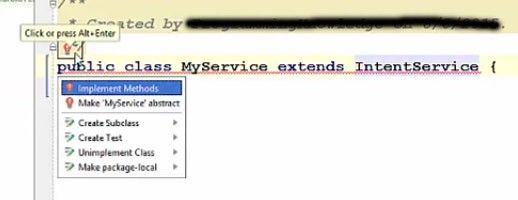
One more thing it requires is, you need to override the constructor. So you need to create a matching super() for the constructor.
public calss Myservice extends IntentService{
	/*
	creates an IntentService. Invoked by your subclass's constructor.
	@param name Used to name the worker thread, important only for debugging.
	*/
	public MyService(String name){
		super(name);
	}
Step 4) Now this takes a string which we are going to give as a thread name for example, we will delete this argument in the constructor and directly give the name to my thread. You can give any name such as my_intent_thread.
public MyService(){
		super("my_intent_thread")
	}
And inside your onHandleIntent() method you can perform a long running task, for example, waiting for something to happen. So we are writing a code from our previous tutorial for waiting for 20 seconds.
@Override
protected void onHandleIntent(Intent intent){
	synchronize (this){
		try{
			wait(20000);
		}catch(IntarruptedException e){
			e.printStackTrace();
		}
	}
}
But you need to notice here that we not adding the self-stop method because this intent service is able to handle itself and it’s able to stop itself when all the works in the thread are done.
Step 5) Now we are going to add these two methods which are called onStart() and onDestroy() method.
@Override
public int onStartCommand(Intent intent, int flag, int startId){
	return super.onStartCommand(intent, flags, startId);
}

@Override
public void onDestroy(){
super.onDestroy();
}
And, in here what we can do is, we can start our service or display the message that our service has been started or being destroyed. So we are going to add the toast which will display the 'Service Started'.
@Override
public int onStartCommand(Intent intent, int flags, int startId){
	Toast.mkeText(MyService.this, "service started", Toast.LENGTH_LONG).show();
	return super.onStartCommand(intent, flags, startId);
}
Second, is 'Service Destroyed'. So we know that our service has been destroyed.
@Override
public void onDestroy(){
	Toast.makeText(MyService.this, "service destroyed", Toast.LENGTH_LONG).show();
	super.onDestroy();
}
Note: The name we have given here, this name we can see the description “Name used to name the worker thread, important only for debugging”. So here you can give the name to your thread, according to your needs or requirement.
/*
* @param name Used to name the worker thread, important only for debugging.
*/
And what this IntentService class is going to do is whenever you want to start a service it’s going to create a special worker thread to handle your requests asynchronously. So you don’t need to explicitly define a thread
Step 6) Now once everything is done, what you need to do is you need to call this class and this method in your MainActivity.java class.

So what we are going to do now is we are going to go to the MainActivity.java file here and in our MainActvity.java class we are going to make our two methods which are startService() and stopService() for our two buttons for starting and stopping the services.
Step 7) Now in the startService() method create an Intent and first, argument in the intent is 'this' and second argument is the class which we are calling 'MyService.class'. And we can start the service using startService() method and pass the intent in it
public void startService(View view){
	Intent intent=new Intent(this,MyService.class);
	startService(intent);
}
And the same thing we are going to do in our stopService() method for stopService() button click event and instead of starting service this button will stop service.
public void stopService(View view){
	Intent intent=new Intent(this,MyService.class);
	stopService(intent);
}
Step 8) Now, we want to call our service to our Manifest file. So go to AndroidManifest.xml file and add the service element here.
<service android:name=".MyService" android:exported="false"></service>
Now we are going to run our app so we can start the service by Start Service button and we will see this message Service Started and at the same time we can insert some text inside my added text input.
.jpg)
Both tasks are handled parallel, the starting of the service which is waiting for 20 seconds and the entering of our text inside our added text ok and you can destroy the service by this stop service. So in this way you can use Intent Service class in your Android app.