SAP Mobile Platform
Almost every company in the world has a mobile application for reaching out to their customers. These apps also help their employees in performing a variety of tasks quickly. These mobile solutions also connect all the stakeholders, including clients, business partners, customers, higher officials, and other employees.
As companies look to deploy more and more mobile solutions, the need for platforms to develop apps increases. These platforms make it easier to create and run apps for a particular business. For this, one of the best platforms on earth is the SAP Mobile Platform. This is SAP's official platform for developing B2B and B2C apps. Its usefulness has made it a widely accepted software all over the world. This is a product of the SAP Net Weaver package and helps many organizations to mobilize their official tasks.
In this post, we will discuss all the important features of the SAP Mobile Platform.
What is SMP (SAP Mobile Platform)?
SAP SMP was initially called the Sybase Unwired Platform (SUP). It helps companies build customer-oriented applications. This platform can also be used for customizing existing applications. These apps can be hosted on the cloud or internally. The main aim of developing this platform was to develop apps that connect business data. Also, these apps help in back-office integration and workflow management.
Using the application development tools on this platform, programmers code the business logic of a mobile app. The platform then eases the task of making the apps compatible with various operating systems. Thus, developing complex mobile apps that work with different data sources is simplified with SAP Mobile Platform.
Moreover, app developers can reach SAP’s existing customers via the app store.
SAP SMP 3.0 Version
SAP SMP 3.0 is the latest version of the software which was released in 2014. It has many exciting features that make the app development process easier. These include drag-and-drop HTML 5 applications, customizable apps, and REST APIs.
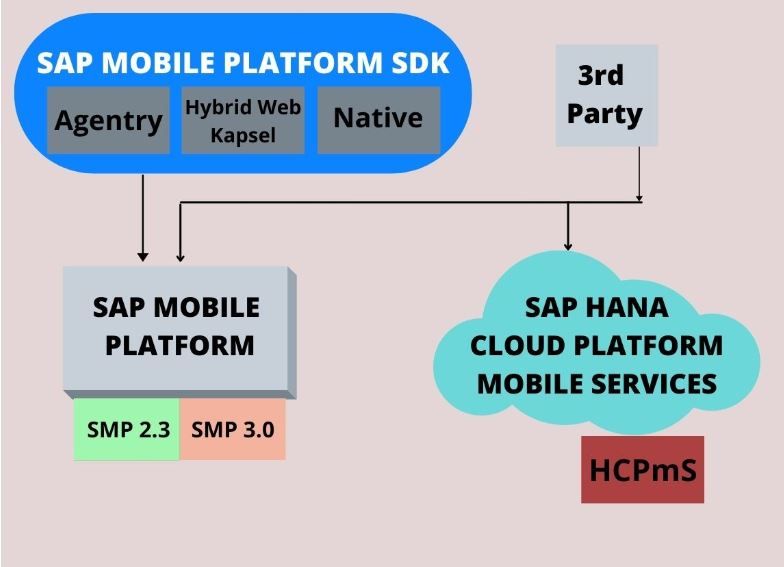
SMP 3.0 has the following components –
- Sybase Unwired Platform –This offers the deployment and development infrastructure for enterprise mobile apps to connect data from a variety of sources.
- Syclo Agentry –This is a tool used for managing the app's development lifecycle. It is also used for designing and deploying apps. Syclo Agentry allows admins to create complex workflows.
- SAP management cockpit –This works as an admin console. It assists employees to ensure tasks such as deploying, monitoring, and managing different applications. These include native, Agentry, and hybrid apps.
- SMS toolkit –This is used for developing SMS applications.
- Integration gateway –This is a runtime environment used for connecting the data sources to the applications. It also fetches runtime data from various sources such as SOAP web services, JDBC data, or JPA.
- SybaseMobiliser– This is a platform for processing payments for mobile transactions.
Other Versions of SAP SMP
The Sybase Unwired Platform was launched in 2008. Later on, Version 2.3 of the product was released as the SAP Mobile Platform. The other versions of this software and their release dates are -
| Version | Release Date |
|---|---|
| Version 3.0 | May-14 |
| Version 2.3 | End of 2013 |
| Version 2.2 | Mar-13 |
| Version 2.1.3 | May-12 |
| Version 2.1.2 | Feb-12 |
| Version 2.1. | Nov-11 |
| Version 2.1 | Sep-11 |
| Version 2.0 | 2011 |
| Version 1.5.2 | 2010 |
| Version 1.2 | 2009 |
| Version 1.0 | 2008 |
Advantages of SAP SMP
a) Customization
SAP SMP is a very customizable platform that enables developers to build apps with great flexibility. It also allows them to tweak and upgrade existing apps.
b) User-Friendly Interface
It offers a user-friendly interface that makes app development faster. Cross-platform applications can be developed without making huge changes to any existing code.
c) Boosts Customer Engagement and Loyalty
When apps are developed for multiple devices and platforms, it helps companies to connect to more users. This, in turn, helps in boosting customer engagement. Plus, the apps made on this platform are simple and interactive. So, customers are more loyal to the products and keep coming back for more.
The platform also helps in reducing unnecessary development costs.
d) Enhances Business Growth
The apps developed on this platform help companies to enhance their daily tasks. As they can be accessed from any device, employees can work with them on the go. This increases their efficiency and saves a lot of time.
Furthermore, apps created on SAP SMP can be executed faster, which reduces the costs of deployment and implementation.
e) Secure
The platform offers high security to its authenticated users. It offers various authentication schemes such as –
- Basic authentication
- Client Certificate Authentication
- Single Sign-On
- Siteminder authentication
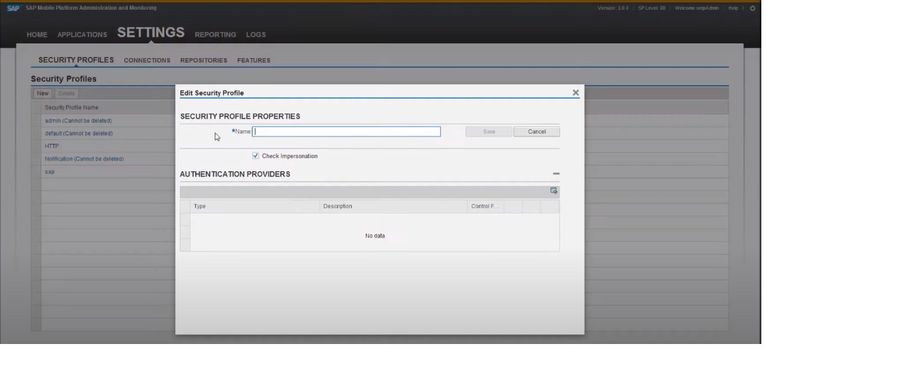
f) Powerful Admin Portal
SMP offers a powerful and navigable admin portal. Developers can configure apps, check usage, and log-in statistics. It also offers troubleshooting and intelligent monitoring for the apps.
Other Mobile Technologies from SAP
SAP provides you with a wide range of amazing apps for business and customer mobility. These apps are scalable, secure, and can connect to multiple devices.
Let us check out some other mobile technologies from SAP –
1) SAP Cloud Platform Mobile Services
This is a comprehensive cloud platform for developing cloud solutions. These are reusable services that are utilized by app developers to execute business requirements, without thinking much about the underlying infrastructure.
2) SAP Mobile Development Kit (MDK)
This provides you with a complete set of mobile app development and management tools. It extends the SAP Web IDE/Business Application Studio and the SAP Cloud Platform Mobile.
3) SAP Cloud Platform SDK
This is intended for iOS devices and offers you tools to build iOS apps in Swift.
4) SAP Cloud Platform SDK
This platform is targeted at Android devices. It helps you to develop native Android apps in Android Studio.
5) SAP Mobile Cards
SAP Mobile Cards offers the facility of sharing enterprise data using containerized micro applications.
6) Mobile Back-End Tools
It lets you generate an OData service for a mobile solution without a backend.
Become a Certified SAP Mobile Consultant
To become a certified SAP Consultant, one must have the basic knowledge of applications on the SAP Mobile platform. The SAP Certified Application Associate - SAP Mobile Platform Native and Hybrid Application Administration (SMP 3.0) course is a good way to get started. The course verifies that the candidate has the fundamental and administrative knowledge of the platform. After completion of the course, the candidate will know the installation, monitoring, configuration, and troubleshooting of all aspects of the platform.
The candidates must have real-life experience in developing mobile apps to succeed in this job role.
Course Structure of SAP Mobile Platform
The course covers all areas of this platform. It explains the data exchange between multiple users and the backend. The various processes of developing enterprise-grade apps, enhancing application security, administration, and troubleshooting are covered.
Some of the modules of this course are –
- SAP Mobile Platform Reporting
- HANA Cloud Platform and HCP Mobile Services
- Security Administration
- SAP Mobile Platform Performance
- SAP Mobile Platform Management Cockpit
- Administration of Integration Gateway
- System Design and Installation
The duration of the exam is 180 minutes and it consists of 80 questions.
Conclusion
The SAP Mobile Platform has helped many organizations to reduce the total cost of ownership while making applications. Plus, by lowering the workload of the programmers, the platform enhances their productivity.
Thus, if you are a company official, implementing the SAP Mobile Platform will be great for your business growth. And as a candidate, learning the platform will great for a brighter career.
SAP Mobile Platform Other Important Resources
Tutorials
- Function module for sending SMS
You have to use the below codes to send the SMS FORM SENDMESSAGE USING P_PA_MOBILE P_PA_TXT. DATA: send request TYPE REF TO cl_bcs. ... - SAPUI5 Browser Support for Mobile and Desktop Applications
If you want to run SAPUI5 that is based up on the web applications in the web browser you entered a right place. This article will help you learning SAPUI5 support for mobile and desktop applications. ...  Installing Cordova & Android SDK on Windows 8, 10 & 11 to Develop Mobile Application using HTML5, JavaScript & CSS
In this article, you will learn how to deploy Cordova apps in an SDK environment for Android devices. Users need Android SDK to set up the Cordova for Android environment, which users can install on s ... Cordova SQLite save Data in local Android Mobile Device using HTML5 & Jquery
I am assuming that Cordova is installed in your system if not then please use this Tutorial to install cordova Installing Cordova & Android SDK on Windows 7, 8 & 10 to Develop Mobile Applic ...- SAP Mobile Platform (SMP), Features, Advantages and Benefits.
As an important part of human life, mobile has become one of an integral part of everyday life. With the spinning wheel of change there is a great change in mobile technology as well as applications o ... 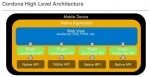 Step to Install Kapsel Plugins in Cordova
1) Open up a command prompt and "cd" to the root directory where SDK 3.0.3 Kapsel plugins are installed, for example: cd C:SAPMobileSDK3KapselSDKplugins (Windows) cd ~/SMP30Dev/SMP303_SDK/Ka ... MIRO/MIR7: 'Services for Object' tab missing
Hello SAP Experts, While processing invoice (Transaction code: MIRO) I noticed that there is no 'Service for Object'. Please follow the steps below in order to regenerate this issue: ...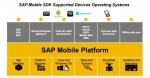 SAP Mobile SDK Supported Devices Operating Systems
Supported Operating Systems Devices For SAP Mobile Platform SDK 3.0 Platform Agentry Kapsel OData SDK Microsof ...