How to use TimePicker Dialog in Android?
Please follow the steps below in order to use the timepicker dialog in Android:
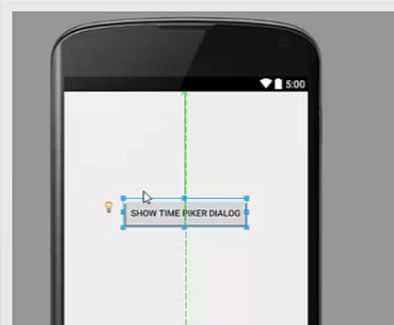
Step.1) So first of all what we will take a button and change the text of this button as ‘show time picker dialog’. We need this button in order to open the time picker dialog.
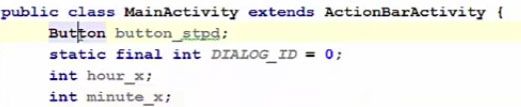
Step.2) Now we will directly go to the mainactivity.java file. So just go to your java folder and open you mainactivity.java and in here we will write the code for timepicker dialog. So first of all let’s create the object for the button, and three variables for a minute, hour and dialog ID.
Step.3) So once we have created these three variables, what we can do is we can create a method in which we can call this button click event and inside this button click event we can call our showdialog method to show this timepicker.We are also going to cast our button.

Step.4) Now once we have casted your button, we can use this button object to call set on click method and inside this setOnClick method we can use new onClickListener
.jpg)
Step.5) Now inside this new onClick method, we can call a method called showDialog() and this method is used to pop up the dialog.The dialog type we are going to define it later but what we are going to do is we will pass the DIALOG_ID in show dialog.

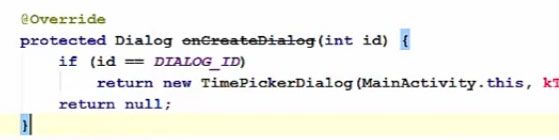
Step.6) Now what we are going to do is we are going to call our inbuilt method like onCreate method, there is a method called onCreateDialog similar to the onCreate method which is a built-in method. So let’s create this method here or you can create it below your show timepicker dialog method. This method will take one argument which will be id.
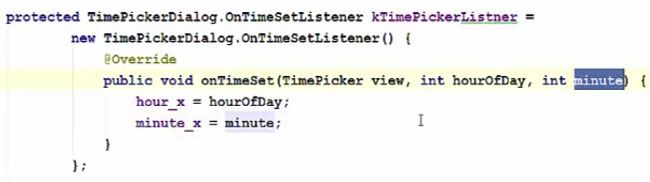
Step.7) Now what we are going to do is we will compare the id which is passed as an argument to the DIALOG_ID which we have declared above So if this id = the DIALOG_ID which we have declared, then we are going to return, new timepickerdialog and this takes, five arguments. First is the context, context can be your class in which you are working, so mainactivity.this and second argument is the time dialog. So this for example, right now we create a variable which we are going to define later. So KTimePickerListener. Third argument, you can pass hour which we have defined and minute is the fourth argument, minute_x and hour_x, and the last argument and the fifth argument it takes is what format of, you know, dialog, timepicker dialog you want to show. Is it a 24 hour format or a 12 hour format and by default it asks for the 24 hour which we don’t want so we will set it false.

Step.8) Now by default if this condition is not fulfilled, what we are going to do is we are going to return by default null if this condition is not fulfilled and in any other condition we are going to return false
Step.9) Now let’s create KTimepPickerListener variable. So what we have done, we have declared a protected variable which is timepickerdialog.ontimesetlistener and we have declared the same variable which we have passed here = new timepickerdialog.ontimesetlistener and it will be created automatically and don’t forget to close this by semi colon and in here inside this ontimeset method, first of all what we are going to do is we are going to set the values of hour and minute.
Step.10) Now once we have assigned these two variables, we can call these variables using for example toast so we can show whats the value of these two variables.
.jpg)
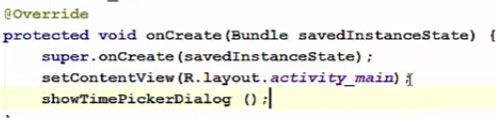
Step.11) Now call this showTimePickerDialog method which we have created by ourselves inside the onCreate method. Now everything is done so we are going to run our program.
So now or app is running and you will see ‘show time picker dialog’ button and whenever we click this show timepicker dialog button, it’s going to show you the timepicker dialog.
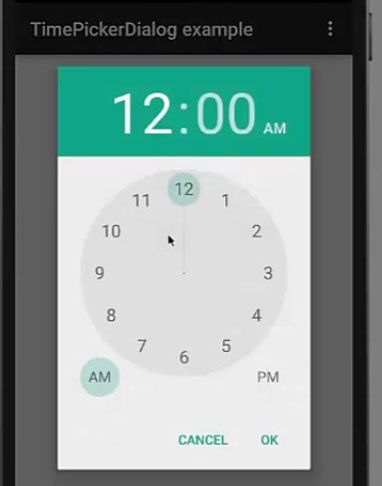
You can set the time to whatever you want. So hours, for example 4 hour 30 minute and I am going to change time to PM and when I click OK here, you can see the time 16:30
.jpg)
Read Next About How to use DatePicker Dialog in Android