Curiosity rises at its peak when we plan to develop our first Android application. Android development typically depends on Kotlin, Java, Swift, Flutter, and Lua Scripting Language. But nowadays, Python stepped into the game, and like every other domain, Python is also digging its root deep into Android application development.
Python in Android Development:
Python is a general-purpose, universal, high-level, object-oriented programming language. Because of all such features and paradigms, we can use Python in developing applications for Android. Python does not have any built-in mobile development service or framework. But as you all know, Python is rich in packages, libraries, and frameworks; there are frameworks and packages like Kivy, Beeware’s Toga, PyQt, etc. libraries that helps in creating mobile applications in Python. In this tutorial, you will learn about Kivy Framework.
Kivy Framework for Android Application development:
Kivy is a cross-platform Python framework that allows application developers to deploy apps in Windows, Linux, Mac, Raspberry Pi, and Android, of course. This framework got released in the year 2011, and the stabler version in 2019. It supports developing multitouch event-driven applications in addition to regular taps, clicks, and keyboard inputs. Kivy framework is designed in such a way that it supports GPU acceleration leveraging the graphics card, and is built on top of OpenGL ES2. TIt is an MIT license project, and therefore, developers can use this library for free or even commercial purposes.
Installing Kivy Framework:
Kivy does not use any native control or widgets. All of its elements are custom-drawn, and for this reason, all Kivi-based applications look similar across different platforms. Kivy also uses various dependencies and hence, developers recommend using it in a Python virtual environment like Python’s built-in venv library or the virtualenv package.
To create a Python virtual environment, type the following command in the shell:
$ python3 -m venv my_kivy_project
Next, to use Kivy in Python for Android application development, install PyCharm in your system. Now, install kivy using the command -
$ python -m pip install kivy
Or, if you are using PyCharm, you can start a new project. Then, go to File > Settings > Project: project name > Python Interpreter > Click the [+] button from the new Window and install the Kivy Package.
Handling Kivy Widgets:
Widgets in Kivy are on-screen control that allows users to interact with the app. All graphical user interface (GUI) toolkits have their own set of widgets. Popular widgets that Python app developers will use include buttons, drop down lists, tabs, combo boxes, etc. There are various widgets Kivy provides to its developers within its framework. Let us now run our first program that uses Kivy for app development.
Program:
from kivy.app import App
from kivy.uix.label import Label
class MainCode(App):
def build(self):
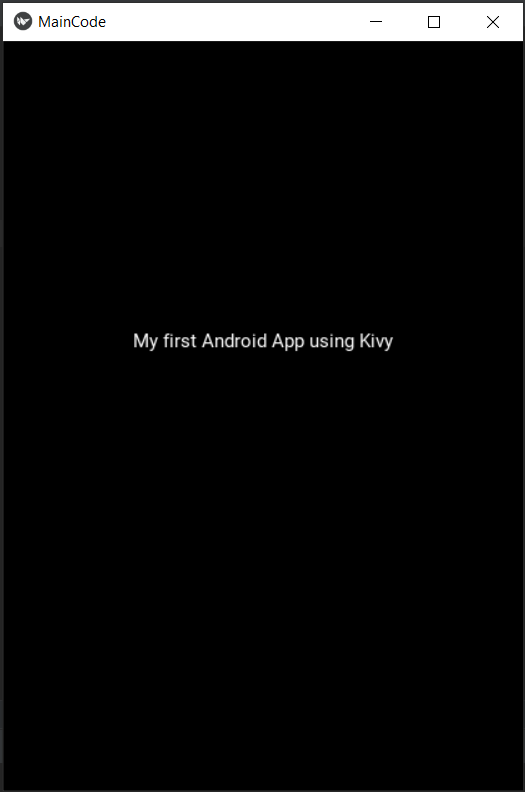
l = Label(text='My first Android App using Kivy',
size_hint = (.6, .6),
pos_hint = {'center_x': .5, 'center_y': .6})
return l
if __name__ == '__main__':
app = MainCode()
app.run()
Output:
Explanation:
Here, we have first imported the App from the kivy.app framework. Also, make sure to import the Label from the same framework. Then we create a class with the name MainCode. Every Kivy-based app demands the subclass App that overrides build(). Now, we have to declare and define the build() function and inside this, we create the Label widget and pass parameters along with the text ('My first Android App using Kivy') as a string. Then, we have to pass the two other values, the size_hint and pos_hint with a value. The size_hint takes x and y. The first value defines the width of the control, and the second value defines the height of the control.
The pos_hint defines the position of the widget within your app. These two arguments are not mandatory though. Then, we make sure our user-defined function returns the value back to the function. Finally, we check whether __name__ == __main__ that makes the standard way of running a GUI code from a Python code. In this, we assign the MainCode() to an app and run that app using the run() method.
NOTE: When you execute this code, you will see Kivy streams a lot of text in the output. Each phase of the built process is expressed in the standard output. This becomes helpful in debugging your application.
Use an Image within the Kivy-based App:
There is a lot of image-related widgets that allow developers to choose and work with. If you are using a local image and want your app to fetch it from the local drive, you can import the Image from the kivy.uix.image sub-package. In case your app demands loading an image from a URL or your app is dealing with online images, you have to import the AsyncImage.
Program:
from kivy.app import App
from kivy.uix.image import Image
class MainCode(App):
def build(self):
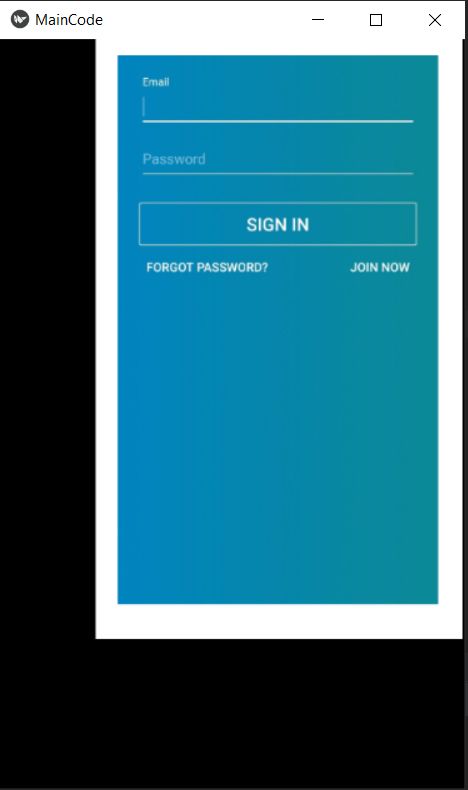
imag = Image(source = 'G:/w12.png',
size_hint=(4, .8),
pos_hint={'center_x': .6, 'center_y': .6})
return imag
if __name__ == '__main__':
app = MainCode()
app.run()
Output:
Explanation:
Here, we have first imported the App from the kivy.app framework. Also, make sure to import the Label from the same framework. Then we create a class with the name MainCode. Every Kivy-based app demands the subclass App that override build(). Now, we have to declare and define the build() function and inside this, we create the Image widget and pass the source value and its absolute path to fetch the image from that directory and display it in the Android app. Then, we have to pass the two other values, the size_hint and pos_hint with their value. The first value defines the width of the control, and the second value defines the height of the control.
The pos_hint defines the position of the widget within your app. These two arguments are not mandatory though. Then, we make sure our user-defined function returns the value back to the function. Finally, we check whether __name__ == __main__ that makes the standard way of running a GUI code from a Python code. In this, we assign the MainCode() to an app and run that app using the run() method.
Dealing with UI Layouts:
Every GUI development library or module contains its own separate methods of creating and managing widgets. Developers should know what to use and which method does what. One common difference we can witness is in wxPython that uses sizers, whereas Python Tkinter implements layout or geometry manager to place different GUI elements. For Kivy, you will have to use the Layouts. Kivy comes with a wide range of layouts. Some of the popular ones are
- BoxLayout
- GridLayout
- FloatLayout
For further details on various layouts, you may refer to the Kivy documentation.
Program:
# box layout for buttons
import random
from kivy.app import App
from kivy.uix.button import Button
from kivy.uix.boxlayout import BoxLayout
colr1 = [1,0,0,1]
colr2 = [0,1,0,1]
colr3 = [0,0,1,1]
colr4 = [1,0,1,1]
class LayoutForButton(App):
def build(self):
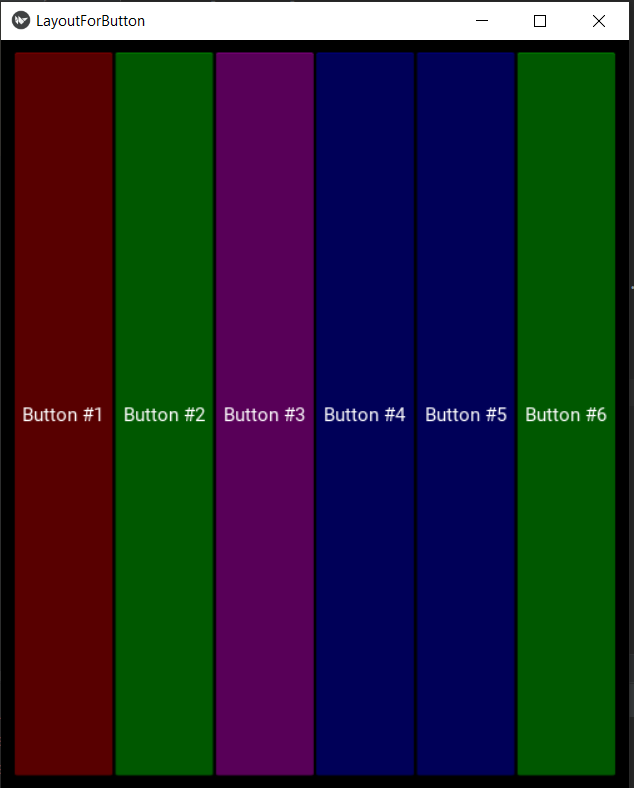
blo = BoxLayout(padding = 10)
clr = [colr1, colr2, colr3, colr4]
for i in range(6):
butn = Button(text = "Button #%s" % (i + 1),
background_color = random.choice(clr)
)
blo.add_widget(butn)
return blo
if __name__ == "__main__":
app = LayoutForButton()
app.run()
Output:
Explanation:
Here, we have first imported the App from the kivy.app framework. Again, we have to import the Button & BoxLayout from the same framework. Also, we need to import the random. Next, we assign some variable with color values through list – something like this
colr1 = [1,0,0,1]

colr2 = [0,1,0,1]

colr3 =  [0,0,1,1]

colr4 = [1,0,1,1]
Then we create a class with the name LayoutForButton. Every Kivy-based app demands the subclass App that override build(). Now, we have to declare and define the build() function and inside this, we create the BoxLayout widget and pass the padding value as 10 to display it in this Android app. Next, set the ‘clr’ variable with all the 4 colors (colr1, colr2, colr3, colr4). Now, iterate five times to generate five different Buttons that will accept their colors randomly. Finaly return the ‘blo’ i.e., the BoxLayout object. Lastly, we check whether __name__ == __main__ that makes the standard way of running a GUI code from a Python code. In this, we assign the MainCode() to an app and run that app using the run() method.
Event-driven Code in Kivy:
As you all know, any complete Android app requires buttons and other GUI elements with specific actions to perform on it. These actions are event-driven code. Kivy supports writing event-driven programs that will perform some actions based on the clicks and taps. The framework will react to user keypresses, taping events, touch events, and mouse events. There is another concept of the clock in Kivy that assists in the scheduling function call with a specific time set in the future. Let us now create an event-driven code that will trigger a message based on the tapping or clicking of the button.
Program:
from kivy.app import App
from kivy.uix.button import Button
class EventCode(App):
def build(self):
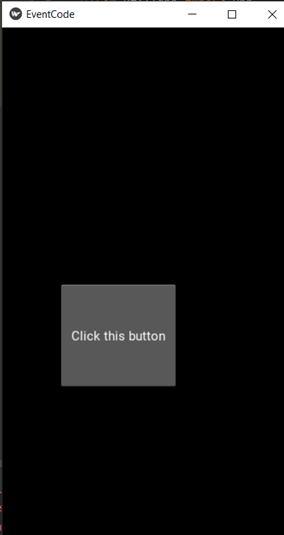
b = Button(text = 'Click this button',
size_hint = (.4, .2),
pos_hint = {'center_x': .4, 'center_y': .4})
b.bind(on_press = self.on_press_button)
return b
def on_press_button(self, instance):
print('The button is pressed !')
if __name__ == '__main__':
app = EventCode()
app.run()
Output:
Explanation:
Here, we have first imported the App from the kivy.app framework. Also, make sure to import the Button from the same framework. Then we create a class with the name EventCode. Every Kivy-based app demands the subclass App that override build(). Now, we have to declare and define the build() function and inside this, we create the Button widget and pass the text value as 'Click this button' so that it gets displayed in your Android app. Then, we have to pass the two other values, the size_hint and pos_hint with their value. The first value within it defines the width of the control, and the second value defines the height of the control. The pos_hint defines the position of the widget within your app. These two arguments are not mandatory though.
Also, we have to bind the event with the button and set an action for it. We will do this within the bind() method. Then we return the Button object. We have to now create a separate function that will call the on_press_button to show the message 'The button is pressed !'. Finally, we check whether __name__ == __main__ that makes the standard way of running a GUI code from a Python code. In this, we assign the MainCode() to an app and run that app using the run() method
The Kivy Language:
The Kivy framework comes with its own language called the KV language. This language will help you prepare your front-end and design interface as per the logic of the application. It follows a Model-View-Controller (MVC) architectural pattern for designing your application. With the help of the KV language, Kivy creates a separation of concern for both logic backend and design frontend. We need to store the KV language in a separate file and save the file with the. kv extension. All the layout, design, size, padding, spacing, font size, text input formats are put in the KV file. Let us take an example of a .kv file where we are planning to create a Calculator program.
Final Program [Calculator.kv]:
<CustButton@Button>:

    font_size: 32


<CalcGridLayout>:

    id: calculator

    display: entry

    rows: 6

    padding: 10

    spacing: 10


    # Display the input in box

    BoxLayout:

        TextInput:

            id: entry

            font_size: 32

            multiline: False


    # data entry updation when buttons are pressed

    BoxLayout:

        spacing: 10

        CustButton:

            text: "7"

            on_press: entry.text += self.text

        CustButton:

            text: "8"

            on_press: entry.text += self.text

        CustButton:

            text: "9"

            on_press: entry.text += self.text

        CustButton:

            text: "+"

            on_press: entry.text += self.text


    BoxLayout:

        spacing: 10

        CustButton:

            text: "4"

            on_press: entry.text += self.text

        CustButton:

            text: "5"

            on_press: entry.text += self.text

        CustButton:

            text: "6"

            on_press: entry.text += self.text

        CustButton:

            text: "-"

            on_press: entry.text += self.text


    BoxLayout:

        spacing: 10

        CustButton:

            text: "1"

            on_press: entry.text += self.text

        CustButton:

            text: "2"

            on_press: entry.text += self.text

        CustButton:

            text: "3"

            on_press: entry.text += self.text

        CustButton:

            text: "*"

            on_press: entry.text += self.text


    BoxLayout:

        spacing: 10

        CustButton:

            text: "AC"

            on_press: entry.text = ""

        CustButton:

            text: "0"

            on_press: entry.text += self.text

        CustButton:

            text: "="

            on_press: calculator.calculate(entry.text)

        CustButton:

            text: "/"

            on_press: entry.text += self.text

    BoxLayout:

        CustButton:

            font_size: 20

            text: "Scientific calculator"

            on_press: entry.text = ""
With its Python Code [Calc-App.py]
from kivy.app import App

import kivy

from kivy.uix.gridlayout import GridLayout

from kivy.config import Config

kivy.require('1.9.0')

Config.set('graphics', 'resizable', 1)

# Create the Layout class to place all the GUI elements here

class CalcGridLayout(GridLayout):

    def calculate(self, calculation):

        if calculation:

            try:

                self.display.text = str(eval(calculation))

            except Exception:

                self.display.text = "Exception / Error Found"


class CalculatorApp(App):

    def build(self):

        return CalcGridLayout()


calcApp = CalculatorApp()

calcApp.run()
Output:

Conclusion:
Mobile application development using Python can be done using different frameworks and libraries. But, amongst these, The Kivy framework is at the top. It is well-known for its simplicity and ease of use widget support. Kivy is cross-platform and easy to install in any environment. So, developers can easily learn using it.