PWA is short for a progressive web application, which helps most website users in several aspects. Users can use it to improve the webpage load time and access native features. Implicitly, a PWA operates service worker browser API to render access to these native features.
This article highlights all the steps to install and configure PWA in the angular JS project.
What is a PWA?
A progressive web application or PWA is a web-based application made from HTML, CSS, and JavaScript. Users can use this application as a web page and mobile application on devices, i.e., Android or Windows.
These web applications have abilities like push notifications, and users can operate these offline. The main characteristics of PWA are responsiveness, discoverability, installable, independent connectivity, cross-platform, and appearance.
Also, it benefits users by providing an app-like undertone. Also, users can use separate cache storage, a brilliant feature of PWA that improves the page load time.
Steps to install PWA in Angular JS
Shortlisting all the steps of installation and configuration of PWA in angular JS:
- Create angular application
- Add Angular PWA Package: @angular/pwa
- Check the files added/modified by @angular/pwa
- Do changes if needed in added files
- Run the web-based app on a local server
- Deploy a PWA application
- Check PWA is working or not
Step 1: Creating angular application
Users can start by creating an angular project using @angular/cli
>ng new angular-pwa
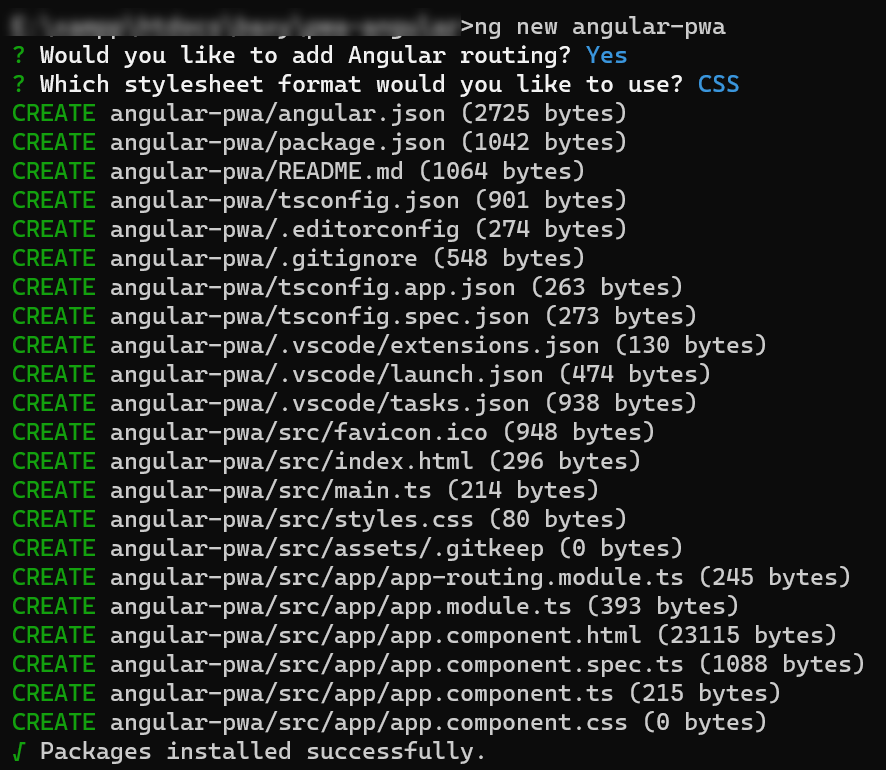
This command will build a scaffold angular app inside the angular-pwa folder. Jump to the next step for navigating the angular-pwa folder and open VSCode.
>cd angular-pwa && code .
Step 2: Adding @angular/pwa package
In the second step, users need to add the@angular/pwa package. The command is as follows:
ng add @angular/pwa
The above command will prompt users to install the version.
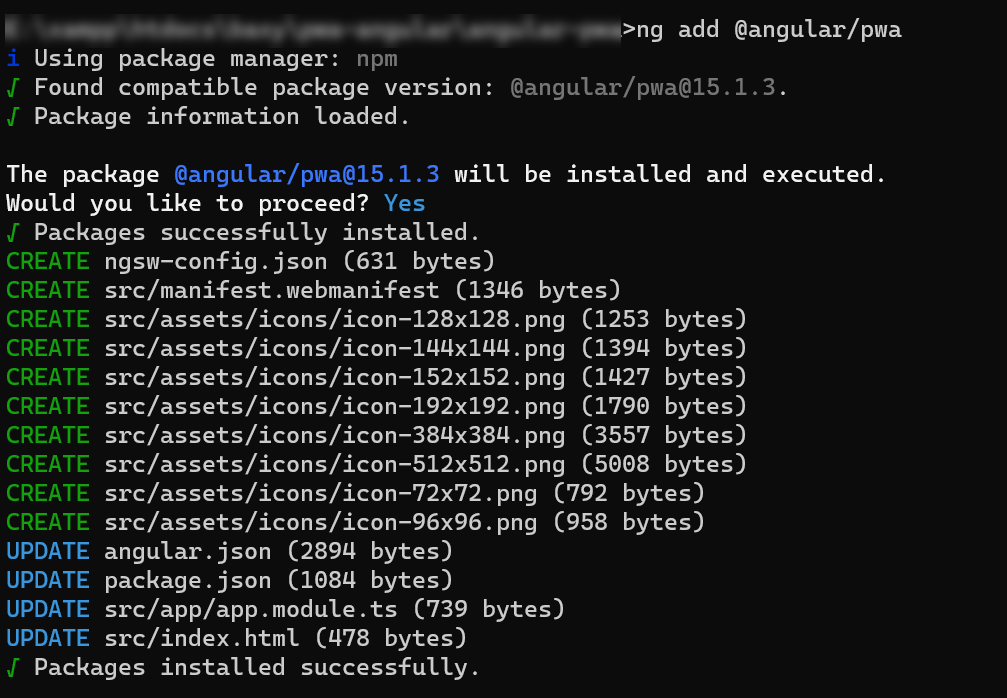
Step 3: Checking the files added/modified by @angular/pwa
It adds various png files for distinct splash images with different resolutions like icon-128x128.png, icon-144x144.png, icon-152x152.png, icon-192x192.png, icon-384x384.png, icon-512x512.png. Following are the created Icon files:
It create png icon file in the src/assets/icons/ folder, and users can replace all these icons with their application icon
src/assets/icons/icon-128x128.png
src/assets/icons/icon-144x144.png
src/assets/icons/icon-152x152.png
src/assets/icons/icon-192x192.png
src/assets/icons/icon-384x384.png
src/assets/icons/icon-512x512.png
src/assets/icons/icon-72x72.png
src/assets/icons/icon-96x96.png
During this configuration process, it will also add the ngsw-config.json file and manifest.webmanifest.
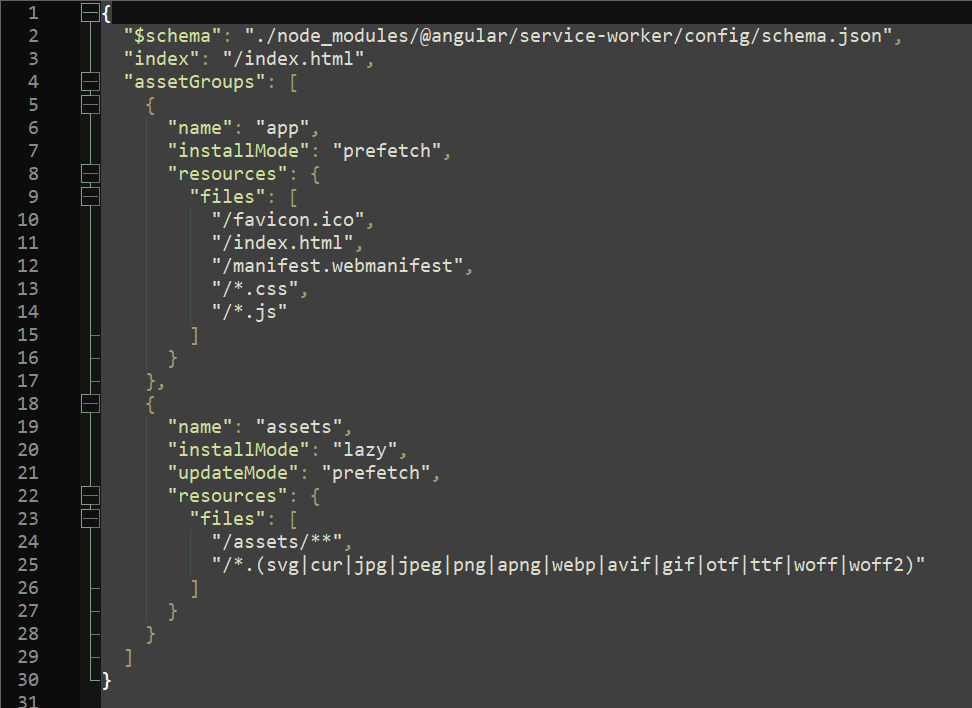
Created ngsw-config file in root directory
It is a file in JSON format for configuration. Especially this file is responsible for the creation of ngsw-worker.js (serviceworker.js). There is no need to write the code implicitly.
By simply setting a specific configuration and it is complete. Eventually, this ngsw-worker.js allows caching resources/assets with a particular caching technique. As discussed above, PWA implicitly uses service worker API under the hood.
Created ngsw-config.json
Following are the properties of configuration in the ngsw-config.json:
- Index: It defines the entry point HTML path.
- AssetGroups: Using this properrty, users can operate the specific assets or resources that need to be cached and define the caching strategy, whether it should be network first, cache, or an assortment of these two.
Created manifest.webmanifest under src folder
It create manifest.webmanifest file under src folder. When users open the PWA app, it will demonstrate how it will look.
Here, users can select options like background color, splash screen icon, display, and more. Users can specify this file as the configuration file of the PWA application.
Within this file, users can modify the name of the PWA application and the icon name when they install the PWA application on their mobile devices.

See the above image and know the location of the app name and the icon of PWA app.
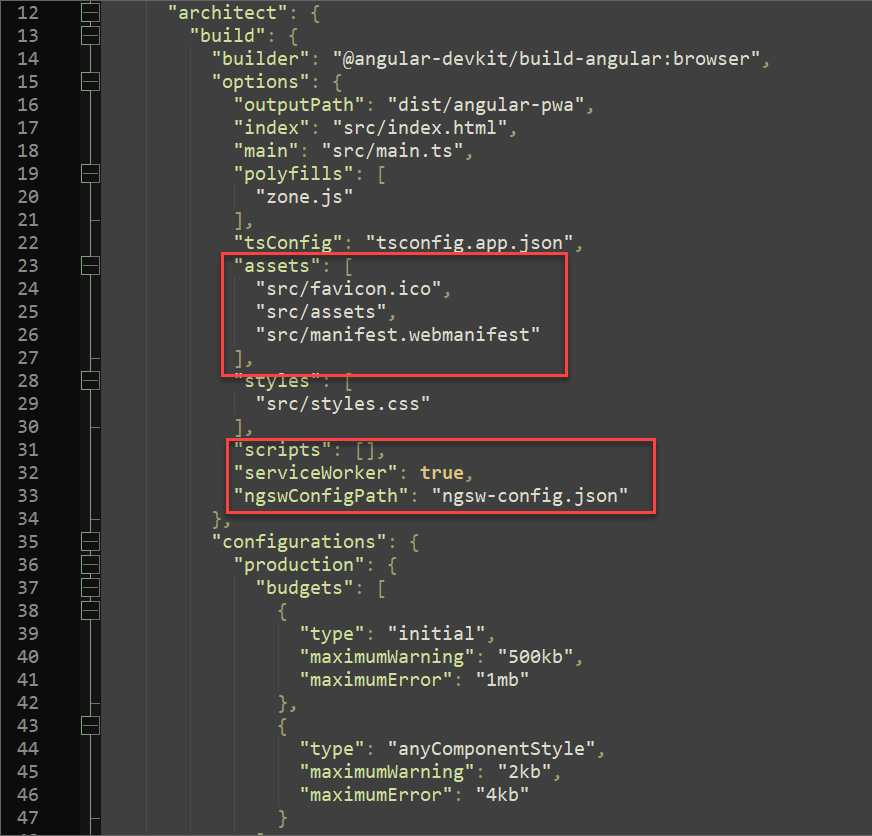
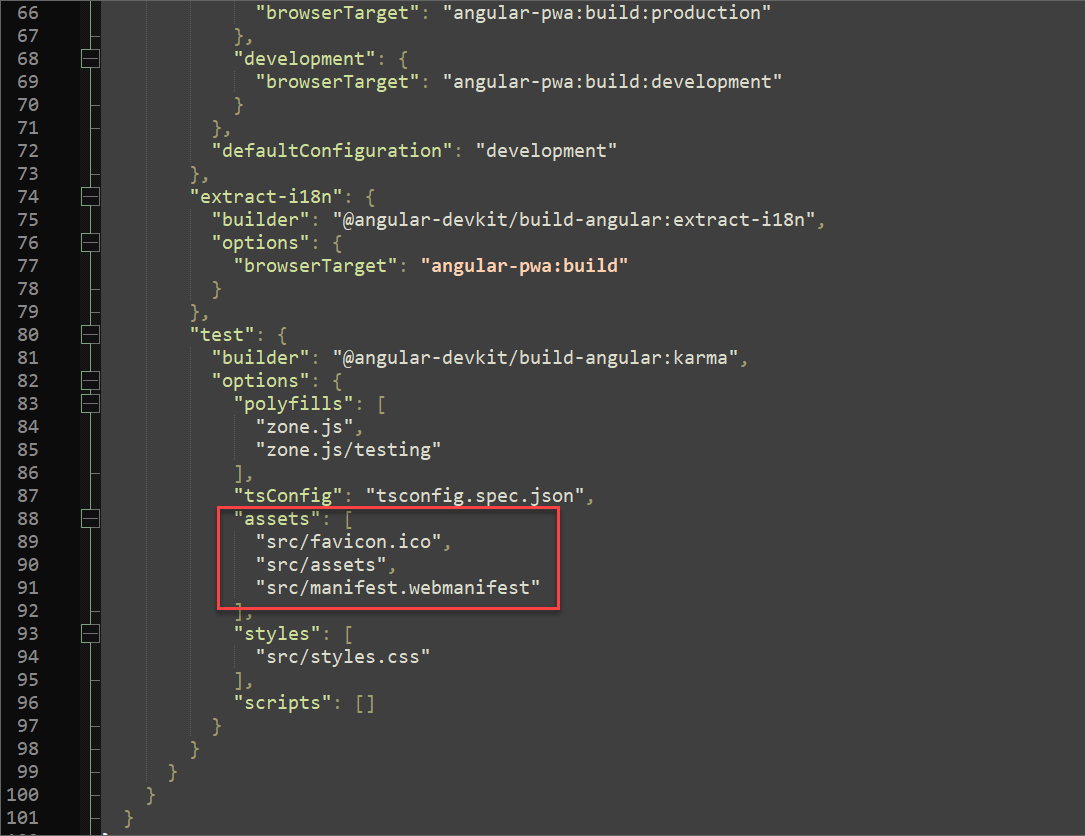
Updated angular.json file
It update angular.json file and the entry for the src/manifest.webmanifest file within the assets. It will serve the file with the site that connects ngswConfigPath and serviceWorker, allowing the production configuration in build schematics.
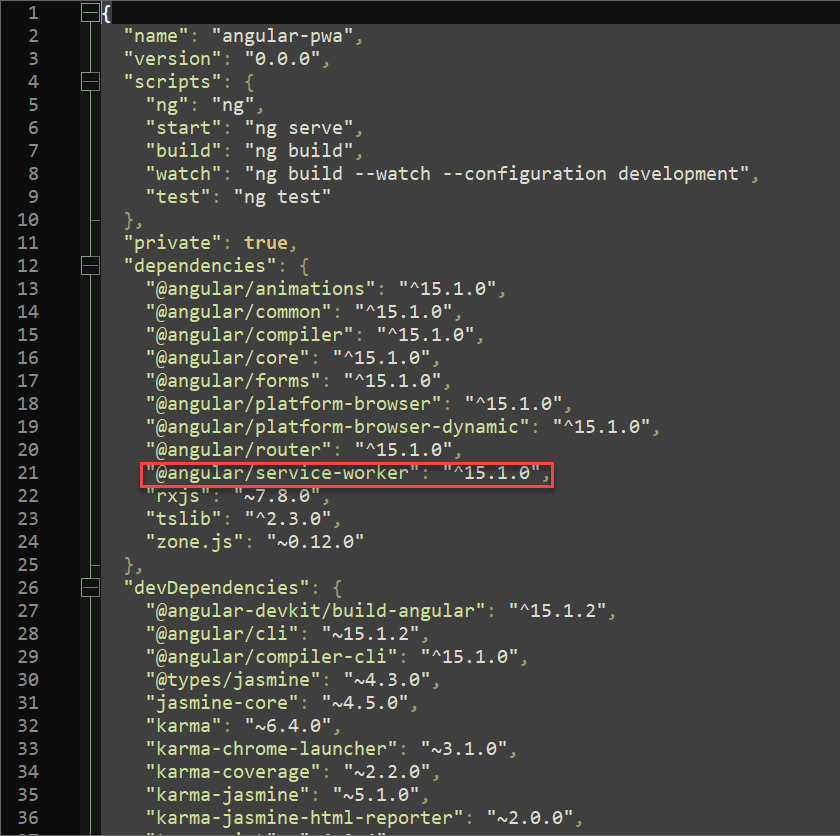
Updated package.json
The given server/package.json defines server dependencies and the start command. Users can use this on nearly every hosting service that supports Node.js.
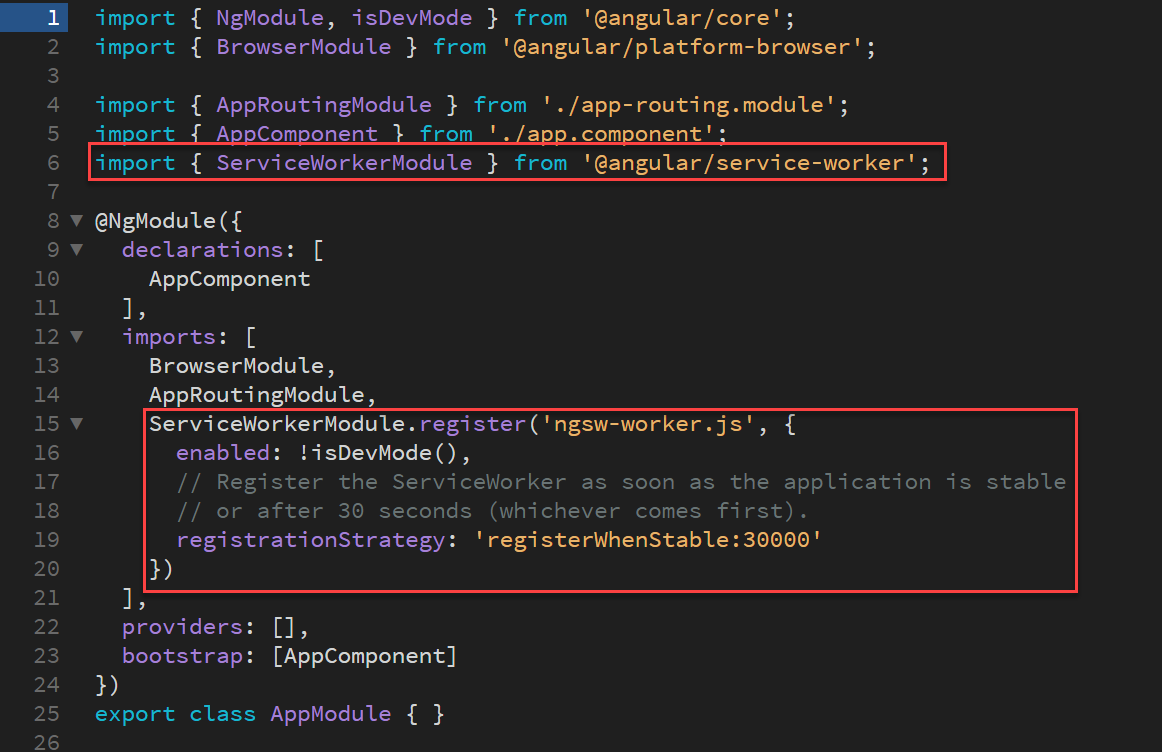
Update app.module.ts
It use app.module.ts to import the ServiceWorkerModule to enlist ngsw-config.js possible only in production mode.
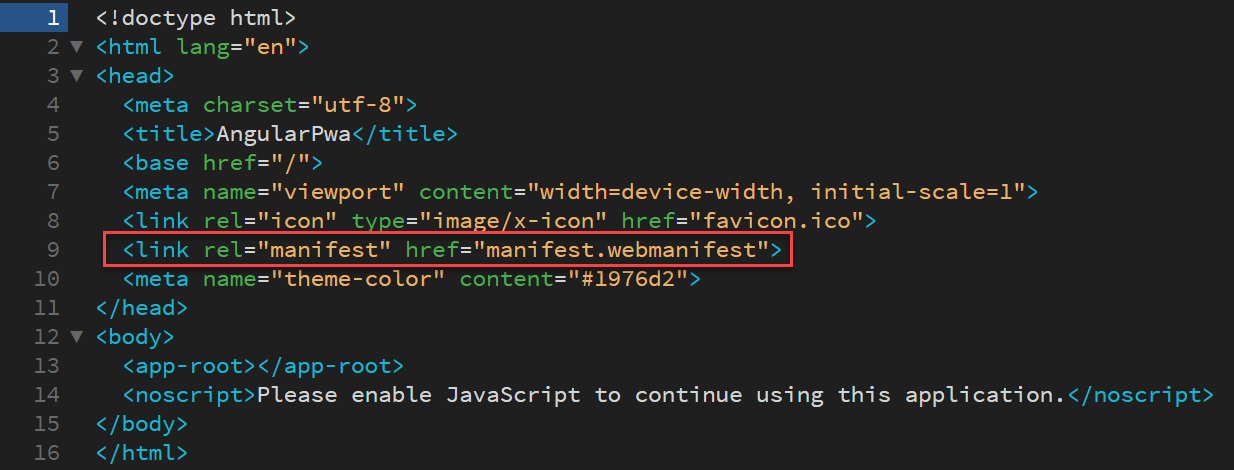
Updated index.html file
It update the index.html under the src field. It will update the entry of the manifest file.
Step 4: Do changes if required in added file
Users can modify the app icons and the names of the app in src/manifest.webmanifest, and they can also replace these icons of the app within the src/assets/icons folder.
Step 5: Run the application
Users can run the PWA application only on https or localhost environments. They cannot use the service worker for the Angular CLI because it does not operate with the ng serve command.
Since the ng server does not serve this, they must create a separate HTTP server for testing their project.
For testing the PWA project and triggering its action, the following steps will help you go through this:
- Run this command ng build --prod, and it will create files within the dist/angular-pwa folder.
- Then using the command cd dist/angular-pwa, users have to navigate to this folder.
- Run this command http-server (npm i -g http-server)
- Copying all the files and uploading them to the live server can be efficient
- Finally, this will open the app.
Step 6: Check PWA is working or not
- Check Manifest settings
- Users first check the Manifest settings
- They need to run their website in the Chrome browser.
- Then users open the Incept element by clicking Ctrl +Shift + I.
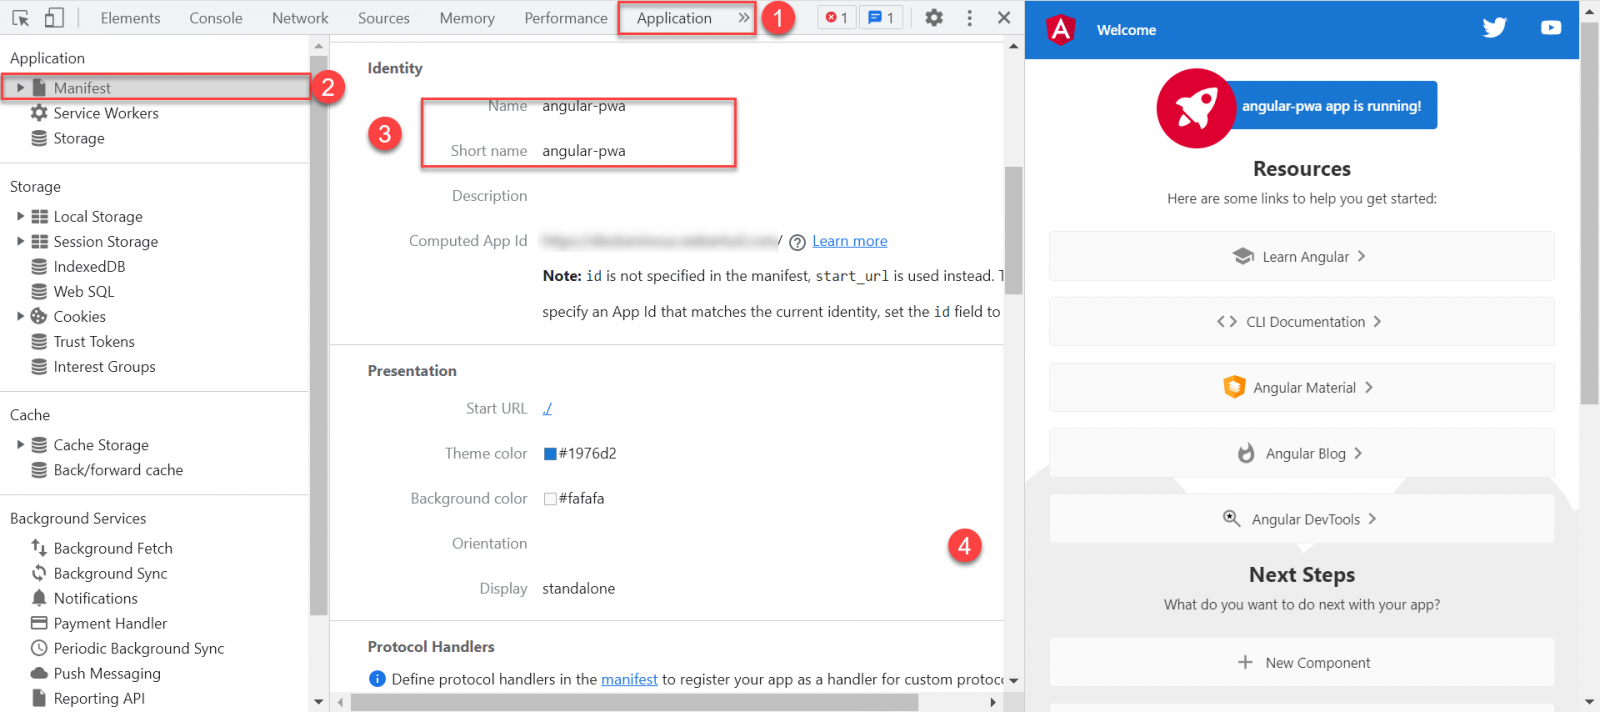
- Follow the steps: Application >> Manifest
- And users can see the application name as shown in the screenshot
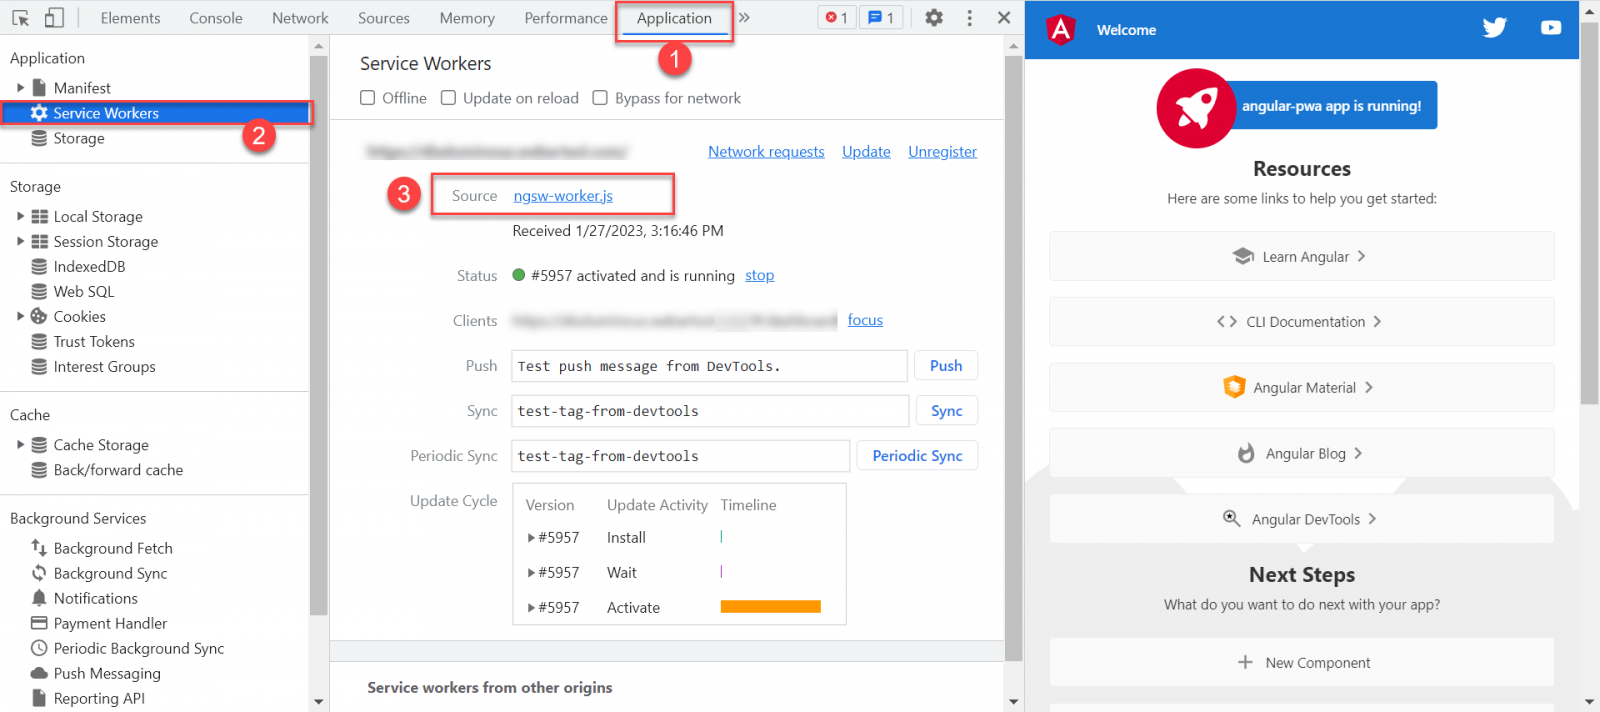
Then users have to check Service Workder settings.
Follow the steps to proceed further: Application >> Service Workders
Then check your PWA app in LightHouse.
Under incept, click on Lighthouse.
Click on the Progressive Web App option and then select Analyze page load.
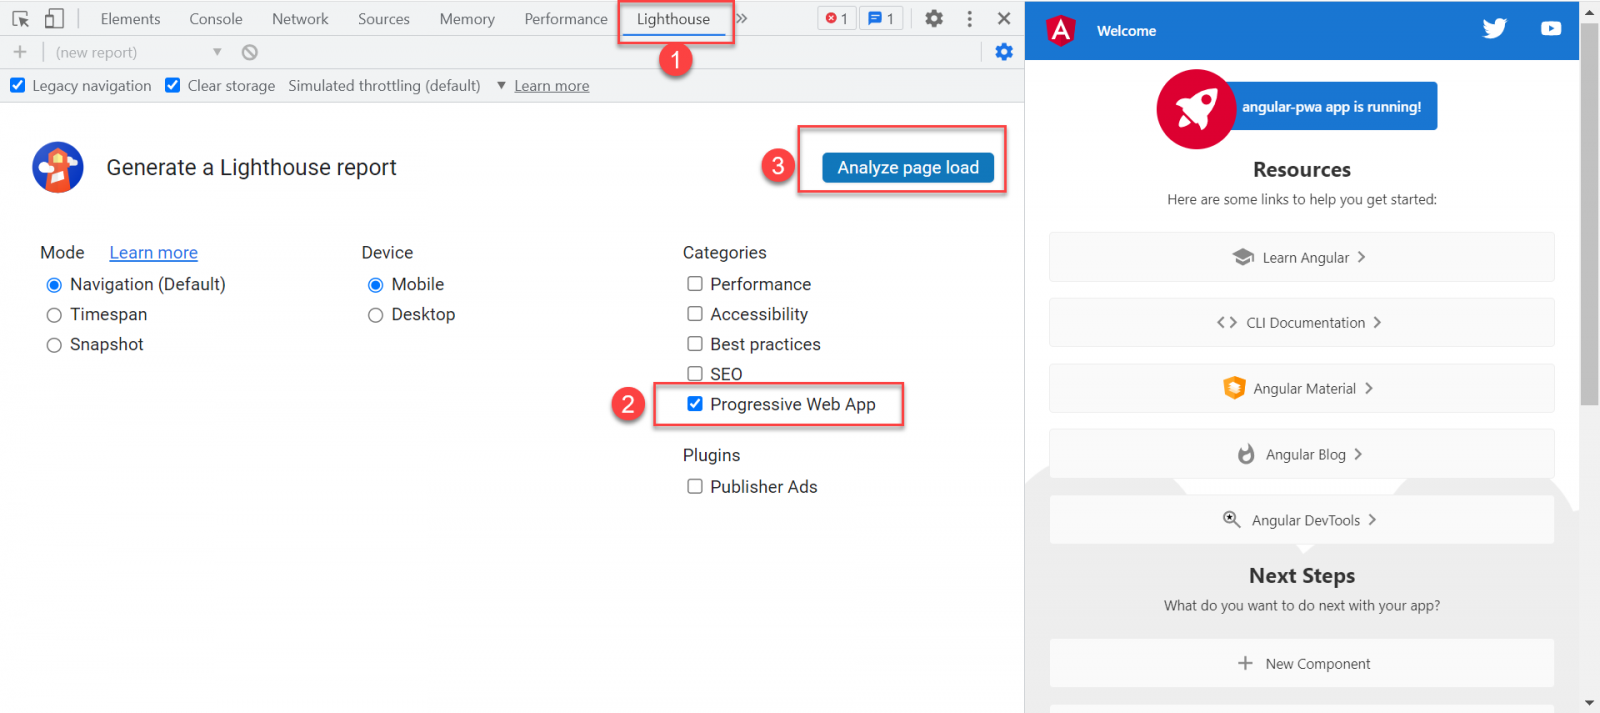
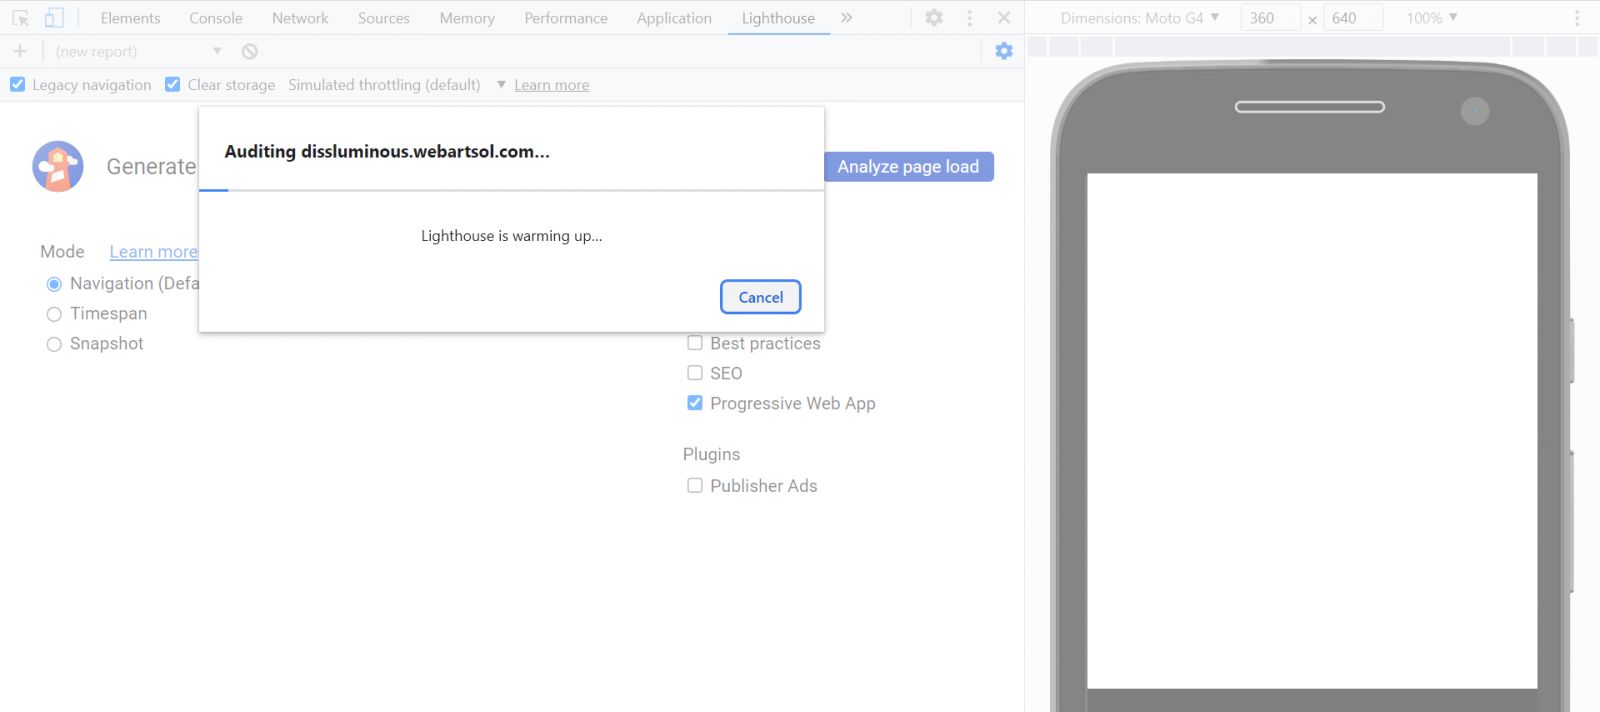
This Green sign of PWA indicates that PWA is working correctly on the server.

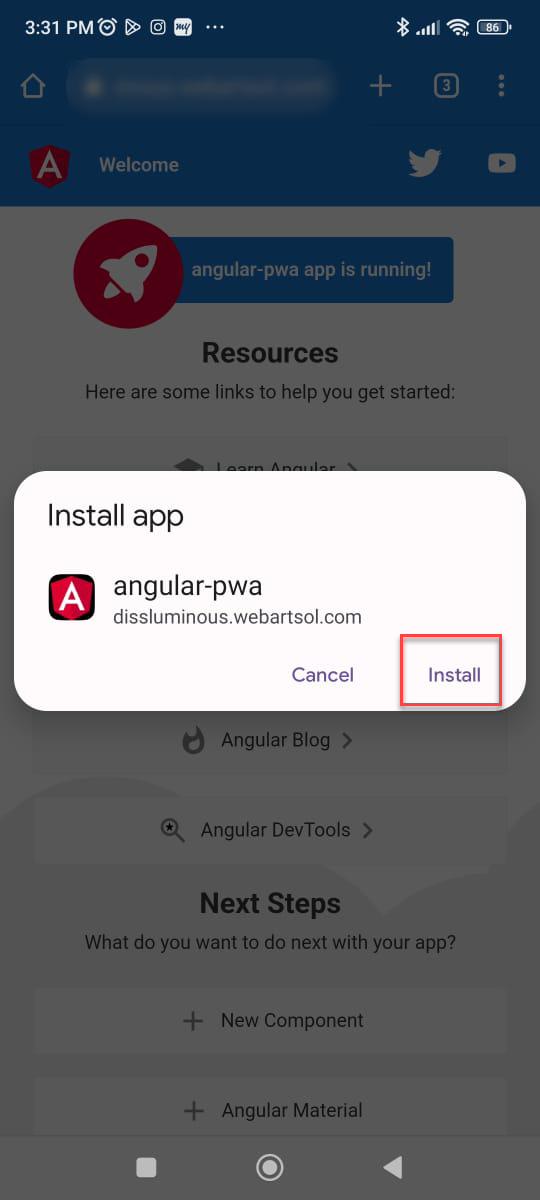
Step 7: Users then check their app on their Android phones.
- Go to the website URL of the Android phone Chrome browser.
- When users open the URL in the Chrome browser, a pop-up message will appear and ask to “Add angular-pwa to Home Screen” if they click on the button, it will install the PWA app on their android device.

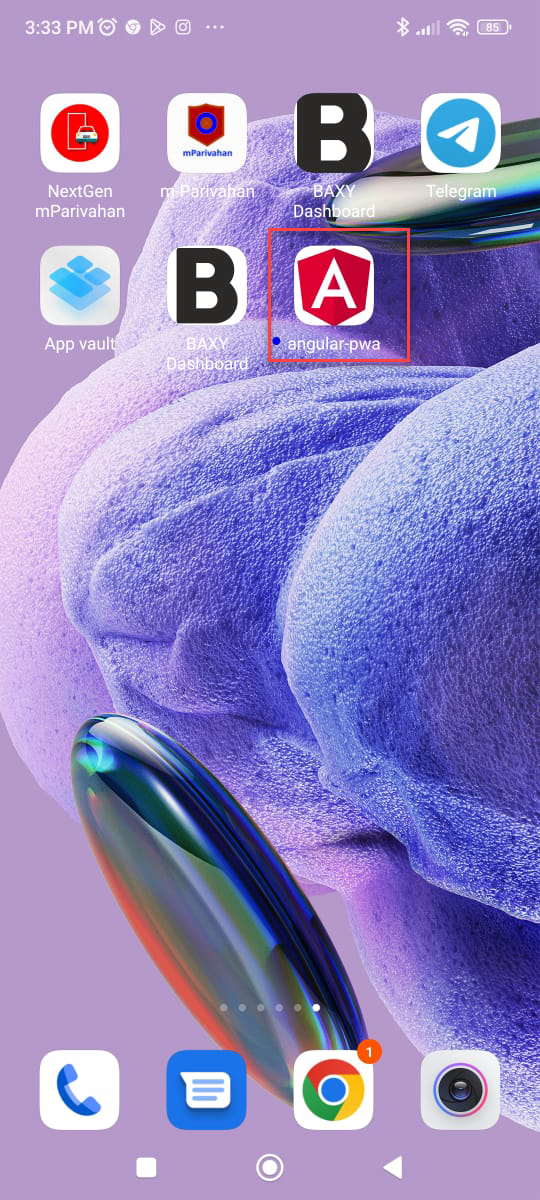
Users can now see implementing the steps has installed the PWA application on their android devices. Now they can open the app by tapping on it.
As users can see in the screenshot, it will open the web application without an address bar.
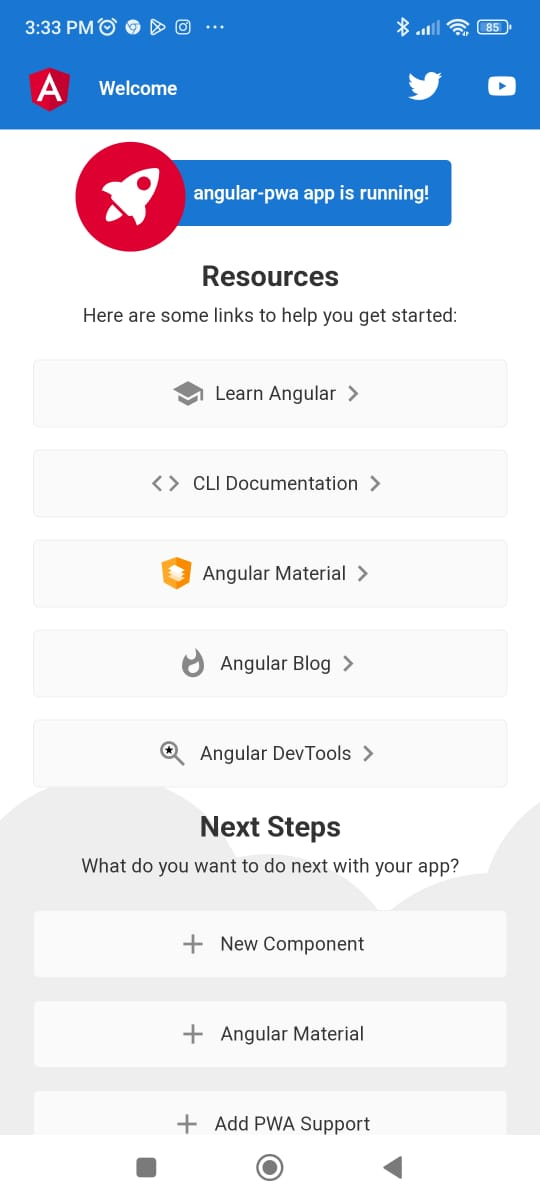
Now, you can see the PWA application works on an Android phone.
Conclusion:
We hope this article has catered to the out-and-out steps for the installation with a configuration of the PWA application in Angular JS. In the final procedure, with all the required screenshots, we have shown how to check whether the app works on Android applications.