If you find your version of the Windows operating system not functioning properly, it may be due to corrupted files. The best way to fix this is by using the SFC to scan the OS and restore the files.
But what if SFC stops working suddenly while you were repairing the damaged files?
In this article, we will discuss all the possible solutions to get you out of such a situation. But first, let us understand what SFC is.
What is SFC?
SFC stands for System File Checker is an in-built tool present in all modern versions of Windows operating systems. This tool helps to check if the system files are corrupted and also repair registry data. SFC is integrated with Windows Resources Protection, and safeguards your important system files along with registry keys.
You can easily run the SFC using the command prompt. It is recommended to not close the command prompt until the scan is over.
But if SFC does not work and fails to run, it may show an error message like this –
Windows Resource Protection could not perform the requested operation
Other messages may notify you that “utility did not find integrity violations” or that SFC found corrupted files but could no repair them. You have to fix them yourself.
Let us now look at the solutions to this problem. In this article we will explains the following methods to resolve this error:
- Run SFC Scan in Safe Mode
- Run CHKDSK (Check Disk)
- Alter the Security Descriptions
- Enable Windows Module Service
- Scan Windows Installation for Error
- Run DISM Scan
- Repair Installation of Windows OS
- Reinstall the System
Solution 1: Run SFC Scan in Safe Mode
If the error message “Windows Resource Protection could not perform the requested operation” pops up while running SFC, you can try running it in Safe Mode. Here’s how you must go about it –
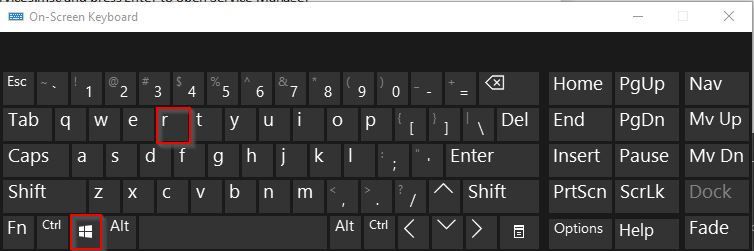
- Press Window + R to open the Run dialog box
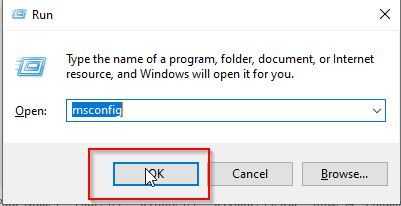
- Next type msconfig in the run box and press Enter
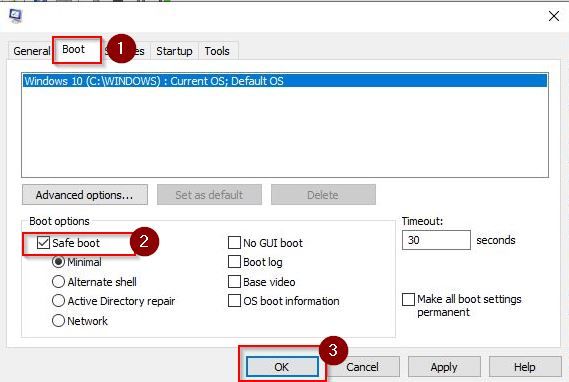
- Now under the Boot tab select Safe boot and click OK
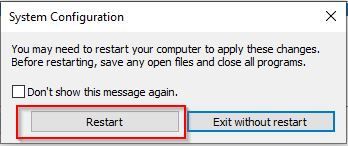
- Next, click on Restart to restart your system to make the changes applicable
Your system will now start in Safe Mode, therefore please check whether the Windows Resource Protection error is resolved.
There is yet another way to run SFC command in safe mode. The steps involved are –
- In Windows 10, click Restart. Then on the sign-in screen, click on Power> Restart while holding the Shift key. After the system restarts again, choose 'Troubleshoot' > 'Advanced options' > 'Startup Settings' > 'Restart'
- Your system will restart yet again, and you will get options to boot it in Safe Mode
- Then open cmd with the option of Run as administrator
- Type sfc/ scannow and hit the Enter button to run SFC
Windows 7 users have to start their system and keep on hitting the F8 button before the Windows logo appears. Then choose Safe Mode under the Advanced Boot Options. The rest of the steps provided above can be followed to run SFC in Safe Mode.
Solution 2: Run CHKDSK (Check Disk)
At times, the data present in your hard drive might get corrupted, causing the SFC scan to crash and stop abruptly. You can run the chkdsk scan to solve this problem. This will fix system errors and ensure the data integrity of your hard disk.
To do this, follow the steps given below –
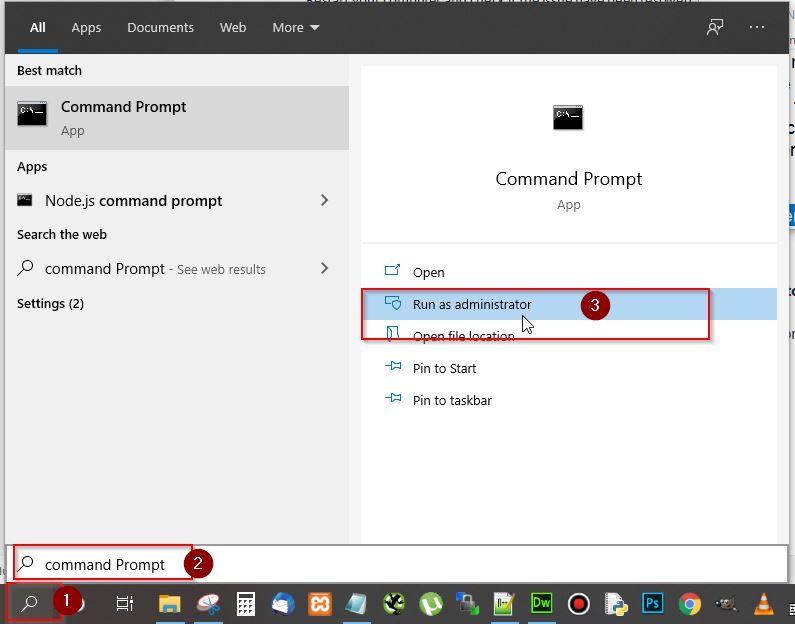
- Open the Windows Search Bar, type Command Prompt and click on Run As Administrator

- Type chkdsk /r command in the command prompt and press Enter
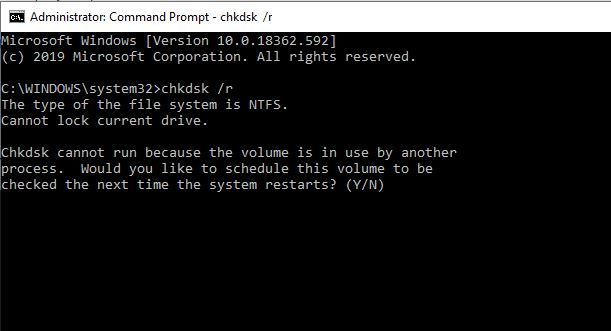
- You may receive a message that says ‘Chkdsk cannot run because the volume is in use by another process. Would you like to schedule this volume to be checked the next time the system restarts?’
- Just type Y and press Enter
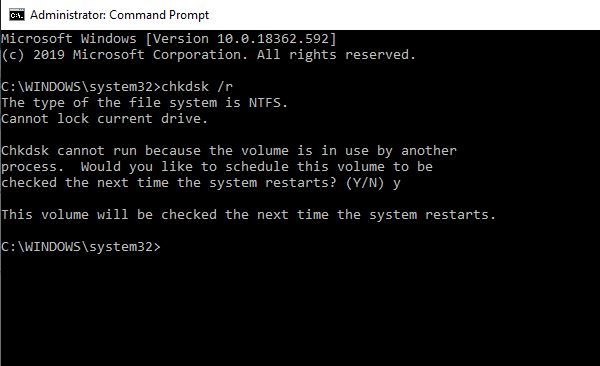
Now exit the command prompt and restart your computer. Wait until the chkdsk automatically detects and resolves any error in the hard disk. The process may take an hour depending upon the hard disk size.
After the process is over, you can run SFC again to check whether the error is resolved.
Solution 3: Alter the Security Descriptions
A security descriptor is a data structure that stores data about securable Windows objects. If the SFC command fails, it may be due to its lack of accessibility of the WinSxS folder. In that case, you have to change the security description of the folder manually.
Follow the steps given below –
- Open Window Search Bar, type Command Prompt and select Run As Administrator

- Next type ICACLS C:\Windows\winsxscommand in the command prompt and press Enter
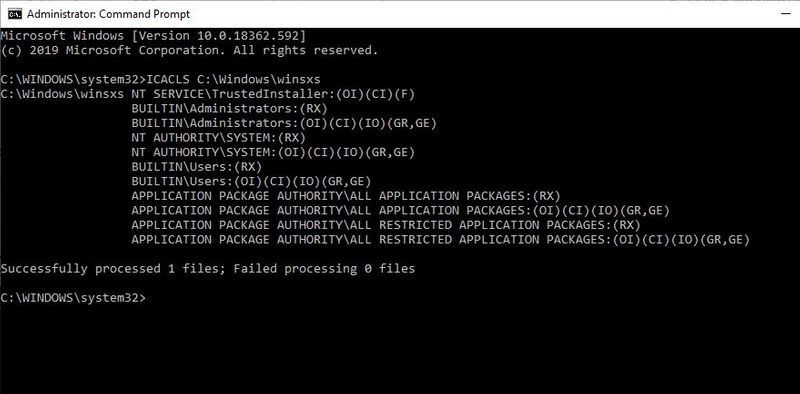
- Now exit the command prompt and restart your computer. Check if the issue has been resolved
Solution 4: Enable Windows Module Service
Windows Services are an important part of the Windows OS that helps in developing and managing crucial processes. They run in the background and start when the system is booted. They manage functions such as data backup, speaker sound, user credentials and also handle network connections.
While running the SFC, you may encounter the “Windows resource protection cannot perform the requested operation” error. This can happen when the Windows Module Installer service is disabled. You have to enable it manually in such a situation.
Please follow the steps below to do it –
- Open Window Search Bar, type Services and click on Open
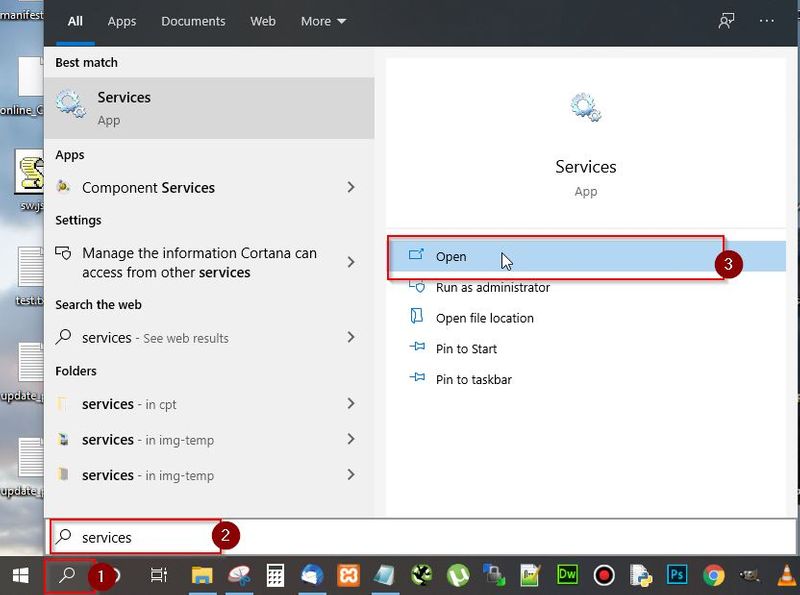
- Next in the Services window, scroll down and search for Window Modules Installer service
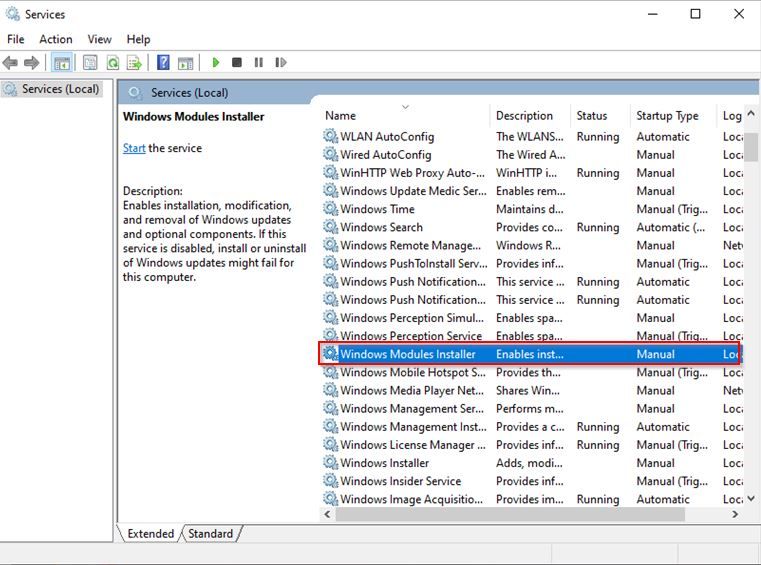
- Now right click on Window Modules Installer and select Start
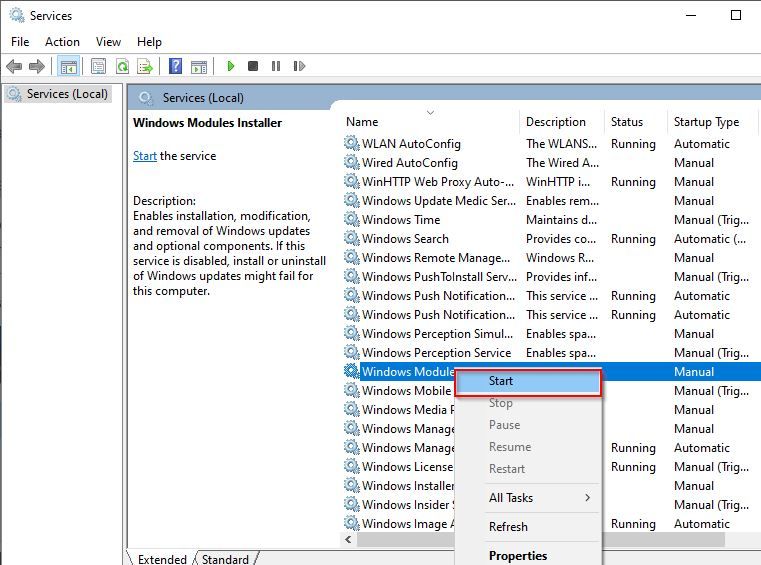
- Next, reboot your system and check if the issue has been resolved
Another way to perform this is by using the command prompt –
- Open cmd and run it as administrator
- Type in the username and password if required
- Type sc config trustedinstaller start= autoand hit Enter
- Type net start trustedinstallerand hit Enter
After that try running the SFC scan.
Solution 5: Scan Windows Installation for Error
The SFC may be crashing due to problems in the currently booted version of Windows. So we will boot up the system into the recovery options. Then we will open cmd from there.
Please follow the steps below –
- Reboot your computer and go to recovery option
- Next open Command Prompt in recovery option
- Now type the following command and press enter
sfc /SCANNOW /OFFBOOTDIR=c:\ /OFFWINDIR=c:\window
Now run the SFC scannow again to check whether it works.
Solution 6: Run DISM Scan
DISM stands for Deployment Image Servicing and Management that helps in creating, changing and repairing system images. You can use it to fix your system’s hidden recovery image. When SFC fails, DISM scan is the next best option to restore broken files. DISM has 3 options to fix a damaged system image:
- CheckHealth
- ScanHealth
- RestoreHealth
Please follow the steps below to run DSIM scan –
- Go to the Window Search Bar, type Command Prompt and click Run as Administrator
- In Command prompt, type "DISM /Online /Cleanup-Image /RestoreHealth" and press Enter

Exit command prompt and check if the “Windows Resource Protection could not perform the requested operation” has been solved.
Solution 7: Repair Installation of Windows OS
Another great way to fix the SFC issue is to perform a repair installation of Windows OS. This helps in fixing corrupted system files and components, without losing your programs and settings. This method repairs if something is wrong with your OS.
The process is very simple. Let us look at the steps involved –
- You will require a bootable version of Windows OS for this repair. You can get it by using the free Microsoft Media Creation Tool
- Download the ISO file from Google

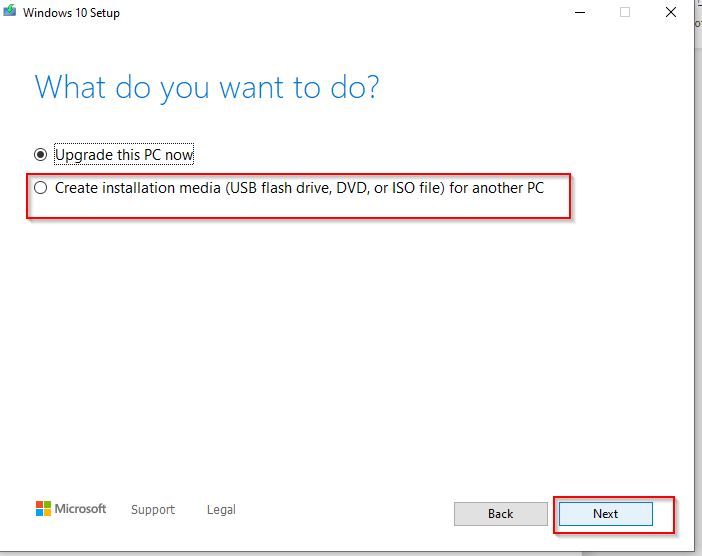
- Launch the Media Creation Tool. You can mount it as a virtual drive or select the “Create installation media” to create an installation disc or a bootable pen drive
- After launching the setup, select Upgrade and click on Next
- Then click on Repair to continue
- Select Troubleshoot in the popup window. Then click on Advanced option
- Choose the Startup Repair option to initiate the process. This will take some time so be patient
- After completion of the process, run SFC to see whether it is working smoothly
Solution 8: Reinstall the System
If you followed the methods till now but all your efforts have gone in vain, you still have one card left to play. Yes, you guessed it right! It is the option of reinstalling the OS on your system.
But first backup all your data and files somewhere safe, such as an external hard drive. Then do the following –
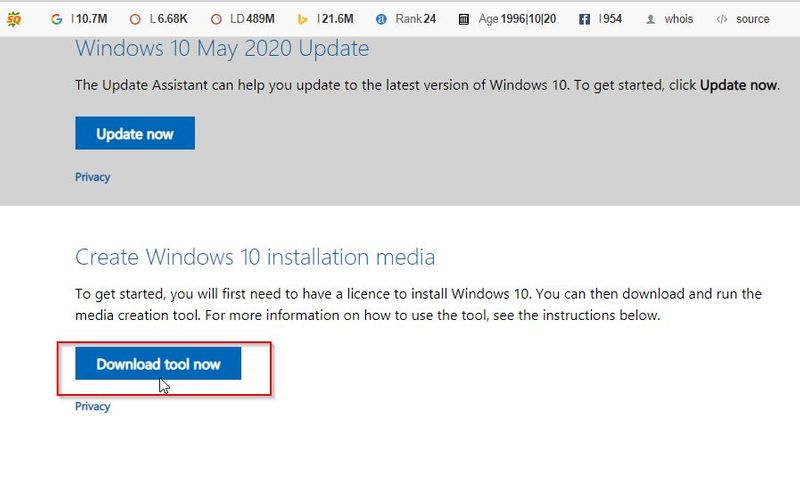
- Go to Google search bar and type Microsoft Media Creation Tool. Click on the relevant result

- Next, click on the Download tool now option.
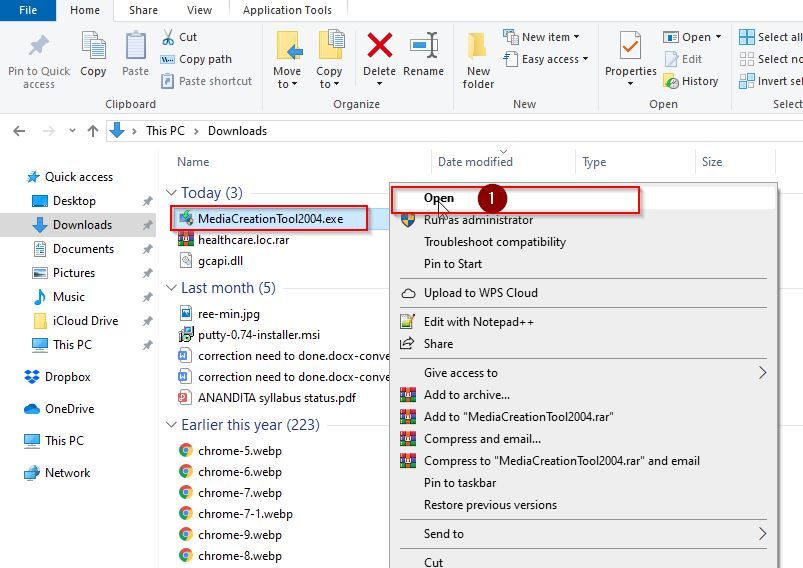
- Now, right-click on the downloaded file and select Open
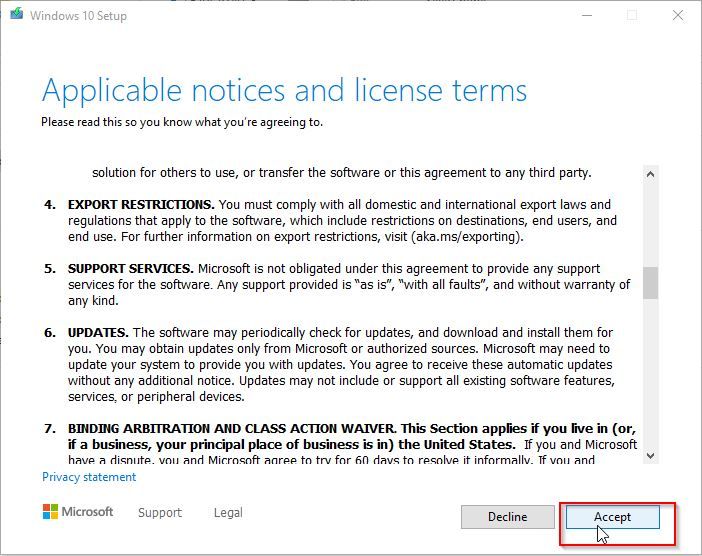
- Next click on Accept to accept the license term
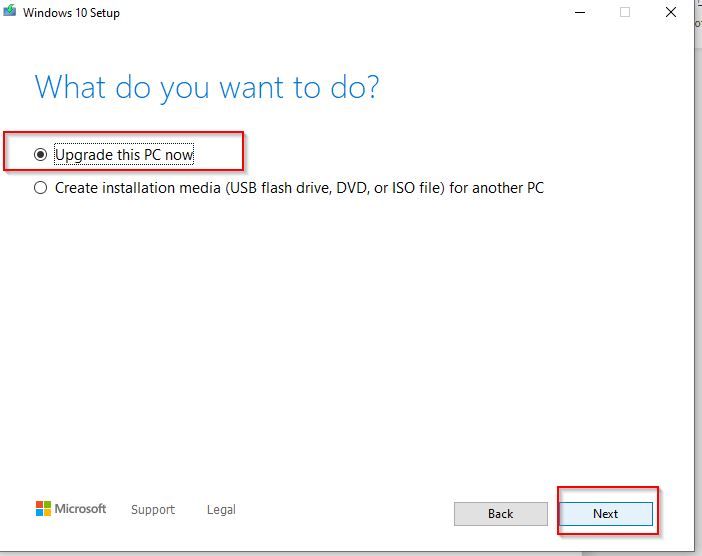
- Now select ‘Upgrade this PC now’ and then click next
- Now just follow the instructions prompted on the screen in order to complete the process
Conclusion
If you keep on trying all of the methods described above, the ‘Windows Resource Protection could not perform the requested operation’ error is bound to get out of way. But whatever you do, keeping a data backup and storing your important data securely is recommended. If you are still struggling with this issue, let us know in the comments section below.