In this tutorial we are assuming that you have already launched a new instance using the Amazon Linux AMI with the help of public DNS name which is within the internet range.
In order to allow SSH (port 22), HTTP (port 80), and HTTPS (port 443) connections you must configured your security group.
1. Update
Perform a quick software update on your instance to keep all the software packages up to date.
sudo yum -y update
sudo yum install -y gcc make
2. Install Nginx & PHP 7.2
sudo yum install nginx php72-fpm -y
3. Install PHP 7.2 extensions
sudo yum install php72-mcrypt php72-xml php72-mcrypt php72-zip php72-xmlrpc php72-gd php72-curl php72-pdo php72-mysqlnd php72-mbstring php72-gmp -y
Install PHP-APC
sudo yum install -y php-pecl-apc
sudo yum install -y pcre-devel
4. Install Mysql 5.7
sudo yum -y install mysql57-server mysql
5. Start Nginx, PHP-FPM, Mysql Services
sudo service mysqld start
sudo service nginx start
sudo service php-fpm start
6. Add NGINX, PHP-FPM and Mysql service start to boot sequence
sudo chkconfig nginx on
sudo chkconfig php-fpm on
sudo chkconfig mysqld on
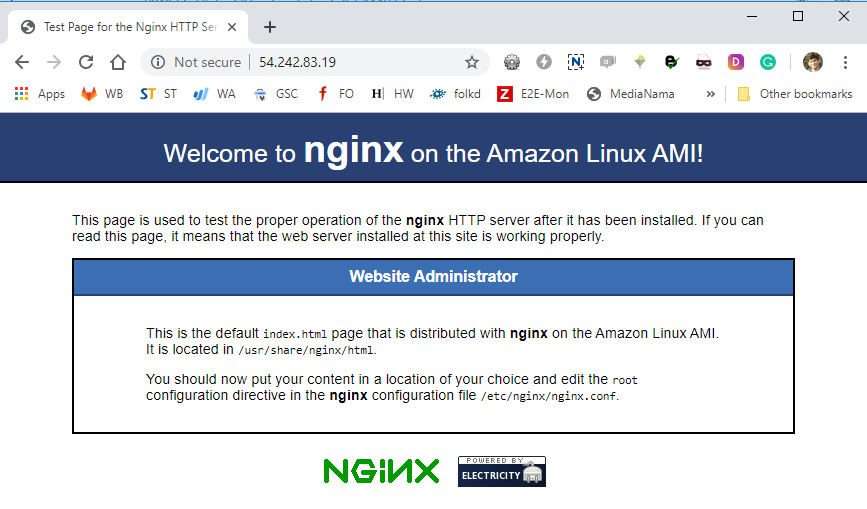
7. Test your web server
http://yourpublicip/
Your Default directory location: /usr/share/nginx/html
nginx configuration file location: /etc/nginx/nginx.conf.
8. To set file permissions
Add your user (in this case, ec2-user) to the nginx group using following command.
sudo usermod -a -G nginx ec2-user
9. Now log out then log in back to fetch the new group and then verify your membership.
exit
groups
Output:
ec2-user wheel nginx
10. Change the group ownership of /usr/share/nginx and its content to the nginx group.
sudo chown -R ec2-user:nginx /usr/share/nginx
11. To add group write permissions and to set the group ID on future subdirectories, change the directory permissions of /usr/share/nginx and its subdirectories.
sudo chmod 2775 /usr/share/nginx

find /usr/share/nginx -type d -exec sudo chmod 2775 {} \;
12. To add group write permissions, recursively change the file permissions of /usr/share/nginx and its subdirectories:
find /usr/share/nginx -type f -exec sudo chmod 0664 {} \;
13. To test your lamp server
Create a PHP file in the Nginx document root.
echo "<?php phpinfo(); ?>" > /usr/share/nginx/html/phpinfo.php
In the web browser, type the url of the newly created file.
http://serverpublicIP/phpinfo.php
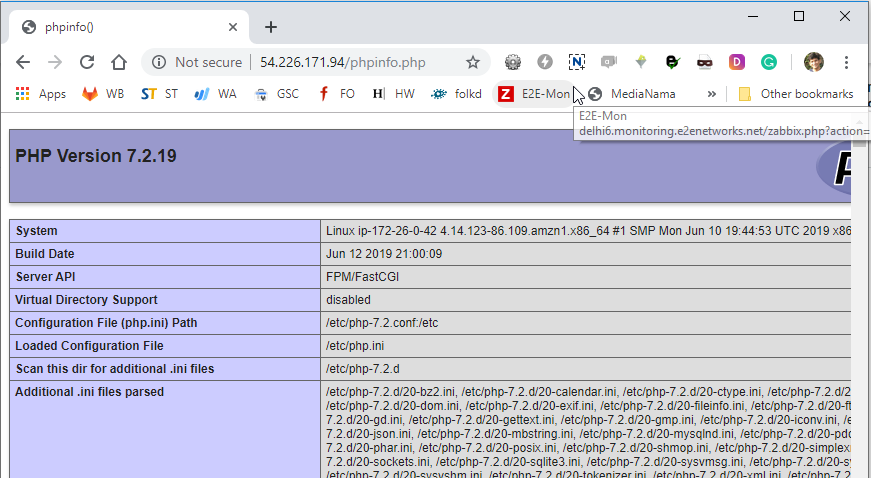
Now delete the phpinfo.php file. Though this is a very useful information for security reasons which can be exploits trough internet.
rm /usr/share/nginx/html/phpinfo.php
Secure the Database Server
The process to set a root password and remove the insecure features from your installation can be done by using mysql_secure_installation command.
sudo mysql_secure_installation
a. Prompt for root password by default root account does not have password. Press Enter
b. Type Y to set a passwordType Y to remove the anonymous user accounts.
c. Type Y to disable the remote root login.
d. Type Y to remove the test database.
e. Type Y to reload the privilege tables and save your changes.
Install phpMyAdmin
1. Install the required dependencies.
sudo yum install php72-mbstring.x86_64 php72-zip.x86_64 -y
2. Restart Nginx & PHP-fpm
sudo service nginx restart
sudo service php-fpm restart
3. Navigate to the Apache document root at /usr/share/nginx/html
cd /usr/share/nginx/html
4. Select a source package for the latest phpMyAdmin release
wget https://www.phpmyadmin.net/downloads/phpMyAdmin-latest-all-languages.tar.gz
5. Create a phpMyAdmin folder and extract the package into it using the following command.
mkdir phpMyAdmin && tar -xvzf phpMyAdmin-latest-all-languages.tar.gz -C phpMyAdmin --strip-components 1
6. Delete the phpMyAdmin-latest-all-languages.tar.gz
rm phpMyAdmin-latest-all-languages.tar.gz
7. If the MySQL server is not running, start it now.
sudo service mysqld start
8. Open phpMyAdmin
http://serverpublicIP/phpMyAdmin/
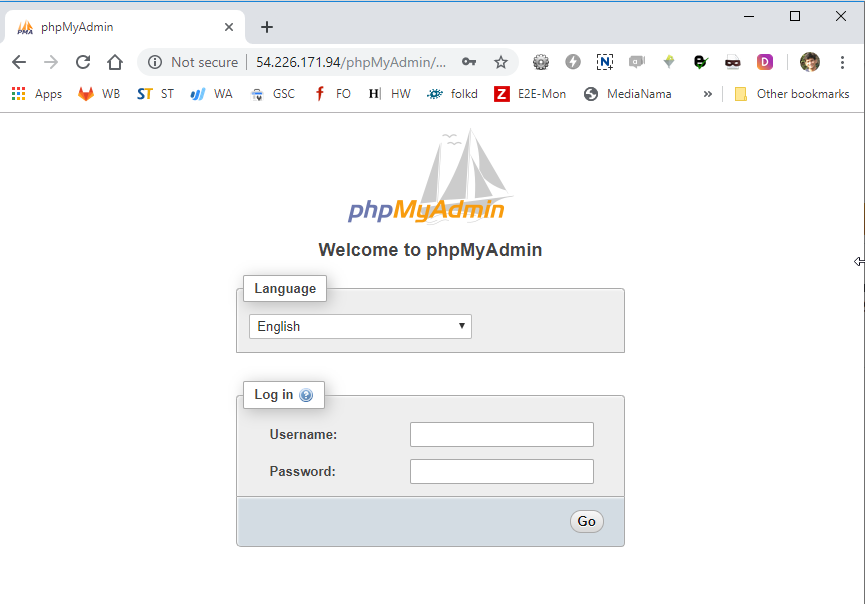
Log in to your phpMyAdmin installation with the root user name and the MySQL root password which you have created earlier.
PHP-FPM Configuration
sudo nano /etc/php-fpm-7.2.d/www.conf
Change the given below parameters
user = nginx
group = nginx

listen.owner = nginx
listen.group = nginx

;listen.acl_users = apache,nginx

emergency_restart_threshold = 10
emergency_restart_interval = 1m
process_control_timeout = 10s
Restart php-fpm
sudo service php-fpm restart
Nginx Configuration
Steps to optimize the performance of your NGINX server
sudo nano /etc/nginx/nginx.conf
1.Update Work Process
To update work process check the CPU running on the server and update the value of work_process
Sudo grep ^processor /proc/cpuinfo | wc -l

worker_processes = 1
2.Update worker_connections
Run command
ulimit -n
1024

events {
worker_connections 10240;
multi_accept on;
use epoll;
}
3.Update Buffer Parameter
client_body_buffer_size: This manages the client buffer size which mean you can sent any POST actions to Nginx.
client_header_buffer_size: this directive manages the client header size, usually 1k is a decent size for this directives.
client_max_body_size: this directive allow the maximum size for a client request. In case of maximum size exceeding Nginx will throw 413 error or Request Entity Too Large.
large_client_header_buffers: this directive manages the maximum number and size of buffers for large client headers.
client_body_buffer_size 10K;
client_header_buffer_size 1k;
client_max_body_size 8m;
large_client_header_buffers 2 1k;
4.Update Timeouts
The directives which are responsible for the time is client_body_timeout and client_header_timeout directives. When we sent a request to the server, server waits for a client body or client header to respond. Server will throw Request time out or 408 error if neither a body nor header is sent.
As we all know that Nginx close the connection with the client after some period of time so you must assign the keepalive_timeout to keep alive the timeouts connections with the client.
Finally establish the send_timeout between the two operations of reading, if after this time client will take nothing, then Nginx is shutting down the connection.
client_body_timeout 12;
client_header_timeout 12;
keepalive_timeout 15;
send_timeout 15;
Gzip Compression
As we all know that Nginx deals with large amount of network transfer, which can be reduce with the help of Gzip. But be careful while increasing the gzip_comp_level, if its high then the server will begin to waste the cpu cycles.
gzip on;
gzip_static on;
gzip_disable "msie6";
gzip_vary on;
gzip_min_length 1024;
gzip_comp_level 8;
gzip_buffers 16 8k;
gzip_proxied any;
gzip_types application/atom+xml application/javascript application/json application/ld+json application/manifest+json application/rss+xml application/vnd.geo+json application/vnd.ms-fontobject application/x-font-ttf application/x-web-app-manifest+json application/xhtml+xml application/xml font/opentype image/bmp image/svg+xml image/x-icon text/cache-manifest text/css text/plain text/vcard text/vnd.rim.location.xloc text/vtt text/x-component text/x-cross-domain-policy;
gzip_disable "MSIE [1-6]\.";

## open fd caching
open_file_cache max=1000 inactive=20s;
open_file_cache_valid 30s;
open_file_cache_min_uses 2;
open_file_cache_errors off;
## open fd caching
Logging
Every request that hits the VPS to a log file is known as Nginx logs. You need to turn off this functionality if you are using analytics to monitor Nginx logs by simply edit the access_log directive:
access_log off;
Static File Caching
We can definitely to set expire headers for file because that don’t change and served on regular basis.
You can add these directives to the actual Nginx server block.
location ~* \.html$ {
expires 7d;
}

location ~* \.(ogg|ogv|svg|svgz|eot|otf||woff|mp4|mp3|ttf|css|rss|atom|js|jpg|jpeg|gif|png|ico|zip|tgz|gz|rar|bz2|exe|ppt|tar|mid|midi|wav|bmp|rtf)(\?ver=[0-9.]+)?$ {
access_log off;
log_not_found off;
expires max;
}
Our Final Nginx configuration file will look like this (/etc/nginx/nginx.conf)
# For more information on configuration, see:
# * Official English Documentation: http://nginx.org/en/docs/
# * Official Russian Documentation: http://nginx.org/ru/docs/

user nginx;
worker_processes auto;
error_log /var/log/nginx/error.log;
pid /var/run/nginx.pid;

# Load dynamic modules. See /usr/share/doc/nginx/README.dynamic.
include /usr/share/nginx/modules/*.conf;

events {
worker_connections 1024;
multi_accept on;
use epoll;
}

http {
log_format main '$remote_addr - $remote_user [$time_local] "$request" '
'$status $body_bytes_sent "$http_referer" '
'"$http_user_agent" "$http_x_forwarded_for"';

# access_log /var/log/nginx/access.log main;
access_log off;

sendfile on;
tcp_nopush on;
tcp_nodelay on;
keepalive_timeout 65;
types_hash_max_size 2048;

client_body_buffer_size 10K;
client_header_buffer_size 1k;
client_max_body_size 8m;
large_client_header_buffers 2 1k;
client_body_timeout 12;
client_header_timeout 12;
send_timeout 15;

include /etc/nginx/mime.types;

gzip on;
gzip_static on;
gzip_disable "msie6";
gzip_vary on;
gzip_min_length 1024;
gzip_comp_level 8;
gzip_buffers 16 8k;
gzip_proxied any;
gzip_types application/atom+xml application/javascript application/json application/ld+json application/manifest+json application/rss+xml application/vnd.geo+json application/vnd.ms-fontobject application/x-font-ttf application/x-web-app-manifest+json application/xhtml+xml application/xml font/opentype image/bmp image/svg+xml image/x-icon text/cache-manifest text/css text/plain text/vcard text/vnd.rim.location.xloc text/vtt text/x-component text/x-cross-domain-policy;
gzip_disable "MSIE [1-6]\.";

## open fd caching
open_file_cache max=1000 inactive=20s;
open_file_cache_valid 30s;
open_file_cache_min_uses 2;
open_file_cache_errors off;
## open fd caching

default_type application/octet-stream;

# Load modular configuration files from the /etc/nginx/conf.d directory.
# See http://nginx.org/en/docs/ngx_core_module.html#include
# for more information.
include /etc/nginx/conf.d/*.conf;

index index.html index.htm;

server {
listen 80 default_server;
listen [::]:80 default_server;
server_name localhost;
root /usr/share/nginx/html;

# Load configuration files for the default server block.
include /etc/nginx/default.d/*.conf;

location / {
}

# redirect server error pages to the static page /40x.html
#
error_page 404 /404.html;
location = /40x.html {
}

# redirect server error pages to the static page /50x.html
#
error_page 500 502 503 504 /50x.html;
location = /50x.html {
}
}

}
Restart nginx
sudo service nginx restart
Configure Virtual Server
To create a virtual server create a configure file in “/etc/nginx/conf.d” folder
cd /etc/nginx/conf.d
sudo vi yourdomain.com.conf
Copy and paste the given below code
Please change yourdomain.com to your live domain name
server {
listen 80;
listen [::]:80;
server_name yourdomain.com www.yourdomain.com;
root /usr/share/nginx/mydomain/html;

index index.php index.html index.htm;

location ~ \.(php|phar)(/.*)?$ {
fastcgi_split_path_info ^(.+\.(?:php|phar))(/.*)$;

fastcgi_intercept_errors on;
fastcgi_index index.php;
include fastcgi_params;
fastcgi_param SCRIPT_FILENAME /usr/share/nginx/mydomain/html$fastcgi_script_name;
fastcgi_param PATH_INFO $fastcgi_path_info;
fastcgi_pass php-fpm;
}


location / {
try_files $uri $uri/ /index.php;
}

error_page 404 /404.html;
location = /40x.html {
}

error_page 500 502 503 504 /50x.html;
location = /50x.html {
}
}
Restart Nginx Server
sudo service nginx restart
Generate Wildcard SSL certificate using Let’s Encrypt/Certbot
Wild card SSL Certificate is for all the possible sub-domain.
*.yourdomain.com
Xyz.yourdomain.com
Abc.yourdomain.com
1. Install Git
sudo yum -y install git bc
2. We will install certbot in /opt folder
cd /opt

Clone of Letsencrypt/Certbot repository from Github

sudo git clone https://github.com/certbot/certbot.git

this will create a clone of Letsencrypt/Certbot under /opt/certbot folder
Stop Nginx
sudo service nginx stop
3. Now run given below command from certbot folder
cd certbot
./letsencrypt-auto certonly --manual --preferred-challenges=dns --email abc@abc.com --server https://acme-v02.api.letsencrypt.org/directory --agree-tos -d *.yourdomain.in --debug

--debug Option will help in installing required dependency for certbot and letsencrypt
4. Certbot will ask to add DNS TXT record
------------------------------------------------------------------
Please deploy a DNS TXT record under the name
_acme-challenge.yourdomain.com with the following value:
5GFgEqWd7AQrvHteRtfT5V-XXXXXXXXXXXXXX
Before continuing, verify the record is deployed.
------------------------------------------------------------------
Press Enter to Continue
Add the given TXT record in DNS of your domain.
5. Check your TXT record
Open mxtoolbox url
https://mxtoolbox.com/SuperTool.aspx
Enter “_acme-challenge.yourdomain.com” in TXT Lookup box and press enter.
If it resolve to “5GFgEqWd7AQrvHteRtfT5V-XXXXXXXXXXXXXX” its mean that your TXT record entered is correct.
6. After adding this DNS TXT record to your domain press enter and continue.
7. Your Certificate is ready
Congratulations! Your certificate and chain have been saved at:
/etc/letsencrypt/live/yourdomain.com/fullchain.pem
Your key file has been saved at:
/etc/letsencrypt/live/yourdomain.com/privkey.pem
Your cert will expire on 2019-12-06. To obtain a new or tweaked
version of this certificate in the future, simply run
letsencrypt-auto again. To non-interactively renew *all* of your
certificates, run "letsencrypt-auto renew"
- If you like Certbot, please consider supporting our work by:

Donating to ISRG / Let's Encrypt: https://letsencrypt.org/donate
Donating to EFF: https://eff.org/donate-le
8. Create dhparam.pem file
cd /etc/nginx/conf.d/

openssl dhparam -out dhparams.pem 2048
Above command will create dhparams.pem under /etc/nginx/conf.d/ folder
9. Add SSL Certificate on nginx configuration file
sudo vi /etc/nginx/conf.d/yourdomain.com.conf
And now we are running our domain on SSL we need to change our yourdomain.com.conf file, our new config file might look like this:
server {
listen 80 default_server;
listen [::]:80 default_server;
server_name yourdomain.com www.yourdomain.com;
return 301 https://www.yourdomain.com$request_uri;
}

server {
listen 443 ssl http2 default_server;
listen [::]:443 ssl http2 default_server;
server_name yourdomain.com www.yourdomain.com;
root /usr/share/nginx/yourdomain.com/html;

add_header Strict-Transport-Security "max-age=31536000";
ssl_certificate /etc/letsencrypt/live/yourdomain.com/fullchain.pem;
ssl_certificate_key /etc/letsencrypt/live/yourdomain.com/privkey.pem;
ssl_dhparam /etc/nginx/conf.d/dhparams.pem;

# ssl_certificate "/etc/pki/nginx/server.crt";
# ssl_certificate_key "/etc/pki/nginx/private/server.key";
# # It is *strongly* recommended to generate unique DH parameters
# # Generate them with: openssl dhparam -out /etc/pki/nginx/dhparams.pem 2048
# #ssl_dhparam "/etc/pki/nginx/dhparams.pem";
ssl_session_cache shared:SSL:1m;
ssl_session_timeout 10m;
ssl_protocols TLSv1 TLSv1.1 TLSv1.2;
ssl_ciphers HIGH:SEED:!aNULL:!eNULL:!EXPORT:!DES:!RC4:!MD5:!PSK:!RSAPSK:!aDH:!aECDH:!EDH-DSS-DES-CBC3-SHA:!KRB5-DES-CBC3-SHA:!SRP;
ssl_prefer_server_ciphers on;
#
# # Load configuration files for the default server block.
index index.php index.html index.htm;

location ~ \.(php|phar)(/.*)?$ {
fastcgi_split_path_info ^(.+\.(?:php|phar))(/.*)$;

fastcgi_intercept_errors on;
fastcgi_index index.php;
include fastcgi_params;
fastcgi_param SCRIPT_FILENAME /usr/share/nginx/mydomain/html$fastcgi_script_name;
fastcgi_param PATH_INFO $fastcgi_path_info;
fastcgi_pass php-fpm;
fastcgi_param GATEWAY_INTERFACE CGI/1.1;
fastcgi_param SERVER_SOFTWARE nginx;
fastcgi_param QUERY_STRING $query_string;
fastcgi_param REQUEST_METHOD $request_method;
fastcgi_param CONTENT_TYPE $content_type;
fastcgi_param CONTENT_LENGTH $content_length;
fastcgi_param SCRIPT_FILENAME /usr/share/nginx/html$fastcgi_script_name;
fastcgi_param SCRIPT_NAME $fastcgi_script_name;
fastcgi_param REQUEST_URI $request_uri;
fastcgi_param DOCUMENT_URI $document_uri;
fastcgi_param DOCUMENT_ROOT /usr/share/nginx/html;
fastcgi_param SERVER_PROTOCOL $server_protocol;
fastcgi_param REMOTE_ADDR $remote_addr;
fastcgi_param REMOTE_PORT $remote_port;
fastcgi_param SERVER_ADDR $server_addr;
fastcgi_param SERVER_PORT $server_port;
fastcgi_param SERVER_NAME $server_name;
fastcgi_param HTTPS $https;
fastcgi_param REDIRECT_STATUS 200;
fastcgi_buffer_size 128k;
fastcgi_buffers 256 16k; # 4096k total
fastcgi_busy_buffers_size 256k;
fastcgi_temp_file_write_size 256k;
}
gzip on;
gzip_static on;
gzip_disable "msie6";
gzip_vary on;
gzip_min_length 1;
gzip_comp_level 8;
gzip_buffers 16 8k;
gzip_proxied any;
gzip_types application/atom+xml application/javascript application/json application/ld+json application/manifest+json application/rss+xml application/vnd.geo+json application/vnd.ms-fontobject application/x-font-ttf application/x-web-app-manifest+json application/xhtml+xml application/xml font/opentype image/bmp image/svg+xml image/x-icon text/cache-manifest text/css text/plain text/vcard text/vnd.rim.location.xloc text/vtt text/x-component text/x-cross-domain-policy;
gzip_disable "MSIE [1-6]\.";

#
location / {
try_files $uri $uri/ /index.php;
}
#
error_page 404 /404.html;
location = /40x.html {
}
#
error_page 500 502 503 504 /50x.html;
location = /50x.html {
}
location ~* \.html$ {
expires 7d;
}
location ~* \.(ogg|ogv|svg|svgz|eot|otf||woff|mp4|mp3|ttf|css|rss|atom|js|jpg|jpeg|gif|png|ico|zip|tgz|gz|rar|bz2|exe|ppt|tar|mid|midi|wav|bmp|rtf)(\?ver=[0-9.]+)?$ {
access_log off;
log_not_found off;
expires max;
}
}
Restart Nginx, PHP-FPM & mySQL
sudo service nginx restart
sudo service php-fpm restart
sudo service mysqld start
Open the website in the browser
https://www.yourdomain.com