"pod" is not recognized as an internal or external command in React Native and is an error that users encounter when they run their react native project on Windows. CocoaPods is a third-party dependency manager with over ninety-six thousand libraries for Swift and Objective-C Cocoa projects. This article illustrates the solution to fixing this error for Windows users.
Before we switch to the solution part, let us first understand the following terms:
Pod:
The pod is a command for the CocoaPods dependency manager for the Xcode project. Thus, it indicates the dependency manager will run on macOS. Using CocoaPods, MacOS users can stipulate their dependencies, such as pods. These manage their project versions efficiently over time and across development environments. But running the CocoaPods on Windows will throw the error "pod is not recognized as an internal or external command in React Native." In the following section, you will see how to run pod commands in Windows.
CocoaPods:
CocoaPods is a library dependencies manager that works for Xcode projects. Xcode projects contain a collection of files and settings that MacOS users can use in constructing an application. When creating, managing, developing, and maintaining applications, users must know how to use and navigate an Xcode project. The Xcode is Apple's IDE for MacOS and source for an application.
CocoaPods handles library dependencies for these Xcode projects. It will set up the libraries as a framework.
Swift and Objective-C:
These are programming languages that work for Apple platforms and writing software for OS X and iOS. Swift and Objective C are the languages for iOS mobile app development.
Following are the solutions to fix the error “pod” is not recognized as an internal or external command in react native:
Solution 1: Add the path of the npm module
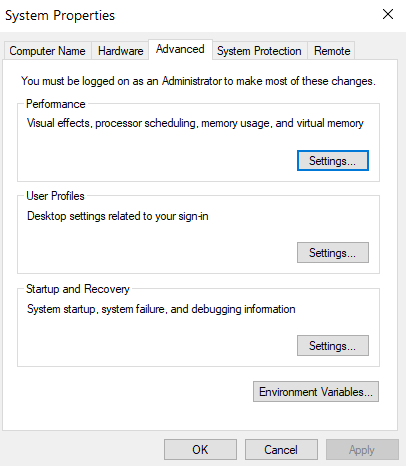
Step 1: Go to the Start menu, open "Environment variables."

Step 2: Click the "Environment Variables" option from the Advance Setting panel.
Step 3: Go to the path property under the "System variables" box. Click on the Edit option.

Step 4: In Windows, users need to add the path of the npm module (C:\Users\your user name\AppData\Roaming\npm) to system variables instead of user variables.
Step 5: Press OK.
If the above solution does not work, then you must try the alternative solution:
Solution 2: pod install and pod update
Step 1: Installing Ruby:
Users first need to install Ruby to run CocoaPods. First, go to the given link, and download the Ruby+DevKit x64 unless users want to install a different package.
Step 2: Users must accept all the defaults and ensure they select the "Use UTF-8 as default external encoding" when installing Ruby. When Ruby starts installing MSYS, users choose the first option "MSYS2 base installation."
Step 3: Check Ruby is successfully installed in the system. Go to the command prompt, and type "gem list." It will display the list of the gems if the installation is successful. It is all set.
Step 4: Installing curl:
CocoaPods uses curl to install packages. By default, users cannot get the curl installed in their system. They must install the latest version 64-bit curl on Windows using this link. Proceed further by extracting the package and ensuring that curl.exe is accessible through the command line.
Step 5: Go to Environment variables, add the path "C:\curl-7.64.1_1-win64-mingw\bin" in Advanced System Settings. It is when users have extracted curl as C:\curl-7.64.1_1-win64-mingw.
Step 6: Check Ruby is successfully installed in the system. Go to the command prompt, and type "curl —help." It will show the curl help pages.
curl --help
Step 7: Installing git
CocoaPods also uses git and tar command-line tools. Users must install git using this link. Then they click the "Use Git and optional Unix tools from the Command Prompt" option and use default settings for everything else.
Step 8: Check whether users have successfully installed git and Unix tools in their system. Go to the command prompt and type "git" and "tar."
Step 9: Installing CocoaPods:
After installing all the required prerequisites that CocoaPods use for running in Windows, users can now install this dependency. Open the command prompt and type "gem install CocoaPods;" to install the latest released version of CocoaPods. But Windows support is only available in the Beta of CocoaPods 1.7.0. Instead, users must run "gem install CocoaPods — pre."
sudo gem install cocoapods
sudo gem install cocoapods --pre
Step 10: Check whether users have successfully installed CocoaPods. Open the command prompt and type "pod — version." It will display the latest version, 1.7.0 or higher.
Step 11: Run and check the pod command:
pod
Since the pod command runs on the Xcode project and is only for MacOS systems, users must have an actual Xcode project to test CocoaPods. So, to run the command, users have to:
- Transfer the project of MacOS to the Windows system
- Navigating to the project folder using the command line
- Open the command line, run "pod init," and create the Podfile.
- Proceed to the next step by editing the Podfile and adding the pods, such as "Fireba."/Analytics."
- To install the pods, run "pod installs."
Conclusion:
While working with CocoaPods, users must understand it is a dependency manager for Swift and Objective-C projects with Xcode. Thus, they cannot use this package in Windows unless they extend their project of MacOS to the Windows system. If not, it will throw the error "pod is not recognized as an internal or external command in React Native."