How to Access the Camera by Building a Simple App
So before we start I am gonna mention that I did start a brand new project. And also make sure you are using API 18 or higher because there is one little package that we are gonna use make sure that your device has a camera. It will still work if you are using like one of the older API’s but it will you this weird warning message.
So, in order to just avoid it, just go ahead and switch to API 18 or anything higher. You can even use lollipop.
Now please follow the steps below:
In your main activity get this text view first.
.jpg)
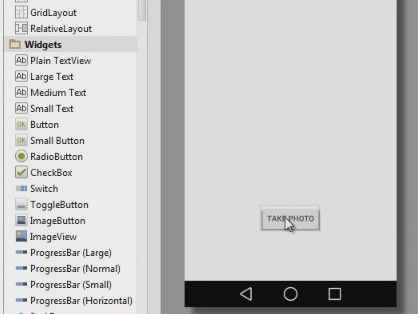
Now the first things are going to need is the button. So go ahead and grab this button and drag it somewhere not in the middle, somewhere on the bottom.
.jpg)
.jpg)
Now I am gonna do some real work. The first thing we need to do is we need to give this an id for ex, 'buckysButton'.
.jpg)
Now you need to change this text is to “take photo”.
.jpg)
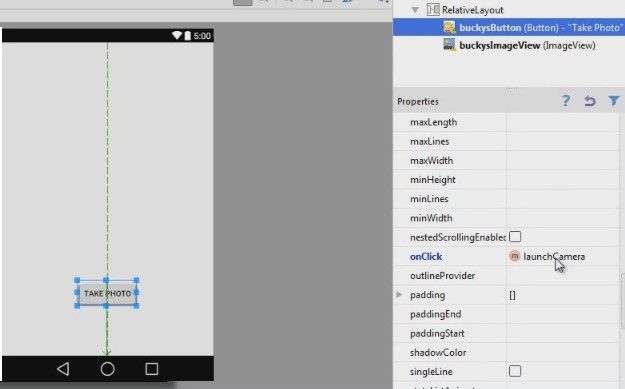
So the user actually knows what’s gonna happen whenever they click it. And of course so this can just actually do something we are going to add a method on click and it will say – launch camera.
.jpg)
So that’s essentially what this is gonna do, whenever you click it its gonna launch the camera app and allow the users to take a picture.
Now after they take the picture we want to display right at the top here. So what we need to do is in order to display is an image view. So if you go down under widgets and Add image view.
.jpg)
You can drag it anywhere; right here is good for now.
.jpg)
So you see here your image view is zero. It pretty much has no size right now. That’s because there no image in it and the layout is set at the wrap content.
.jpg)
So it’s pretty much can wrap around whenever you stick image in there.
Now let’s go down and add min-height in what say like 300dp.
.jpg)
And we are going to give a minimum width of 300dp too.
.jpg)
Now what I wanna do is move that up a little bit. So if I go away up I will layout margin and change the margin-top to like 50dp.ses if that works.
.jpg)
Alright it works.
So now the other thing that we need to do is the one last thing is we need to give this an id. So the image view id would work but I would rather name it buckys Image View.
.jpg)
Now we have got an area that can display the image and now we have a button that whenever we click it calls launch camera.
Now before we hop over and start coding this let's go ahead, and in the manifest we need to set up one permission and that’s of course the permission to add the camera.
.jpg)
So if you go uses-features android:name and the name of this is android.hardware.camera. not camera2 juts camera.And another thing is android:required is set this equal to true.
.jpg)
Now we are pretty much saying okay we want to use the camera on user’s device whenever they install this app. So that all we have done in the manifest, so close out of this. And hop into your main activity.java and we can start coding this thing.
.jpg)
So, all my import that I am going to use are right here sp to copy these and after you do that you can actually get rid of these last two menu methods.
.jpg)
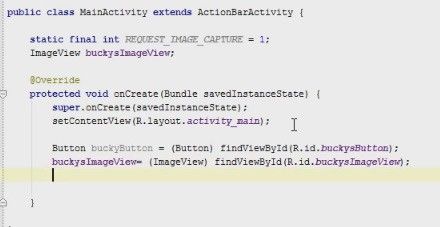
You won’t be needing those. Now the first thing I am gonna do is to set up some variables and the first one is- static final int REQUEST IMAGE CAPTURE and set this to 1.
.jpg)
So what this constant is basically it way to identify your intent and if you have a bunch of different intents then you can say identify along with each one. But the only intent we have that is we have the intent to open p the camera and eventually to take a picture. So again this is really important you can just pass in one of your, you have to set it to a constant. So the next thing is I need a reference to image view right here so we can be using it in a few methods and I will just name it buckys image view because that was the name in activity main.
.jpg)
So now, OnCreate as soon as we create this what we want to do. Well the first thing we are gonna do is reference to that button. Now we are only going to using n this method so I am just gonna create the entire thing right. Of course you already know how to so this find view by id(R.id.buckybutton). And we also need to do the same thing for the image view. So set this equal to image view, which of course is the area where we can display the image. Find view by id(R.id.buckys image view).
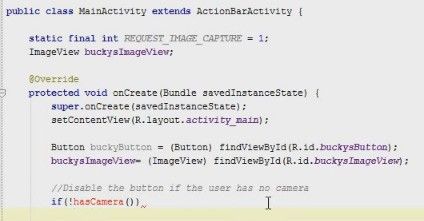
So that was the easy stuff . now the first thing we need to do is before we can take a picture, we wanna check if the user actually has a camera; because if you are trying to call a bunch of intents the one with the camera and the device may be it really odd one or just maybe… you know not a high end and they don’t have a camera. Its gonna cause some problems. So I am gonna say “disable the button if the user has no camera” or something.
.jpg)
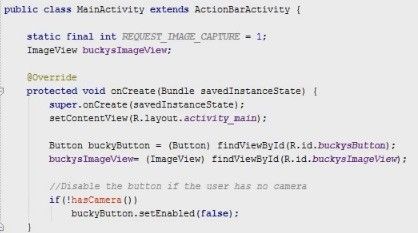
Again we are gonna check for a camera and if they don’t have one then we will gonna disable this button.
.jpg)
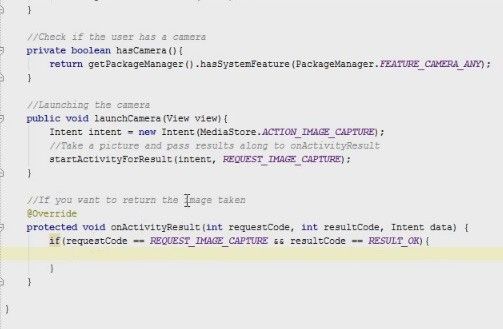
Now I am gonna make a function called "has camera" but for now I am just gonna call “has camera”. So it’s either gonna return true if they have a camera or false if they don’t have.
it’s giving me an error because we didn’t create and to disable that button what I am gonna do is to call buskysButton.setEnabaled equal to false.
Now just go ahead and make that has camera method right here. So again, all we can do is just “check if the user has the camera”. And remember it just gonna turn true or false so you don’t need any extra information but actually let me add only one line of code. All this is gonna do is it’s just gonna return this getPackageManager() .hasSystemFeature and in here I am gonna write PackageManager.FEATURE_CAMERA_ANY.

So again this package manager in all this right here is pretty much saying okay if your device. On your device, we are going to check for a feature. What do you want to check for? We just wanna check for any camera. Now there are different types of cameras you can check for, you can check for only a front facing camera or a back facing one. But this is going to say okay as long as the user has any camera on their device then it will gonna return true and as long as you return true that button will still be enabled. If they don’t have any camera on their device then it gonna disable the button. So that’s all that does right there.
Now another thing I want to do is remember whenever we click this button it calls the Onclick method called launch camera.
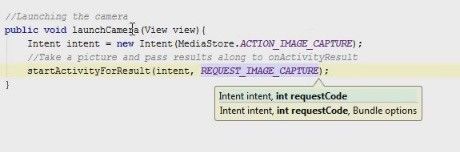
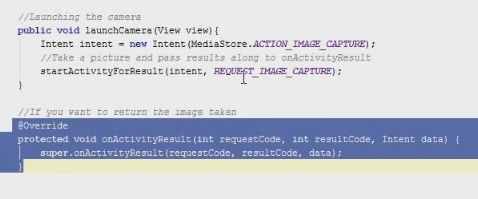
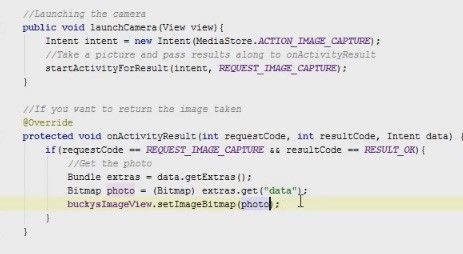
So now we need to build that method right here and this is gonna be responsible launching the camera. Now inside this method we need to pass through our views. And I will give myself a little bit space to work. So in order to launch this camera we need to do is we need to make a camera launching Intent. And we can just name it intent = new Intent. And to launch the camera it MediaStore.ACTION_IMAGE_CAPTURE. So this is the intent to actually capturing image in otherwords launch the camera.

So after we are taking an image next you want to do is you want to take a picture and pass results and by results I mean the image information itself. Whatever you take an image of we are gonna pass the results along to something called onActivityResults.
So again this is what we intent to do, a take a picture
And this right here pretty much clicks up the intent.
.jpg)
So as soon as you start this activity it’s going to launch your camera. Now the reason we said start activity for result it because we want to get some information back after this is done happening. What information we want back we just want the information about the image that we took. So then, we can do something like save it, print it out, or add some photo filter to it whatever we want to do but we are going to need essential that image.
.jpg)
And I am gonna override this method on activity result.
.jpg)
But this on activity result its method will be called automatically after this method right here, startActivityForResults(REQUEST_IMAGE_CAPTURE. So start activity result as I said is we intent to capture an image after we do send their result to on activity for result.so this is pretty much gonna take on the data and will just whatever we say we wanted to do. So the first thing I wanted to do is I want to just make sure that we indeed take an image and also that we didn’t have any error or anything like that. And we can check those with these two variables right here. And just write quickly if (requestCode = REQUEST_IMAGE_CAPTURE “ result Code = RESULT_OK).
So again like I just said this request code pretty much ensures that image and result code if the result is true, it means that you don’t have any errors or anything like that. So that’s true then that means that you did an image. So now just go ahead and get the data from it. So get the photo. Alright! S if we go through a bundle extras = data which is this which was passed in the data of the photo.
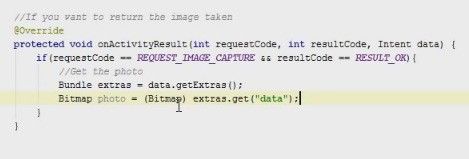
Now if you could just get extra then we can do from here is Bitmap and I am just gonna name the photo itself photo or you can name it pic or anything like that. Ok and this is What the heck did I press? Alright! Okay this taking me off. Okay so (Bitmap) extra.get(“data”). This is essentially returning the photo information, you are converting it to Bitmap, and we are restoring to variable photo. So now, this photo is essentially a photo that you can use to stick in right here and in order to do that you just need your image view which is the area that show the photo Bitmap right here. Since we have Bitmap image, write here photo.
Now make sure everything is working. Now obviously, if I run this in an emulator its snot gonna work because the emulator is on my computer and doesn’t have a camera. So what I am gonna do is I am gonna test this on my device and I will put some screenshots of it so you guys can see what it looks like. Let me do this, let me just take a screen shot of the screen I am working on right now. You guys probably could hear me take the screen shot. That’s what I am looking at now.

Now I am gonna tap “take photo button” and after I tap it this pops up. So you guys can see a picture of computer.