How to use List View in Android Activity
This tutorial gives a step by step explanation of how to use listview in our android activity.
Listview is used to display any list in our Android activity.
Please follow the steps below in order to use listview with an example:
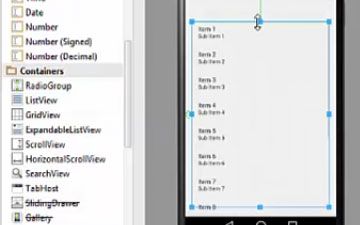
Step 1) First in blank project drag and drop a container called listview from your palette.
Step 2) Now in order to populate this list, we have to create another layout with our text boxes and then we will populate multiple text boxes in this listview. So right click my layout and go to ‘new’ and in here, the last option is the xml file, so go to xml and then click layout xml value.
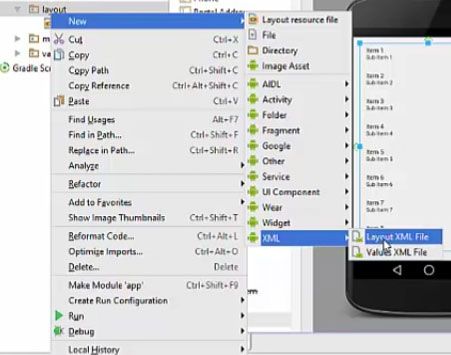
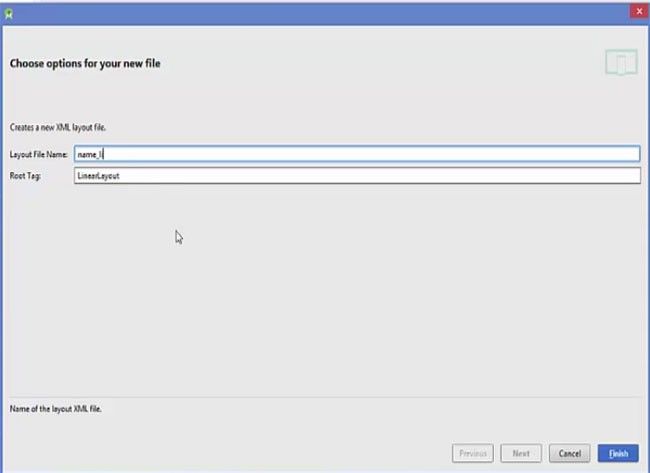
Step 3) Now name to your layout, for example, we want to make a list of names, so we can name it as 'name_list' and click finish.This will create a new xml file in our layout folder inside the resources folder.
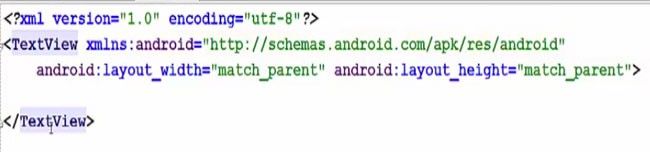
Step 4) Now click the name_list.xml file and go the design view of this list and in here, this is a linear layout, so we will change this tag to text view so just change it to textview and same we will do here so we will initialize and add this text view with this keyword textview.
<?xml version="1.0" encoding="utf-8"?>
<TextView xmlns:android="http://schemas.android.com/apk/res/android" android:layout_width="match_parent" android:layout_height="match_parent">

</TextView>
Step 5) Now go to the mainactivity.java and in here declare this variable called listview.
public class MainActivity extends ActionBarActivity {
       private static ListView list_view;

Step 6) Once you have declared this listview now we have to declare an array to populate our listview. So for example, we can make an array of string for names.
lic class MainActivity extends ActionBarActivity {
   private static ListView list_view;
   private static String[] NAMES= new String[] {"Tom","Mark","John","Jack","Patrik","Peter"};

Step 7) Now there is something called adapter and this adapter is like a, you know, as the name suggests, an adapter between the data and the view So we are going to declare the adapter and then using this adapter, we are going to, you know, join this data and the listview.
Step 8) So first of all, let’s declare a method and inside this method, cast our listview variable.
public void listview() {
      list_view = (ListView) findViewBYId (R.id.listview);
.jpg)
Step 9) Now we are going to create an adapter for our listview and pass string data type for this and then we will name our adapter, now this takes three arguments. One is the context, which is this itself. Second is the, you know, list, sample list. So we have created this name_list layout here. And then it takes the data so for us the data is this strings of name or array of name.
Public void listview() {
    list_view = (ListView)findViewBYId(R.id.ListView);
    ArrayAdapter<string> adapter = new ArrayAdapter<string>(this,R.layout.name_List,NAMES);

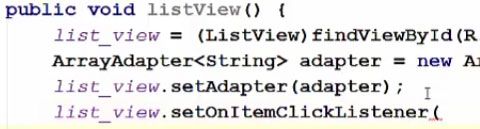
Step 10) And then create an list_view.setAdapter and pass this adapter inside this setAdapter function. It’s going to load all the data into our listview.
Public void listview() {
    list_view = (ListView)findViewBYId(R.id.ListView);
    ArrayAdapter<string> adapter = new ArrayAdapter<string>
    list_view.setAdapter (adapter);

Step 11) Now let’s add some functionality to our listview so whenever we click some item off the list, it should display the content of the list or something like this in the message. So let’s do this. First of all, we are going to take our listview and we will set item click event,
Public void listview() {
    list_view = (ListView) findViewBYId(R.id.ListView);
    ArrayAdapter<string> adapter = new ArrayAdapter<string>
    list_view.setAdapter (adapter);
    list_view.setOnltemClickListener(adapter);
Step 12) Now just choose this option called setonItemClickListener and inside this setonItemClickListener , we will create new onItemClickListener and inside this function onItemClick, we can use this position of the item or ID of the item to display something So for example, we can use this position and what we can do is, using this position we can, you know, get the value of the item.
new AdapterView.OnItemClickListener() {
    @Override
     public void onItemClick(AdapterView<?> parent, View view, int position, long id)

Step 13) So now create a string variable pass this item called ‘position’ here or this position here so it takes the position and now we have the name of the item at this position whatever we click.
@Override
   public void onItemClick(AdapterView<?> parent, View view, int position, long id)
   String value = (String) list_view.getItemAtPostion(position);

Step 14) Now we will use toast to display the value and position, toast.maketext and it takes the three arguments as we know, first is the name of your activity or context. this. The second argument it takes is the message itself, so we are going to create some message, for example, and we will take this position from here and then we can display the value. Value and this value we can take from this string value and the third argument we will pass here are the toast.length and then we will show this toast and now our function is done.
@Override
   public void onItemClick(AdapterView<?> parent, View view, int position, long id) {
   String value = (String) list_view.getItemAtPostion(position);
   Toast.makeText(MainActivity.this,"Postion : " + postion + " Value : "+ value,Toast.LENGTH_LONG).show();
.jpg)
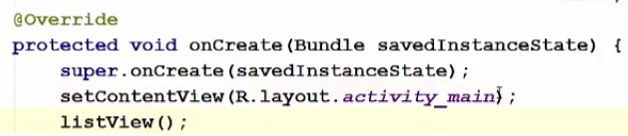
Step 15) So now what we are going to do is we are just going to call this function in our onCreate method in here and run our program.
@Override
   protected void onCreate (Bundle savedInstanceState) {
       super.onCreate(savedInstanceState);
       setcontentView(R.layout.activity_main);
       listView();
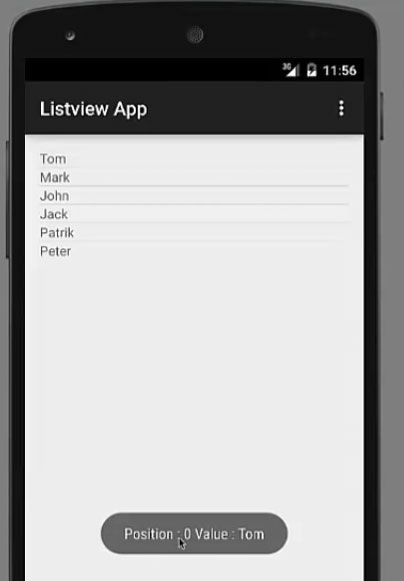
So now our program is running and you can see all the names are populated inside our list and these names are these names, right and once we click on any name we can see the position of this name is 0 because the index of the list starts from 0 and the name appears.
So in this way you can populate listview using your string or using this adapter.