A Login screen is the screen where the user is asked to fill his credential like email, name etc to login into any particular application.
How to Create a Simple Login Application
This tutorial explains how to create a simple login application using the Android Studio. In the first part we will learn how to design our login application and set up all the resources and in the second part, we will write the backend code for this application.
Designing Login Application
Please follow the steps below for designing a Login Application:
Step 1) First create a new android studio project and give a name to your new application. For example, simple login app.
.jpg)
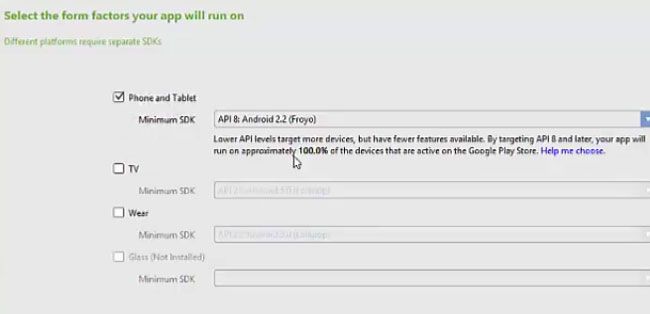
Step 2) Now click next and we are going to make this project for phone and tablets and therefore make sure that you choose the version with minimum SDK which covers hundred percent of devices.
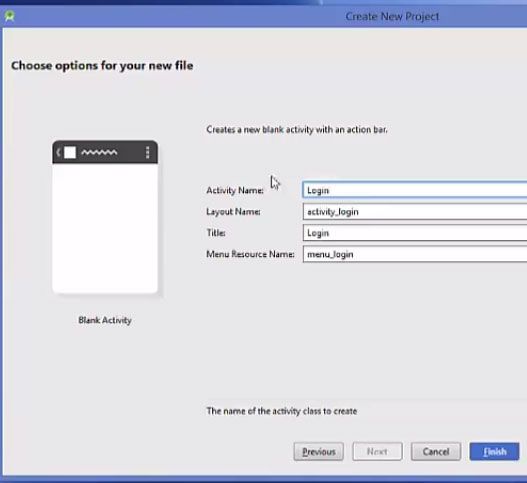
Step 3) Now choose the blank activity here, click next. And give the activity name for example ‘login’.
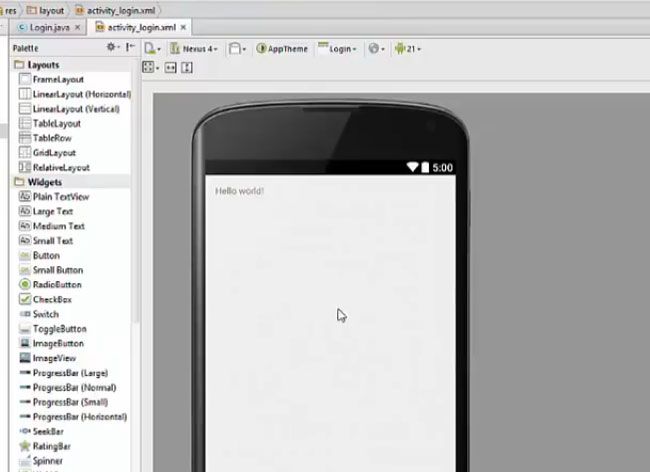
Step 4) So now our project is set up and now this is the first activity we can see here which is ‘login activity’.
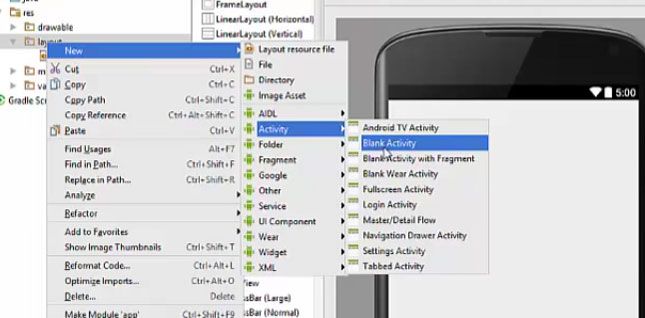
Step 5) Now create one more activity so that we can redirect the user if he provides valid login and password so that it can be a users activity so that user can access some screen or some activity after login. So in your app, just go to this ‘resources’ folder or res folder and inside this, you will be able to see this folder called ‘layout’ and create a new blank activity and name the activity for example as "user" and click finish
Step 6) So now we have two activities: - one is ‘login’ activity (activity_login.xml) which will be used to create our login page and the other is ‘user’activity (activity_login.xml) which will open after authentication of the user.
Step 7) Now in the app folder there will be a folder called ‘manifests’ go to your manifest folder. Inside this folder, there will be an xml file called ‘android manifest’ file (androidmanifest.xml file) click this and you will see both activity, one is our main activity or our launcher activity and the other is our user activity.
.jpg)
Step 8) Now we have to set up the intent filter for the second activity (main activity). In our first activity, which is our login activity, this intent filter is already there, But in the user activity there is only name and label no intent filters available. So we are just going to copy this intent filter tag from our login activity and paste it in the user activity.
<activity
            android:name=".Login"
            android:label="SimpleLoginApp" >
            <intent-filter>
               <action android:name="android.intent.action.MAIN" />

               <category android:name="android.intent.category.LAUNCHER" />
            </intent-filter>
        </activity>
        <activity>
               android:name=".User"
               android:label="User" >
           </activity>
        </application>
Step 9) Now there can only be one launcher activity for your app, therefore, the second activity will be a default activity. Launcher activity means that the first activity which will appear is launcher activity which is our login activity. Now the user activity is our default activity which will open whenever we are going to authenticate the user.
<activity
            android:name=".User"
            android:label="@string/title_activity_user" >
            </intent-filter>
                 <action android:name="android.intent.action.MAIN" />

                <category android:name="android.intent.category.DEFAULT" />
            </intent-filter>
        </activity>
     </application>

 </manifest>
Step 10) The name of the default activity will be the content name of this second activity. So go to your activity_user.xml file and copy the path and paste androidmanifest.xml in the <action android: name =
android:name=".User"
    android:label="@string/title_activity_user" >
    </intent-filter>
       <action android:name="  " />
Now as we have successfully set up our second activity, therefore we are now going to design our first login activity here:
Step 1) So first drag and drop some text views and added views so that, you know, the user can enter his login credentials.
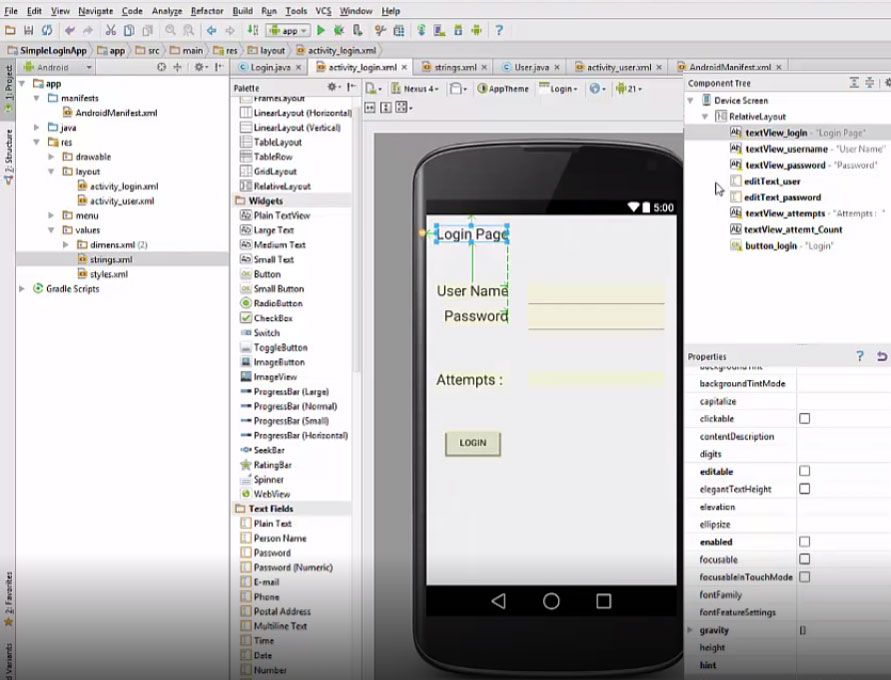
Step 2) After completing the design part now transfer all our string constant to the string.xml file. So in your app folder, there will be a folder called ‘values’ here in the resources folder so go to resources or res folder and there will be a folder called ‘values’ and inside this values, there will be a folder called strings.xml file and in here you can define all your string constant.
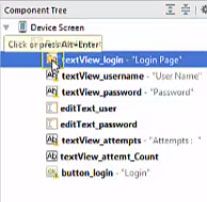
Step 3) So what we are going to do is once you are done designing your app, you can just go to this content tree and in here on every, you know, text view and other button you can see a small little warning yellow light and when you click this, you will be able to see a small little button or bulb here and just click this bulb and this bulb says "hardcoded string login page should use the string resource". So android studio also gives us the option to, define all the string constant in our string xml.
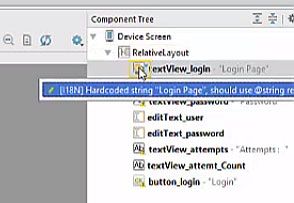
Step 4) So just click this message here and then it will open your extra resources file and file name here is string.xml and in here you can name your resource. So this text page is our text, right? So you can just name it as ‘login_text’ so it is just ID for your string OK and once you are done with that, you can just click OK.
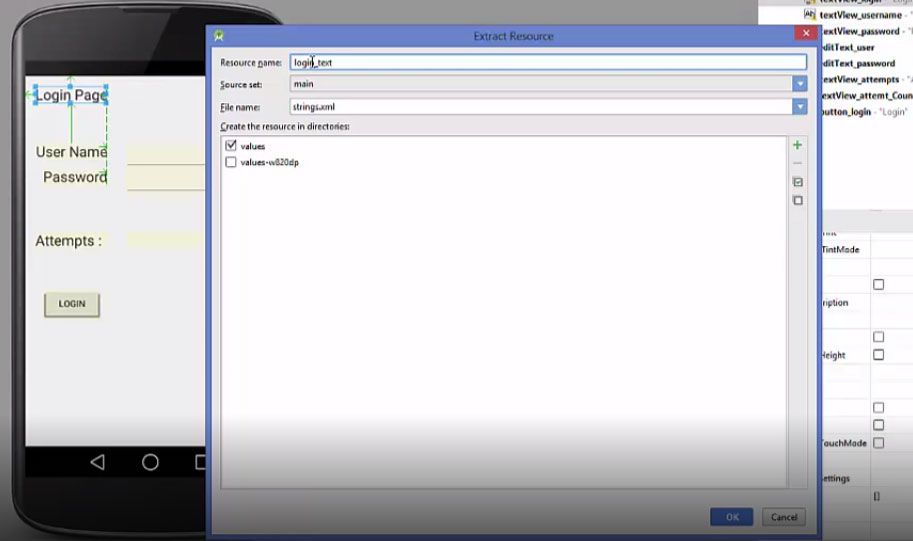
Step 5) Do the same for every text and added text and button here so that all these resources are transferred to my string.xml file. You can see we have created login_text and the text on this login_text is login page. In the same way, we have defined one more tag for a username so I will do the same for other text boxes or text views and buttons.
<?xml version="1.0" encoding="utf-8" ?>
<resources>
	<string name="app_name">SimpleLoginApp</string>
	<string name="hello_world">Hello World!</string>
	<string name="action_settings">settings</string>
	<string name="title_activity_user">User</string>
	<string name="login_text">Login Page</string>
	<string name="usename_text">User Name</string>
	<string name="password_text">Password</string>
	<string name="attempts_text">Attempts :</string>
	<string name="button_login">Login</string>
	<string name="Secon_page_text">Welcome to the second page</string>
</resources>
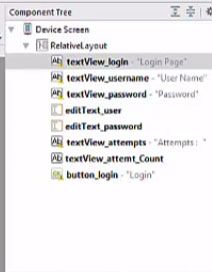
Step 6) So now I have successfully defined all my strings to the string in the string.xml file. So now I have defined all my string constants, all my strings as constant and I have transferred all my strings as constant in my strings.xml file. You can see all my strings like username, password, attempt, login have some you know, tag here or constant name here so that I can reuse them in some different place using the tags or tag Ids right? Now our designing is done. You can even go to the second activity which is activity_user.xml file and go to the design and in here I can just drag and drop large text and I can change the text.
So now our design part is almost complete or complete.
Code for Login application.
Step 1) Now once we have completed our design, now we will go to the java folder here and in here, we will go to the login.java folder and there we will declare some variables inside our login class and then we will add a button action perform a method to our OnCreate method.
Step 2) So now first declare the variables. We will declare two added text boxes for username and password, one text view for the attempt and one for the button. We will declare one extra variable here which is called int attempt counter. So we want to provide minimum attempt or maximum attempt to the user so that, just, for example, we want to provide five attempts to the user to try login and password and if these attempts are gone then we want to do some other option.
public class Login extends ActionBarActivity  {
       private static EditText username;
       private static EditText password;
       private static TextView attempts;
       private static Button login_btn;
       int attempt_counter = 5;
Step 3) Now we are ready to create our button click event. So just create a method and inside the method and cast all the variables which we have declared. So we will cast username, password and the attempt and the button variables.
public void LoginButton() {
       username = (EditText) findViewById (R.id.edittext_user);
       password = (EditText) findViewById (R.id.edittext_password);
       attempts = (TextView) findViewById (R.id.textview_attemt_count);
       login_ btn = (Button) findViewById (R.id.button_login);
Step 4) Now after casting all the four variables which we declared now we will add a button click event to our login button and on the basis of this button click event, we are going to assign them some action. So let’s take a login_btn variable and create a button click event count, create a new OnClickListener and inside this OnClick method, we are going to write our code.
login_btn.setOnClickListener (
          new View.OnClickListener() {
              @Override
              public void onClick (View v) {
                  if (username.getText(). toString() .equals ("user") &&
                             password.getText(). toString().equals ("pass") ) {
                          Toast.makeText(Login.this,"User and Passwword is correct",
                                  Toast.LENGTH_SHORT).show();
                 }
Step 5) The above condition applies when the username and password is correct. If the username and password is wrong, then define the else condition for this. So else, what we are going to do here is we are going to reduce the number of count right because we have defined the maximum number of count is equal to five. So we can, you know, reduce the number counts if the login is failed. So what we are going to do is, first of all, we will show some message to the user such as "username and password is not correct" and then reduce the number of attempts, so we can just reduce this counter by one and if this counter is equal to 0 then we are going to disable this login button so that user cannot login anymore.
} else {
       Toast.makeText(Login.this,"User and Password is not correct",
                Toast.LENGTH_SHORT).show();
       attempt_counter--;
       if(attempt_counter == 0) {
            login_btn.setEnabled(false);
Step 6) Now we are going to call this method in our OnCreate method. Therefore, just copy the LoginButton () method and paste it in OnCreate method.
@Override
  protected void onCreate (Bundle savedInstancesState) {
       super.onCreate (savedInstanceState) ;
       setContentView (R.layout.activity_login) ;
       LoginButton () ;
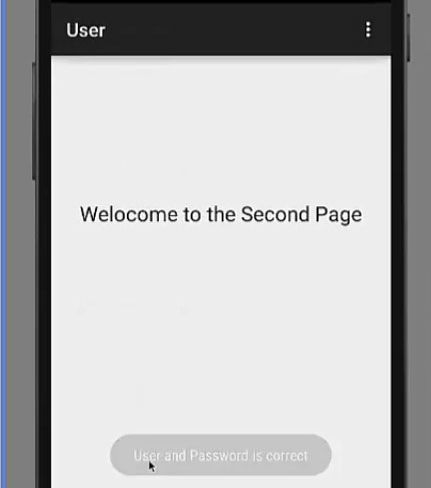
Step 7) Now we will add the code to open the new activity when username and password is correct. So if this username and password is correct below our message that username and password is correct, we are going to create an instance of intent, ‘i’ or whatever name you want to give is equal to new intent and as an argument, we will pass the path to our second activity for the user.
public void onClick (View v) {
        if (username.getText () . toString () . equals ("User") &&
                password.getText () . toString () .equals ("pass") ) {
             Toast.makeText (Login.this, "User and Password is correct",
                     Toast.LENGTH_SHORT) .show () ;
             Intent intent = new Intent ("com.example")
             startActivity(intent) ;
Step 8) Now we have to set the count to attempt text box take the attempts from inside the LoginButton() method and just below the casting of these variable, we will setText is equal to whatever is the counter or current counter and convert this counter to text.
public void LoginButton () {
        username = (EditText) findViewById(R.id.editText_user) ;
        password = (EditText) findViewById(R.id.editText_password) ;
        attempts = (TextView) findViewById(R.id.textview_attemt_Count) ;
        login_btn = (Button) findViewById(R.id.button_login) ;

        attempts.setText (Integer.toString (attempt_counter)) ;
Step 9) So now once we have printed the number of attempts, just copy setText code as we also want to reduce the number of the count and set this text to the attempt text box in the else condition. So once if the username and password are correct or not correct, we will reduce the counter and set the text to our attempt text box here So just paste below else condition.
else {
    Toast.makeText (Login. this,"User and password is not correct",
              Toast.LENGTH_SHORT) .show () ;
    attempt_counter--;
    attempts.setText (Interger. toString(attempt_Counter)) ;
So this attempt or set the text is pasted two times:– once at the starting after the casting of all the variables here and second after reduction of this counter by 1 in the else condition.
Step 10 )Now we are going to run our program. So now our app is running and now we are going to enter username and password. Remember your username should be ‘user’ and password should be ‘pass’ in order to, you know, a successful login, right? So we will enter first of all successful username and password or correct username and password and if the username and password is correctly entered, when we press this login button, you see it shows this message – username and password is correct and we are redirected to the next page.
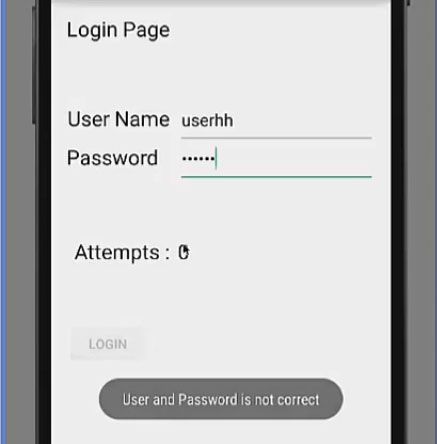
Step 11) Now let’s try to enter some random username and password and let’s see the response OK so once we enter the, you know, random username and password, and we click this login button, it reduces the attempts and it shows you the name and password is not correct. And last time when we attempt login, once the attempts become 0, then this login button is no more active OK so it’s disabled.
Conclusion
So following the above steps a user can create a new simple login application design in Android,
Complete Code:
App >> Manifests >> AndroidManifest.xml
<?xml version="1.0" encoding="utf-8"?>
<manifest xmlns:android="http://schema.android.com/apk/res/android"
	package="com.example.programmingknowledge.simpleloginapp">

	<application
		android:allowBackup="true"
		android:icon="@drawable/ic_launcher"
		android:label="SimpleLoginApp"
		android:theme="@style/AppTheme">
		<activity
			android:name=".Login"
			android:label="SimpleLoginApp" >
			<intent-filter>
				<action android:name="android.intent.action.MAIN" />
				<category android:name="android.intent.category.LAUNCHER" />
			</intent-filter>
		</activity>
		<activity
			android:name=".User"
			android:label="User" >
			<intent-filter>
				<action android:name="com.example.programmingknowledge.simpleloginapp.User" />
				<category android:name="android.intent.category.DEFAULT" />
			</intent-filter>
		</activity>
	</application>
</manifest>
Java >> com.example.programmingknowledge >> Login.java
package com.example.programmingknowledge.simpleloginapp;

import android.support.v7.app.ActionBarActivity;
import android.os.Bundle;
import android.view.Menu;
import android.view.MenuItem;

public class Login extends ActionBarActivity {
	private static EditText username;
	private static EditText password;
	private static TextView attempts;
	private static Button login_btn;
	int attempt_counter = 5;
	@Override
	protected void onCreate (Bundle savedInstanceState) {
		super.onCreate (savedInstanceState);
		setContentView(R.layout.activity_login);
		LoginButton();
	}

	public void LoginButton() {
		username = (EditText)findViewById(R.id.editText_user);
		password = (EditText)findViewById(R.id.editText_password);
		attempts = (TextView)findViewById(R.id.textView_attemt_count);
		login_btn = (Button)findViewById(R.id.button_login);

		attempts.setText(Integet.toString(attempt_counter));

		login_btn.setClickListener(
				new View.onClickListener(){
					@Override
					public void onClick(Veiw V){
						if(username.getText().toString().equals("admin") && password.getText().toString().equals("admin_pass")){
							Toast.makeText(Login.this,"Welcome to the Sample Login Tutorial",Toast.LENGTH_SHORT).show();
							Intent intent = new Intent("com.example.programmingknowledge.simpleloginapp.User");
							startActivity(intent);
						}else{
							Toast.makeText(Login.this,"Username or Password is not correct",Toast.LENGTH_SHORT).show();
							attempt_counter--;
							attempts.setText(Integet.toString(attempt_counter));
							if(attempt_counter == 0){
								login_btn.setEnabled(false);
							}
						}
					}
				}
			);
	}

	@Override
	public boolean onCreateOptionsMenu(Menu menu){
		//Inflate the menu; this adds item to the action bar if it is present.
		getMenuInflater().inflate(R.menu.menu_login, menu);
	}
	@Override
	public boolean onOptionsItemSelected(MenuItem item){
		//Handle action bar item clicks here. The action bar will
		//automatically handle clicks on the Home/Up Button,So long
		//as you specify a parent activity in AndroidManifest.xml
		int id = item.getItemId();
	}

}
res >> Layout >> activity_user.xml
<RelativeLayout xmlns:android="http://schemas.android.com/apk/res/android"
	xmlns:tools="http://schemas.android.com/tools" android:layout_width="match_parent"
	android:layout_height="match_parent" android:paddingLeft="16dp"
	android:paddingRight="16dp"
	android:paddingTop="16dp"
	android:paddingBottom="16dp"
	tools:context="com.example.programmingknowledge.simpleloginapp.User">

	<TextView android:text="Hello World!" android:layout_width="wrap_content" android:layout_height="wrap_content" />
</RelativeLayout>
res >> Value >> strings.xml
<?xml version="1.0" encoding="utf-8" ?>
<resources>
	<string name="app_name">SimpleLoginApp</string>
	<string name="hello_world">Hello World!</string>
	<string name="action_settings">settings</string>
	<string name="title_activity_user">User</string>
	<string name="login_text">Login Page</string>
	<string name="usename_text">User Name</string>
	<string name="password_text">Password</string>
	<string name="attempts_text">Attempts :</string>
	<string name="button_login">Login</string>
	<string name="Secon_page_text">Welcome to the second page</string>
</resources>