Applying Styles on Components
For example, If we have two large texts and to buttons and we want to change the style of these text boxes and these buttons.
.jpg)
- One way of doing this is just select your text area or text box, go to the property here, and change the properties as you wish.
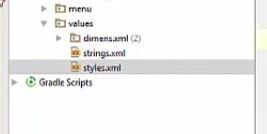
- The other way of doing this is go to the folder called values here and the go to the folder called style.xml and here we can define the style to our components.
Please follow the steps below in order to apply different styles to Android components:
Step 1) First of all remove all the style which are done by default are given to these text box and these button such as layout height and text appearance for each and every component.

Step 2) Now you will notice when you go to the design it will give you this rendering problem because we have just deleted the layout with and layout height and appearance of these text boxes and button.

Step 3) Now to give the styles you want you just need to go to this styles.xml file and in here we can define our style.

Therefore, first of all, you just need to give this style attribute here and then the name of the style.
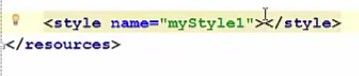
Note: The name of the style depends upon you but it should be a unique name. for example, mystyle1 and the just close the style.
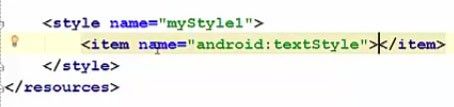
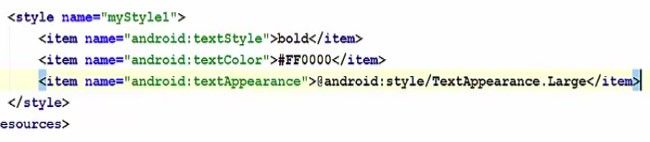
Step 4) And inside the style you can add some items related to appearance or width or height or whatever. So we can add an item name and then we can decide what item or what attribute we want to add. For example, we want to add the text style to the text view. So inside the text style we will write bold.
Step 5) In the same way we can add more items. For example, we want to change the text color.
So now for the text color what you can do is you can search on your browser the web color Wikipedia page. In here you can find all the web colors.

And their code so copy it, and paste it in your project with the hatch.
.jpg)
And you will notice the colour you choose here
.jpg)
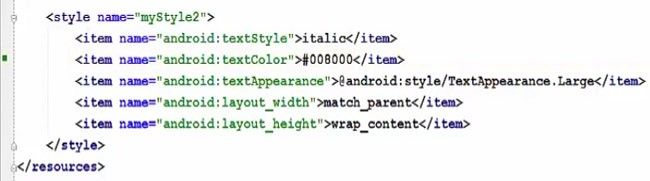
Step 6) Now we will add one more item and this time we want to choose the text appearance. So choose text appearance and close it here and for the text appearance, you can give Android style, Text appearance and then the Large text appearance.
Step 7) Now we can define the layout with a layout height of the style. So just add an item here and then choose Android layout width first and this will be for example match parent and in the same way, choose the layout height and this will be for example wrap_content.

So this is our first style which we can do.
Step 8) In the same way, we can define multiple styles with different names with different colours, names and other features.
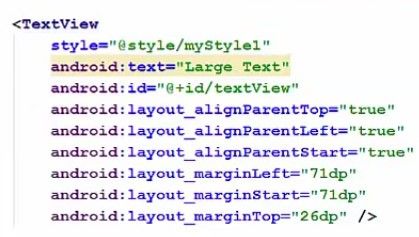
Now in order to give the style to your button or text boxes, you just to go to the text and in here you just need to give the style attribute. So give style and then the style name you want to choose, for example, mystyle1 for example.
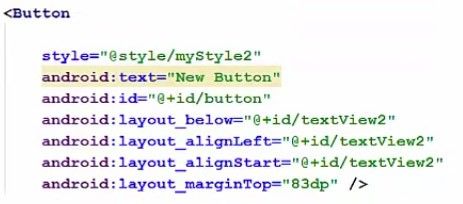
And for these buttons you can to give the style 2, so mystyle2
And now when you go to the design you will see the text with bold and red color and buttons with italic and green color.

So in this way you can apply the styles to your component in android. I hope you enjoyed this video. Please recommend and subscribe and bye for now.
app-res-layout-activity_main.xml
<resources>
    <!-- Base Application theme -->
    <style name="AppTheme" parent="Theme.AppCompat.Light.DarkActionBar">
        <!-- Coustomize your App Here -->
    </style>
    <style name="myStyle1">
        <item name="android:textStyle">bold</item>
        <item name="android:textColor">#FF0000</item>
        <item name="android:textAppearence">@android:style/TextAppearence.Large</item>
        <item name="android:layout_width">match_parent</item>
        <item name="android:layout_height">wrap_content</item>
    </style>

    <style name="myStyle1">
        <item name="android:textStyle">italic</item>
        <item name="android:textColor">#008000</item>
        <item name="android:textAppearence">@android:style/TextAppearence.Large</item>
        <item name="android:layout_width">match_parent</item>
        <item name="android:layout_height">wrap_content</item>
    </style>

</resources>
app-res-values-styles.xml
<RelativeLayout xmlns="http://schema.android.com/apk/res/android"
    xmlns:tools="http://schema.android.com/tools"
    android:layout_width="match_parent"
    android:layout_height="match_parent"
    android:paddingBottom="16dp"
    android:paddingLeft="16dp"
    android:paddingRight="16dp"
    android:paddingTop="16dp"
    tools:context=".MainActivity">
    <TextView
        style="style/myStyle1"
        android:text="Large Text"
        android:id="@+id/textView"
        android:layout_alignParentTop="true"
        android:layout_alignParentLeft="true"
        android:layout_alignParentStart="true"
        android:layout_marginLeft="71dp"
        android:layout_marginStart="71dp"
        android:layout_margintop="26dp" />
    <TextView
        style="style/myStyle1"
        android:text="Large Text"
        android:id="@+id/textView2"
        android:layout_alignParentTop="true"
        android:layout_alignParentLeft="true"
        android:layout_alignParentStart="true"
        android:layout_marginLeft="71dp"
        android:layout_marginStart="71dp"
        android:layout_margintop="26dp" />
    <Button
        style="style/myStyle2"
        android:text="New Button"
        android:id="@+id/button"
        android:layout_below="@id/textView2"
        android:layout_alignLeft="@id/textView2"
        android:layout_alignStart="@id/textView2"
        android:layout_margintop="83dp" />
    <Button
        style="style/myStyle2"
        android:text="New Button"
        android:id="@+id/button2"
        android:layout_below="@id/textView2"
        android:layout_alignLeft="@id/textView2"
        android:layout_alignStart="@id/textView2"
        android:layout_margintop="43dp" />
</RelativeLayout>