BASIS Client Management
Sometimes the Administrator may need to change the settings of a client in order to allow or disable customizations or changes to repository objects. In order to perform these operations execute the following sequence of actions:
• Log into any client of the system as super user.
• Execute transaction SE06
• Click on the System Change Option button; set Global Setting as Modifiable.
• Execute transaction SCC4. Alternately access the menu path Tools -> Administration -> Management -> Client admin. -> Client maintenance
• Click on the pencil marked edit button on the top of the resulting screen.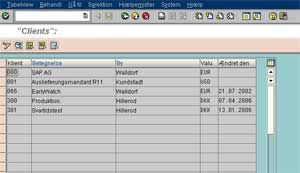
• Click the green right pushbutton on the next window, when the system issues a warning that the table, the administrator is going to change is client independent.
• Next double click on the entry of the client whose settings need to be changed.
Setting up a configuration for client-dependent customizations
The default settings “Automatic recording of changes” allow client dependent customizations and also record all such changes through change requests.
Administrator may disable all changes by selecting “No Changes Allowed”(for a productive client or integration testing client)
Turning off of recording of the customizations by change requests is possible by selecting “Changes w/o automatic recording” (e.g. for a sandbox client)
By selecting “No Transports allowed”, administrator allows customizations in the client that cannot be transported to other clients.
Setting up a configuration for client-independent object changes
Clicking on the pull down button associated with the single field in the frame for client-independent object changes allows the administrator to select one of the available four options. One can selectively enable or disable changes to client-independent objects as well as to other repository objects.
selectively enable or disable changes to client-independent objects as well as to other repository objects.
Client Copy
Copying clients is another important activity in Client Management. Client copy sometimes involves copying either SAP provided clients or a live and working client to another client. The request for a client copy should be documented and forwarded to the Administrator for execution. The request should specify the timing of the execution in addition to all other client details. It should be kept in mind that client copy may consume a lot of disk space that is not recoverable by just deleting the client. Hence adequate planning should be done in order to justify the need of a new client.
• From the SAP login screen, login as any super user in any existing client.
• At the SAP main menu, click Tools -> Administration -> Client admin. -> Client Maintenance ( Transaction SCC4)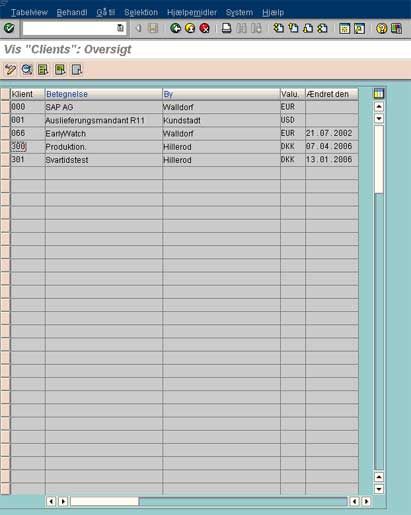
• Click on the pencil marked edit button
• Click the green right pushbutton on the next window, when the system sends a warning that the table one is attempting to change is client independent
• Click on the ‘New entries’ pushbutton
• Type the new client number e.g. 010
• Select a settings for the client-dependent object changes, and client-independent object and repository object changes
• Depending on the type of client, select a category of the client.
• Save the entries.
• From the SAP login screen, login as SAP*, password ‘pass’, in the new client whose entry has just been created.
• Local Copy:
Access the menu path click Tools -> Administration -> Client admin -> Client copy -> Local client copy. Alternately use transaction SCCL.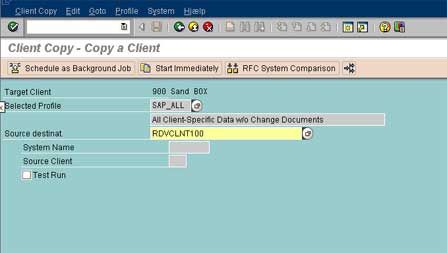
• Remote Copy:
Access the menu path click Tools -> Administration -> Client admin -> Client copy -> Remote client copy. Alternately use transaction SCC9. Ensure that the RFC connection is setup between the source and target systems.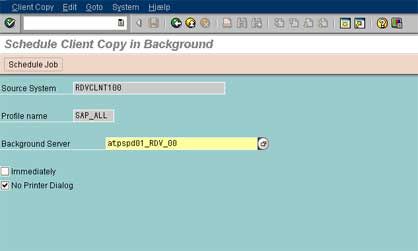
• Enter a source client from where one would like to copy.
• Click on the pull down button in the field Profile, and choose an SAP provided copy profile. To check whether the profile that has been selected matches the required one, place the cursor on this field entry and access the menu path Profile -> Display profile. Use a different source client for the user master information.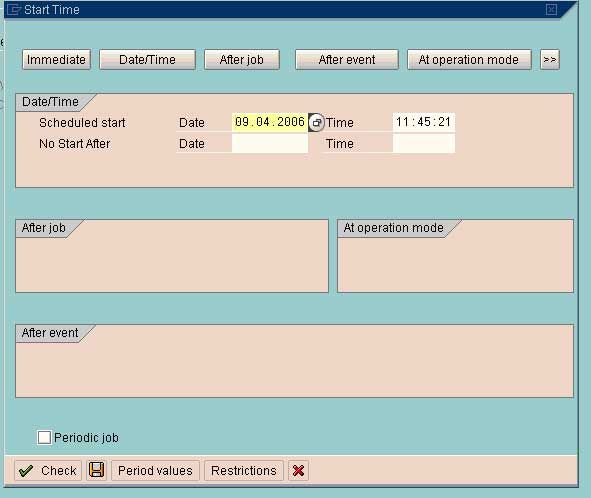
• Click on the Execute pushbutton to perform the client copy in the foreground. Else, Option Execute in Background pushbutton can be selected in order to schedule a background job for doing the client copy.
• After one presses the Execute button, the system will prompt with a window where administrator has to verify whether the selected profile and source client matches what he exactly wants. If so, then continue with the procedure.
• Another window box will appear prompting with a message like “ Tables To Be Copied xxxx Copy? “
• Click on [Yes] button in order to start the client copy procedure. To monitor the progress go to transaction SCC3.
• After the client copy gets over, check the copy logs in order to ensure that there was no problem. Access the menu path Tools -> Administration -> Client admin -> Copy logs.
In the resulting window double click on the entry corresponding to the client copy one has just run. In the following window place the cursor on the chosen client copy run, and press the Choose pushbutton. If the client copy process is terminated before completion, due to power failure or other reasons that caused the process to hang, client copy can be restarted without doing the entire procedure afresh.
While client copy is in progress, please ensure that no one is using the source client because any update during that time will result in data inconsistency in the target client.
Deleting a Client
• From the SAP login screen, login as any super user in any existing client.
• Access the menu path Tools -> Administration -> Client admin.-> Special functions -> Delete client. Alternately run transaction SCC5.
• In the resulting screen select the option ‘Delete from T000’ and click on ‘Online’ pushbutton in order to run the client delete in the foreground. Alternately administrator can also run this in the background by clicking the pushbutton ‘Background’
Exporting a client
On both systems it is necessary that the dictionary is the same when doing a remote client copy. Is this not the case (could be because some tables have not been established because they are situated in a transport that has not yet been released) you have to undertake a client export. The export is started in the client you wish to copy and is started from transaction code SCC8: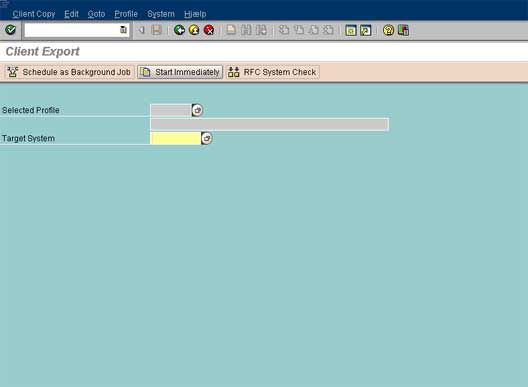
• From SAP log in screen, log in as super user in the client that is to be exported.
• From menu select, Tools > Administration
• Next select Administration > Client Admin > Client Transport > Client Export. Alternately run transaction SCC8.
• For selected profile field, any of the options available from the list of values can be selected. For example for copying the entire client one can select SAP_ALL profile, for selecting user masters and authorizations select SAP_USER.
• The target system should be a different SID than the one from which the client export is being taken.
• Select Execute in background and schedule the job to be triggered immediately / later.
Depending on the profile selected, the client export generates 2 - 6 files
– Datafile (RO*) and cofile (KO*) for client independent objects
– Datafile (RT*) and cofile (KT*) for client dependent objects
– Datafile (RX*) and cofile (KX*) for Sapscripts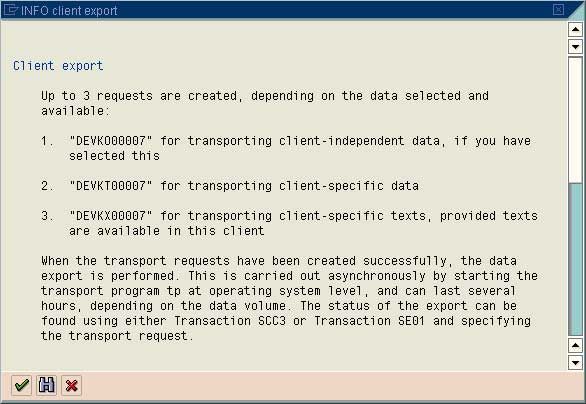
• These files are ftp-ed to the target system. The datafiles are ftp-ed in binary format to directory /usr/sap/trans/data, co-files are ftp-ed in ASCII format to directory /usr/sap/trans/cofiles, sapscript file is ftp-ed in ASCII format to directory /usr/sap/trans/data.
Importing a client
• In the target system, log into SAP as superuser and go to transaction SCC4.
• Create a new entry for the client as discussed above.
• Check the database space through transaction DB02 and ensure there is space for the new client that is to be imported.
• Log in to the operating system as sidadm.
• Go to directory /usr/sap/trans/bin
• First client independent transport file is to be imported.
# tp addtobuffer <sourcesid>KO<request no> <target sid>pf=/usr/sap/trans/bin/TP_DOMAIN_SID.PFL
# tp import <sourcesid>KO<request no> <target sid>client nnn
u18 pf=/usr/sap/trans/bin/TP_DOMAIN_SID.PFL
where nnn – client number in which the data is to be imported and u18 is unconditional mode.
• Next client dependent transport file is to be imported.
# tp addtobuffer <sourcesid>KT<request no> <target sid>.
pf=/usr/sap/trans/bin/TP_DOMAIN_SID.PFL
# tp import <sourcesid>KT<request no> <target sid>client nnn
u18 pf=/usr/sap/trans/bin/TP_DOMAIN_SID.PFL
where nnn – client number in which the data is to be imported and u18 is unconditional mode.
• Next SAPScript transport file is to be imported.
# tp addtobuffer <sourcesid>KX<request no> <target sid>.
pf=/usr/sap/trans/bin/TP_DOMAIN_SID.PFL
# tp import <sourcesid>KX<request no> <target sid>client nnn
u18 pf=/usr/sap/trans/bin/TP_DOMAIN_SID.PFL
where nnn – client number in which the data is to be imported and and u18 is unconditional mode
After these transports are over we have to do the post client import processing using the transaction SCC7. The screen displays the Source Client, the profile with which the client was exported. Execute the post-processing in foreground by pressing the ‘Execute in Foreground’ button. Once the post-processing is over, the client import process is complete.