This tutorial explains SAP SD Configuration Step by Step Guide which includes topics such as Creating Sales Relevent Organisation Units, Assigning Organisational Units, Creating Master Data, Sales Order Creation and Understanding the sales order.
TABLE OF CONTENTS
CREATING SALES RELEVANT ORGN UNITS
STEP 1: Creating Sales Organization
STEP 2: Creating Distribution Channel
STEP 3: Creating Division
STEP 4: Creating Sales Offices
STEP 5: Creating Sales Group
ASSIGNING ORGN UNITS
STEP 6: Assigning Sales Organization with Company code
STEP 7: Assigning Distribution Channel to Sales Orgn
STEP 8: Assigning Division to Sales Orgn
STEP 9: Creating a Sales Area
STEP 10: Assigning Sales Office and Sales Group
CREATING MASTER DATA
Introduction to Master data
STEP 10: Preparing the system for Master Data Creation
- Creating Common Distribution Channel
- Creating Common Division
Customer Master Data - Introduction
STEP 11: Creating Customer Master
Material Master Data - Introduction
STEP 12: Creating Material Master
STEP 13: Posting Stocks for Material
STEP 14: Stock Overview
Condition Master Data - Introduction
STEP 15: Creating Condition Master
SALES ORDER CREATION
Definition and Prerequisites
STEP 16: Preparing the system Combining Organisation Units
STEP 17: Assigning Sales Document to Sales Area
STEP 18: Sales Order Creation
UNDERSTANDING THE SALES ORDER
STEP 19: Viewing Header Details
STEP 20: Viewing Item Details
STEP 21: Viewing Schedule Lines
ORGANISATION SETUP
SALES ORGANIZATION
Sales Organization the Sales Organization is central organizational element that controls the terms of sale to the customer.Defining the Sales Organisation is the foremost step in customizing SD module in SAP.
STEP 1: CREATING SALES ORGANIZATION
Best advised business practice is to copy an existing sales orgn and create own sales orgn :
Menu Path:
SAP IMG → Enterprise Structure → Definition → Sales and Distribution → Define, Copy Delete, Check Sales Organisation
On Choose Activity screen, select Copy, Delete, Check Sales Organisation – Double Click on it.
On the following screen please provide the From(Source) and To(Target) company code.
Note: In practice please select sales orgn 3000 as source and give a target sales orgn as your own
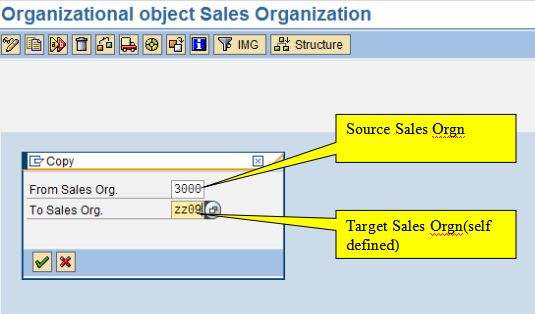
Press Enter till the Sales organization gets created. Upon creating system issues a confirmation.
STEP 2: CREATING DISTRIBUTION CHANNEL
SAP IMG → Enterprise Structure → Definition → Sales and Distribution → Define, Copy Delete, Check Distribution Channel
Click on Define Distribution Channel – New Entries
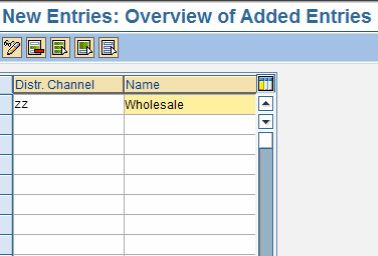
Create your own Distribution channel and save it by ‘Enter’ & ‘Save’ <
STEP 3: CREATING DIVISION
Menu Path :
SAP IMG → Enterprise Structure → Definition → Logistics - General → Define, Copy Delete, Check Division – Double Click
Create own Division by providing Division and name.

Save the inputs
STEP 4: CREATING SALES OFFICE
- Sales office: Geographical aspects of the organizational structures in business development and sales are defined using sales offices. A sales office can be viewed as an actual office or perhaps a territory or region. Sales offices are assigned to sales areas. If you enter a sales order for a sales office within a particular sales area, the sale s office must be permitted for that sales area. A sales office can be assigned to more than one sales area.
Menu path:
SAP IMG → Enterprise Structure → Definition → Sales and Distribution → Maintain Sales Office
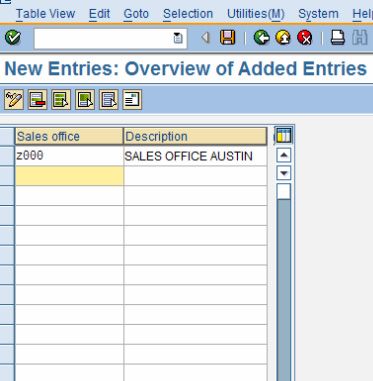
Save your entries. When you enter a new window for Address entry will pop up please provide address info and then save the entries.
STEP 5: CREATING SALES GROUP
Sales group:
Employees of a sales office can be assigned to sales groups defined for each division or distribution channel. Sales groups are assigned to sales offices.
Menu path:
SAP IMG → Enterprise Structure → Definition → Sales and Distribution → Maintain Sales Group
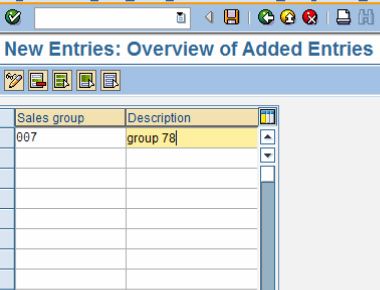
Save entries.
ASSIGNMENT OF ORGANISATION UNITS
STEP 6: ASSIGNING SALES ORGANISATION TO COMPANY CODE
A sales organization is assigned to exactly one company code.
Menu path:
IMG → Enterprise Structure → Assignment → Sales and Distribution → Assign Sales Organization to Company code
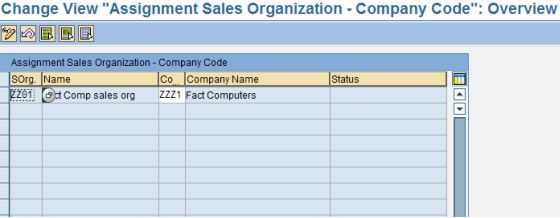
Assign the created Sales Organization to the Company Code.
STEP 7: ASSIGNING DISTRIBUTION CHANNEL TO SALES ORGN
Menu path:
IMG → Enterprise Structure → Assignment → Sales and Distribution → Assign Distribution Channel to Sales Organization – New entries
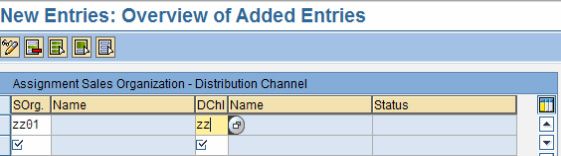
Creates assignment between your Distribution Chennel & Sales Organisation and save.
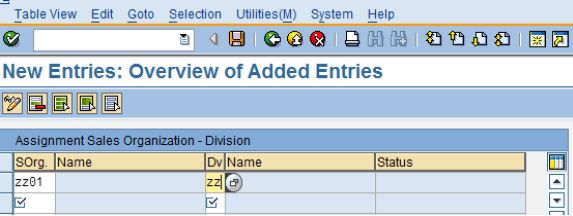
STEP 8: ASSIGNING DIVISION TO SALES ORGANISATION
Menu path:
IMG → Enterprise Structure → Assignment → Sales and Distribution → Assign = Division to Sales Organization – New Entries
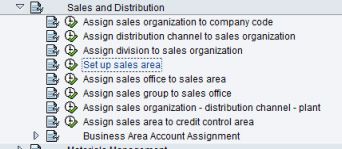
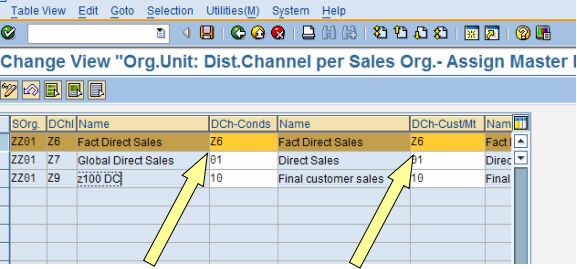
STEP 9: CREATING SALES AREA
A sales area is a combination of sales organization, distribution channel and division. Sales documents, delivery documents, and billing documents are always assigned to a sales area. Every sales process always takes in a specific sales area.
Creating Sales Area:
Menu Path:
IMG → Enterprise Structure → Assignment → Sales and Distribution → Setup Sales area
Click on ![]() .
.
Create assignment between your Sales organization, Distribution Channel & Division By selecting new entries.

If the entry already exists the system will throw a message. If not, please save your assignment.
STEP 10: ASSIGNING SALES OFFICE AND SALES GROUP
Sales Offices are assigned to Sales Area
Menu Path:
IMG → Enterprise Structure → Assignment → Sales and Distribution → Assign sales office to sales area → New Entries

Enter Sales Area {Sales Organization, distribution Channel & Division} & your Sales Office info and save entries.
Sales Groups are assigned to Sales Offices:
Menu Path:
IMG → Enterprise Structure → Assignment → Sales and Distribution → Assign sales group to sales office → New Entries
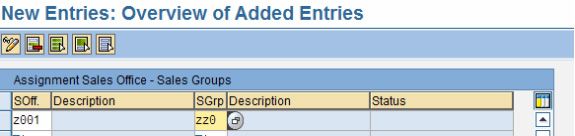
Enter created Sales office and sales group info and assign it by saving your entries.
CREATING MASTER DATA
STEP 11: PREPARING THE SYSTEM
It is essential to define common distribution channel and common division this step is done to avoid redundancy of master data creation. By this definition, the master data shared by several distribution channels applies to conditions and customer and material master data.
Menu path:
IMG → Sales and Distribution → Master Data → Define Common Distribution Channel
Ensure to provide the Common Distribution channel. For eg. Provide your own distribution channel in both places.
Similarly Define Common Divisions:
IMG → Sales and Distribution → Master Data → Define Common Division

Create common Divisions assignment and save entries.
INTRODUCTION TO CUSTOMER MASTER
The customer master groups data into 3 different categories: General data, Sales area data, and Company code data.
- The general data is relevant for sales and distribution and for accounting. It is stored centrally (client specific), in order to avoid data redundancy. It is valid for all organizational units within a client.
- The sales area data is relevant for sales and distribution. It is valid for the respective sales area (sales organization, distribution channel, division).
- The company code data is relevant for accounting. It is valid for the respective company code.
Creating Customer master:
Menu Path:
SAP Easy Access → SAP Menu → Logistics → Sales and Distribution → Business partner → Customer → Create → Complete
T Code → XD01

Account Group:
An Account group controls the data that needs to be entered at the time of creation of a master record. Account groups exist for the definition of a GL account, Vendor and Customer master. It controls Number ranges and Fields that appears while creation of customer.
Select standard account group ‘Sold-to party R/3 → CRM ’
Enter your company code for eg ZZ01
Enter the defined Sales area Eg Sales Orgn – ZZ01 Distributin Channel – Z6 & Divinsin Z7
Click ![]()
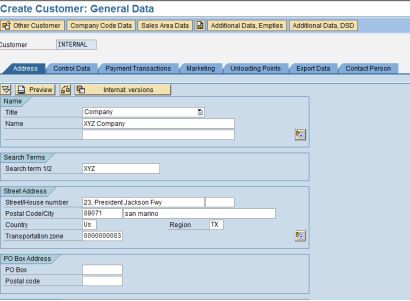
Enter the general data specific to your customer. This data will be created at the Client level. Data will be shared by all company code under that client. Click Enter.
Then click on.![]() The data stored will be specific to a Company Code.
The data stored will be specific to a Company Code.
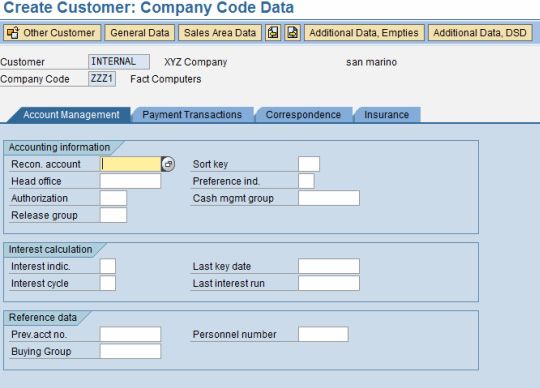
Enter Reconciliation account (Standard 142000). Also, Click on tab ‘Payment Transactions’ and enter relevant details. After entering relevant details in every tab.
Click.'Sales Area Data' is specific for a sales area created under the company code.
SALES AREA DATA

Sales Tab: Enter your Sales Office. Save your entries.
Click on tab ‘Shipping’
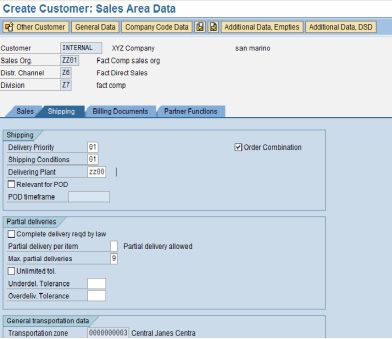
Enter data relevant for shipping. Delivery Priority, Shipping Conditions & Delivering plant are the fields which will be referenced at various levels of sales order processing. Please ensure input for these fields.
Click tab ‘Billing Documents’
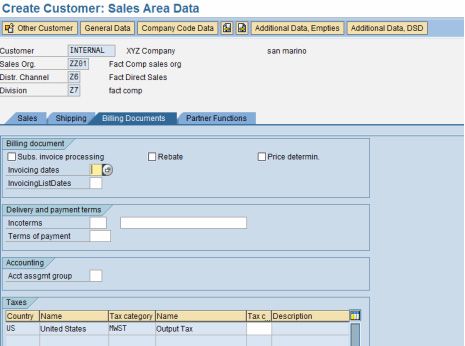
Enter billing relevant details for the customer. Incoterms, Terms of payment and Tax condition are the necessary data. Enter Tax condition as ‘0’.
Partner functions Tab: Creates all necessary partners associated with this customer.
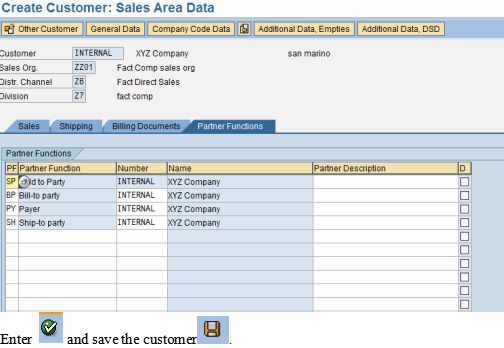
The created customer number will be displayed at the bottom of the screen
MATERIAL MASTER
INTRODUCTION TO MATERIAL MASTER
All the information to manage a material is stored in a data record in the material master, sorted by various different criteria.
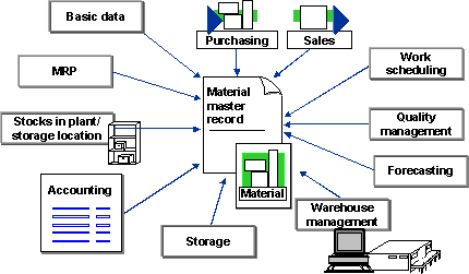
Different departments in a company, work with the same material but uses different information on the material.
STEP 12: CREATING MATERIAL MASTER
Menu Path:
SAP Easy Access → SAP Menu → Logistics → Sales and Distribution → Master Data → Material → Other material → Create
TCode: MM01
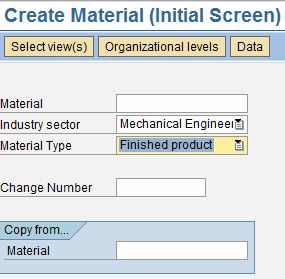
Click enter or press ![]()
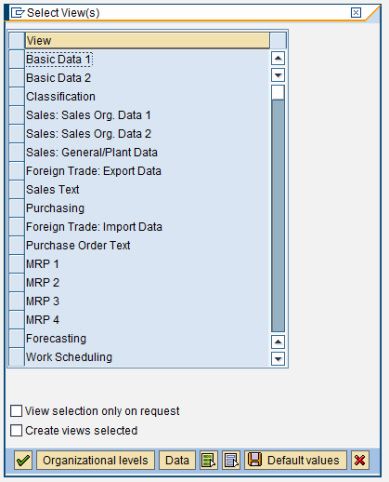
A view screen will pop up on this screen we need to select the tabs that are necessary for the creation of a material. Select the views by clicking on it and after selection Click enter.
Please Note to create a standard material the following tabs are to be selected,
Basic Data 1, Basic Data 2, Classification, Sales: Sales Org. Data 1, Sales Sales Org. Data 2, Sales General/Plant Data, MRP 1, General Plant Data / Storage 1, General Plant Data / Storage 2, Accounting 1 & Accounting 2.
Click enter or press![]()
A Material is created under Organisation levels Plant, Storage location, Sales Organisation & Distribution Channel.
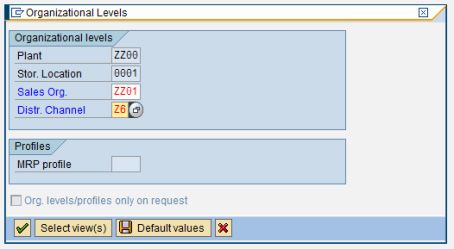
Provide input for Plant, Storage Location, Sales Organization & Distribution Channel and enter.
Understanding material creation screen:
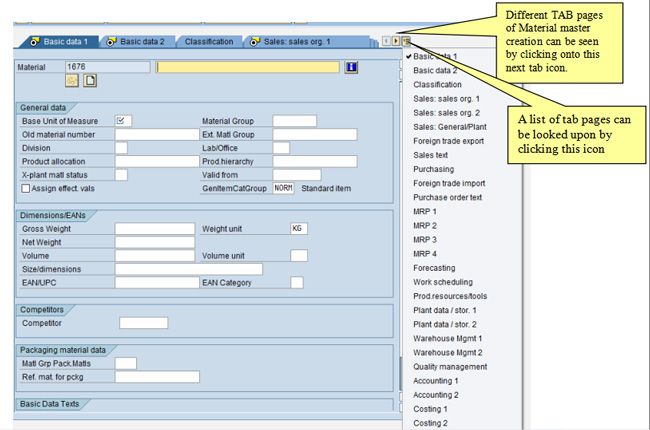
Entering basic data for Material creation:
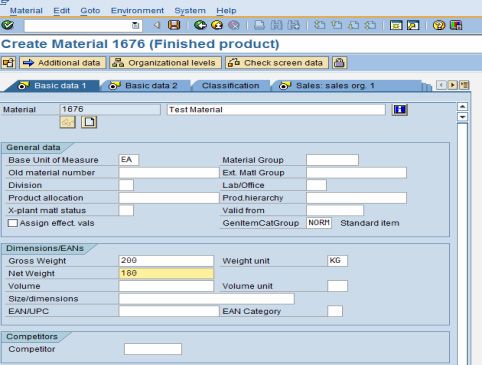
Basic Data1: Enter Material Description, Base Unit of Measure, Gross weight and Net weight of the material.
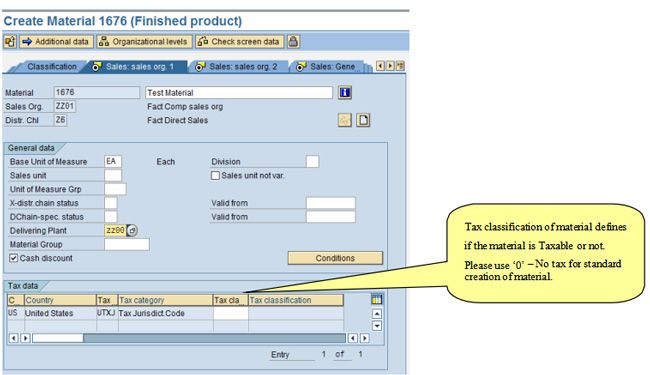
Goto Tab Sales: Sales Org1
This tab ensures that all sales relevant information for a material is stored. It is important to enter if the material is taxable.
Click on Sales Org 2 Tab: Ensure that the entries for Item category group exist at this page. Item category group is an important field to determine respective Item category for a sales order.
Goto Sales: General/Plant
.jpg)
Important fields are: Availability check, Transporation group & Loading Group. Transportation group is a key element in determining the Route & Loading Groups for determination of Shipping point at Sales order processing stage.(This will be discussed in detail at later stages)
On the MRP1 Tab:
MRP tab entries will be used to determine the method system uses to work on materials requirement planning
Enter value ‘ND’ – No planning in MRP Type field.
Click on Tab ‘ Plant data / stor.1’
In order to create standard material no entry is necessary at this tab. Base Unit of Measure field will get automatically filled up as we already have provided the input.
.jpg)
Click on Tab Plant data/stor2:
No data is necessary ‘to be entered’ at this tab.
The Warehouse management and Quality management tabs stores data that are needed for these departments of a business. A standard material can be created without entering this information.
Click tab Accounting 1:
Provide inputs for fields Valuation class(standard entry is 7920) & Standard price(any price). Valuation class is an entry with which the inventory posting for a material at stock level are controlled. Standard price defined under a material helps for valuation of stocks.
After entering all necessary information click ![]() and SAVE. A confirmation message will appear on the bottom as shown in screenshot below.
and SAVE. A confirmation message will appear on the bottom as shown in screenshot below.
![]()
STEP 13: POSTING STOCKS FOR CREATED MATERIAL
It is important to have stocks for the created material in order to proceed with Sales order processing. Without having stocks a sales order cannot be processed. This step explains the posting of stock without the purchase order.
Note: Posting of stocks is an exercise made by MM consultants.
Step1: T Code: MB1C
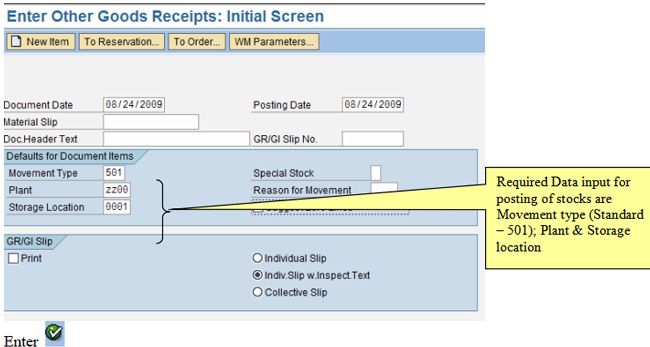
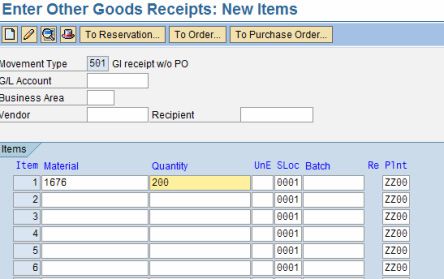
Provide Material No and desired quantity on the respective fields. Enter and Save.
Confirmation of posting will appear on the bottom of the screen.
STEP 14: STOCK OVERVIEW
One can view the total stock of a particular material by viewing the ‘Stock Overview Screen’
T Code: MMBE
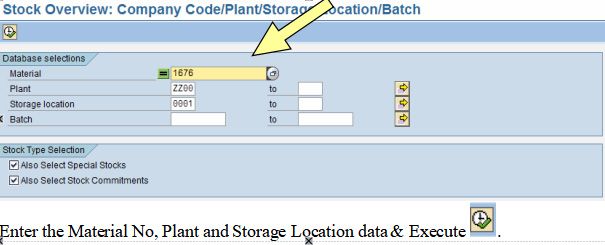
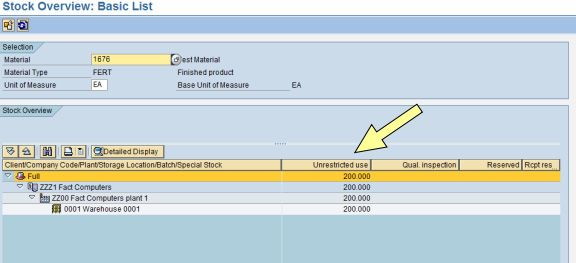
Look into the values under Column ‘Unrestricted Use’. This confirms that the stocks are posted and are available for further processing.
CONDITION MASTER
Another important Master data for Sales order processing is the Condition Master. Condition Master has data related to a condition for a specific customer or a Material. For eg, Pricing, Surcharge, Freight & Taxes are examples of a Condition master.
We can define condition master data (condition records) to be dependent on various data. For example, maintain a material price customer-specifically or define a discount to be dependent on the customer and the material pricing group.
PRICING FOR MATERIAL:
Pricing involves condition technique. (This will be explained in detail in later chapter). This part of the course explains the basic steps involved to create a condition record (Condition master) so to proceed with creation of sales order. Condition records are stored against a specific condition type.
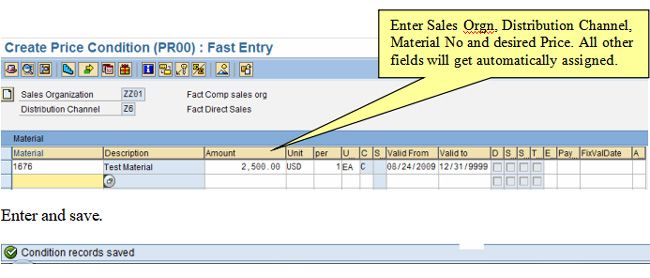
STEP 15: CREATING CONDITION MASTER
Menu Path:
Logistics → Sales and Distribution → Master Data → Conditions → Select using condition type → Create
T Code VK11
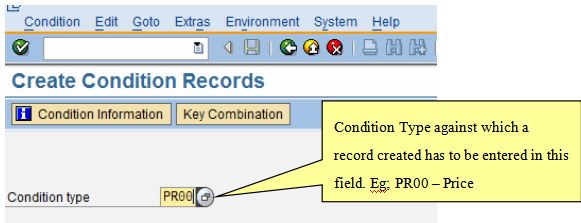
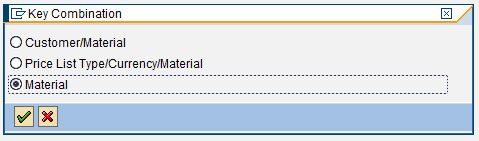
Press Enter ![]() on the Key combination screen pop up please select Material as we are creating a record against a material.
on the Key combination screen pop up please select Material as we are creating a record against a material.
SALES ORDER CREATION
Definition:
A Sales order is an agreement between company and customer for delivery of goods or services at certain time and on agreed terms.
Eg: Standard sales order ‘OR’
The Sales area is responsible for execution of sales order on the terms agreed. All Sales documents are created under a sales area.
Preconditions
Following master data are required
- Customer master data.
- Material master data.
- Pricing condition records.
STEP 16: PREPARATION OF SYSTEM
Preparation settings for Sales order:
- To create a sales order in a specific sales area, it is important that the sales order document type (eg;OR) is assigned with the sales area.
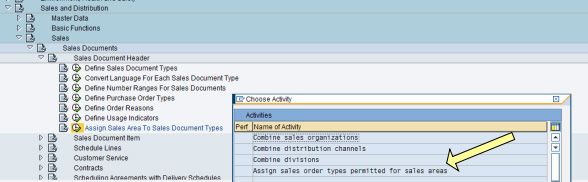
- Combining Sales Orgn / Distribution Channel & Division: If all sales document types are allowed for all sales organizations,Dist.Channel & Division leave the field blank. Otherwise, enter the Organisation unit which will be used as reference
Menu Path:
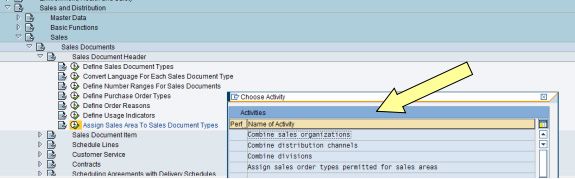
IMG → Sales and Distribution →Sales → Sales Documents → Sales Document Header → Assign Sales Area to Sales Document Types → (on the new pop up menu) Combine Sales Organizations
Combine Sales Organisations:
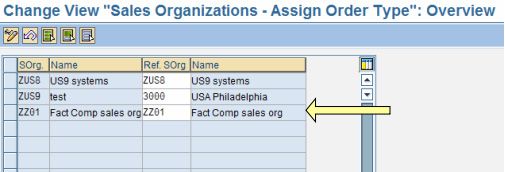
Assign a ref sales organization against your sales organization. Standard practice is to assign your own Sales orgn as ref.sales org.
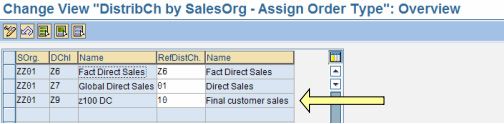
Combine Distribution Channel:
Similar to assignment of sales organization assign Distribution channel and Division as references.
Combine Division:
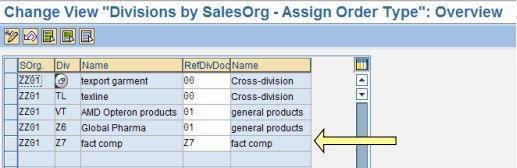
STEP 17: ASSIGN SALES ORDER TYPE TO SALES AREA
Menu Path:
IMG → Sales and Distribution →Sales → Sales Documents → Sales Document Header → Assign Sales Area to Sales Document Types → (on the new pop up menu) Assign Sales Order Types permitted for Sales orgn.
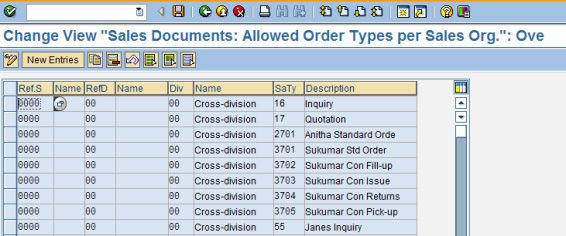
On this page please select 'NEW ENTRIES' andassign your Sales Area to the Sales Document Type. Eg Sales area (ZZ01/Z6/Z7) is assigned with ‘OR’- standard Sales Document Type.
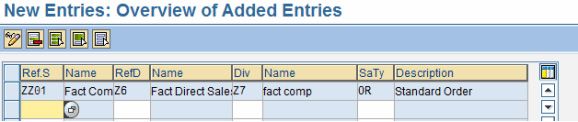
Enter and Save your entries.
STEP 18: SALES ORDER CREATION
Menu Path:
Logistics → Sales and Distribution → Sales → Order → Create
Transaction Code: VA01
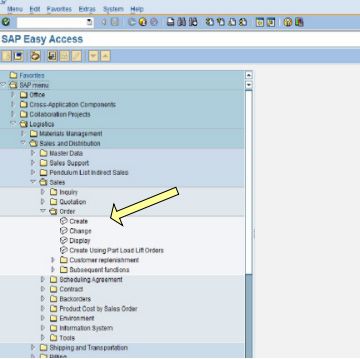
Click on ‘Create’
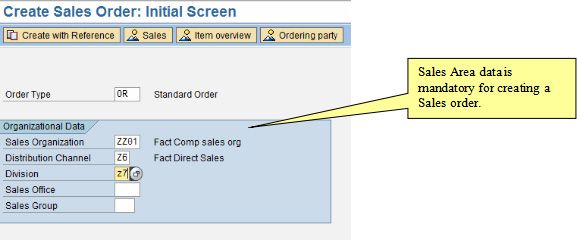
Here enter the Order Type, Your Sales Organization, Distribution Channel & Division.
Click Enter
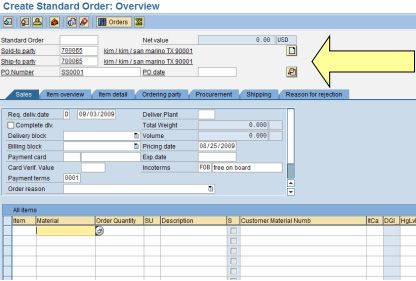
Enter Sold-to party and PO number as customer reference and Press enter or click System determines Ship to party automatically.
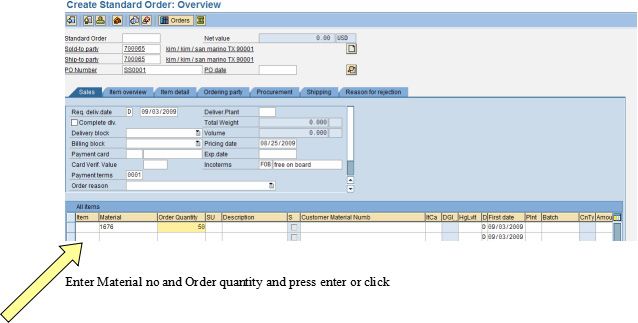
Enter Material no and Order quantity and press enter
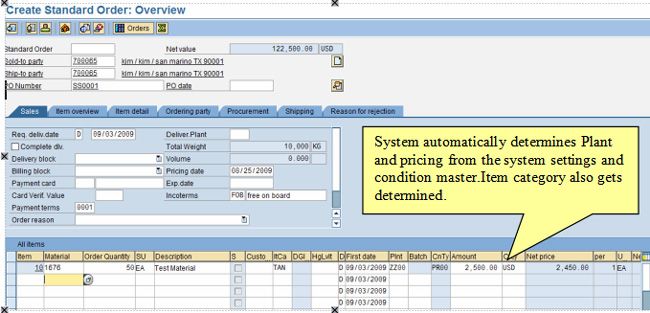
The Plant and Pricing is determined automatically as seen above.
Delivering plant is proposed in order if it is maintained in master data and the preference is as follows:
- From Customer-Material info record if maintained there
- From Customer master record of Ship-to party if maintained there.
- From Sales view of Material master if maintained there.
** If records are not maintained Delivering plant can be entered manually.
Sold to party, Material & Quantity are the inputs that need to be provided for a sales order. Any other details can be derived from the data already stored in various master data.
Now, Click to save the sales order.
UNDERSTANDING THE SALES DOCUMENT:
Sales Document consist Header level data, Item level data & Schedule lines.
HEADER LEVEL: The data in the document header is valid for the entire document. e.g. Sold to party; PO Number; Order date
ITEM LEVEL: Each item in the sales document contains its own data. e.g. Material, Quantity.
-
- Each sales document can have several items.
- Individual items can be controlled differently.e.g. Free of charge Items; Delivery Items
SCHEDULE LINE: Schedule lines contain delivery quantities and delivery dates.
STEP 19: VIEWING HEADER DATA
In main menu follow Menu path:
Goto → Header → Sales or click on icon Check Header data on all the tabs.
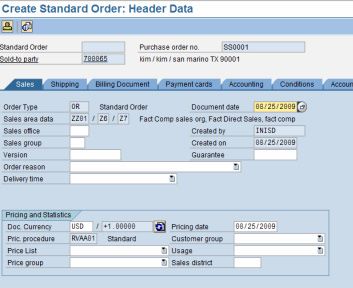
Check Sales area data, Document currency and Pricing date Next click on tab ‘Shipping’
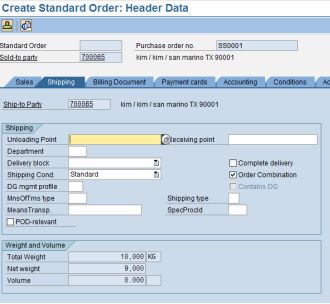
Check Shipping Condition and total Weight/Volume
Click on tab ‘Billing Document’
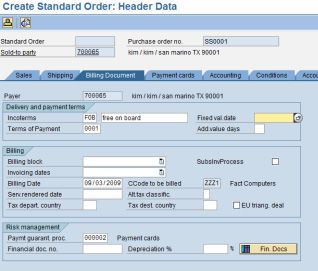
Check Incoterms, Terms of Payment terms – These data are copied from Customer master. Billing Block if active will be visible over here.
Click on tab ‘Conditions’
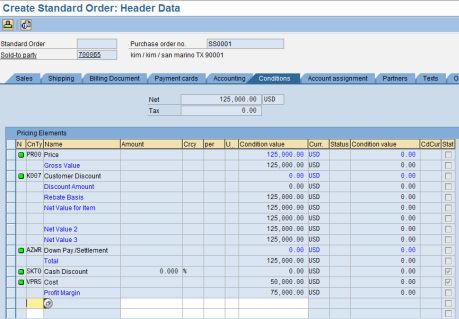
The header level conditions will be displayed on this tab. The Net price of the document will be displayed against the ‘Net’ field.
Click on tab ‘Partners’

Check the Partners and details are correct.
Similarly other relevant tabs of Header data to be checked and changed if required.
STEP 20: VIEWING ITEM DATA
In main menu follow Menu path: Goto → Overview Next to check on Item data select item and follow
Menu path:
Goto → Item → Sales A or click on icon
Item data screen will be displayed as under:
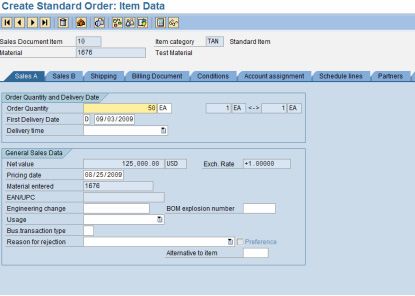
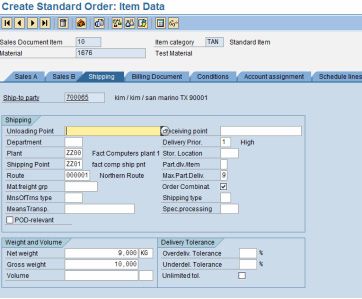
Check Plant, Shipping point and Weight/Vol of item.
Click on tab ‘Billing Document’
Here Header data is copied on to items.
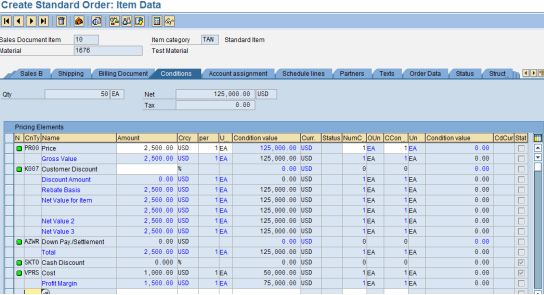
Click on tab ‘Conditions’
The Pricing data maintained as Condition records for the specific product will be displayed on this tab. The Pricing procedure controls the way the prices are calculated.
Pricing conditions are determined here and some records can be entered manually if required. Check if pricing amount is correct.
Understanding Schedule Lines:
Click on tab ‘Schedule Lines’
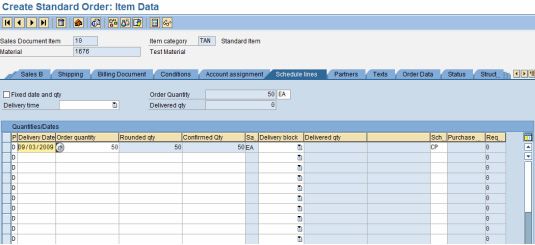
Check if schedule lines have been created and quantity confirmed on dates required.
To open schedule line detail for a particular item Select the entire line item and double click it (or) click on Schedule line.
Every delivery required by the customer form as a single schedule line in sales order.
Detailed view of a schedule line can be seen by Double clicking on the item row or by clicking on ![]() icon on the bottom of the page.
icon on the bottom of the page.
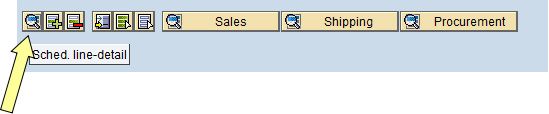
Once the Schedule line details are open please verify the sales, shipping and Procurement details for the specific Item.

Similarly, data can be checked and maintained on other tabs like Text and Partners as required.
Next In main menu follow Menu path: Goto → Overview or icon – This will bring up the overview of the sales order.
Next, follow Menu path: Edit → Incompletion Log to check the completeness of document Complete the incomplete data if any.
Then press ![]()
Following message is displayed at bottom left corner of screen
"Document is Complete"
Click Save.
Sales order creation is complete. The Sales order no will be displayed at the bottom of the screen.
"Standard Order xxxx has been saved"