The cost center is the organizational unit where costs are incurred. A work centre specifies one cost center only.
In order to create a Cost Centre first you have to:
- Create a Company and assign it to the Company Code
- Create a Fiscal Year Variants and assign it to the Company Code
- Create Chart of Accounts and assign it to the Company Code
- Create Controlling Area
- Create Standard Hierarchy and assign it to the controlling area
- Create Cost Centre Groups
- Create Cost Centre
1. Create a Company and assign it to the Company Code
Steps to create a Company:
T.code OX15 is used to create a Company.
OR
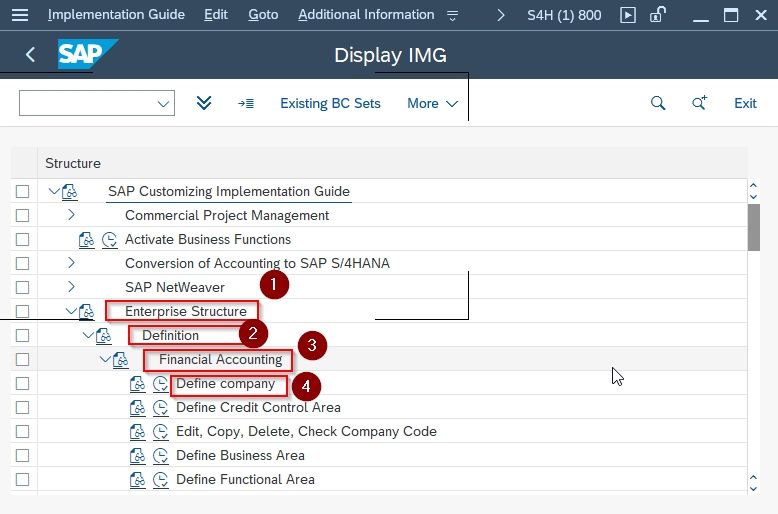
Step 1: Goto SPRO-> SAP IMG-> Enterprise Structure-> Definition-> Financial Accounting-> Define company
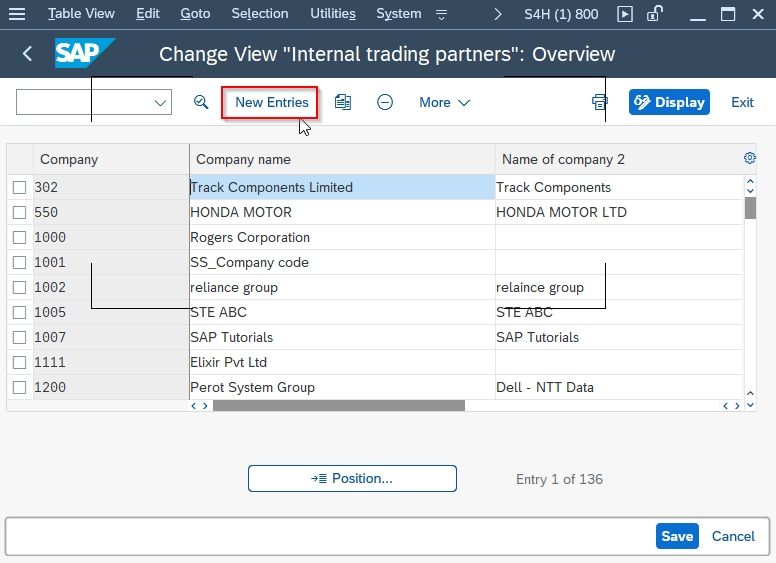
Step 2: On the Change View “Internal trading partners”:Overview screen click on New Entries button
Step 3: On the New entries: Details of the added Entries screen fill the required information about your company and press the Save button.
- Company: Type the unique code of the company. For e.g 6469
- Company name: Type the name of the company. For e.g Krish Pvt ltd.
- PO Box: Type the name of the post box of the company.
- Postal code: Type the postal code.
- City: Type the city name.
- Country: Type the country name.
- Language Key: Type the language used.
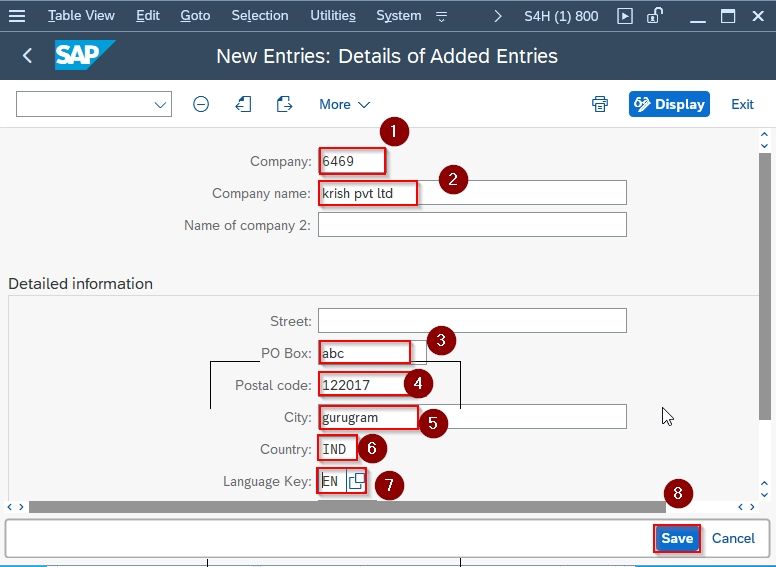
Now your company krish pvt ltd is created successfully.
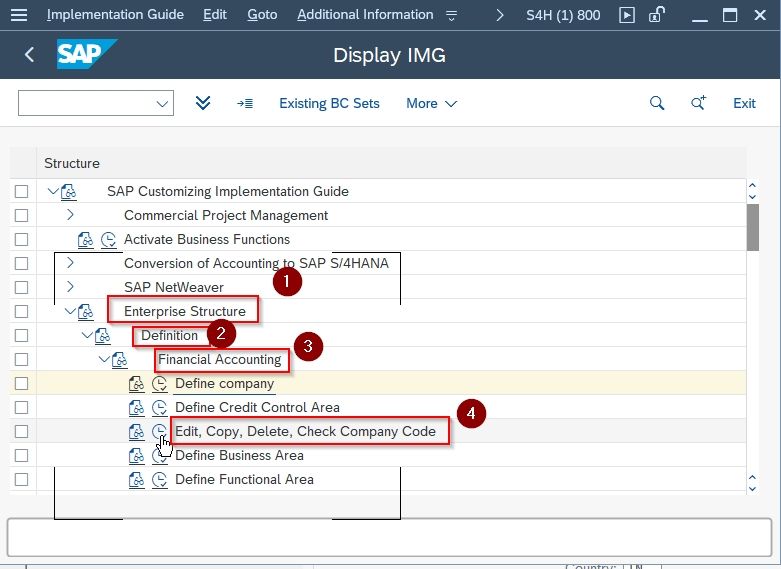
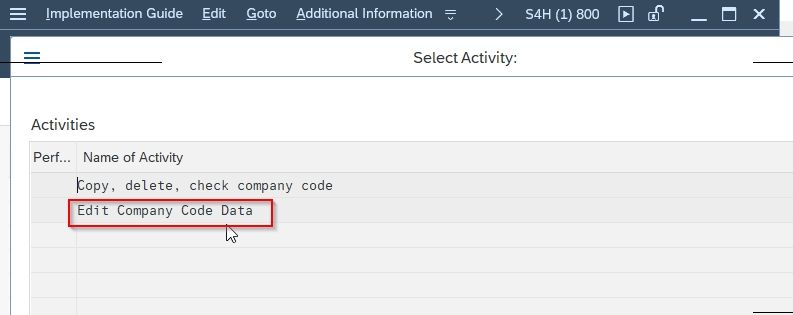
Step 4: Goto SPRO >> SAP IMG >> Enterprise Structure >> Definition >> Financial Accounting >> Edit,Copy,Delete, Check Company Code
Step 5: Select Edit Company Code Data from the popup window
Step 7: On the Change View “Company Code”: Overview screen select New Entries button

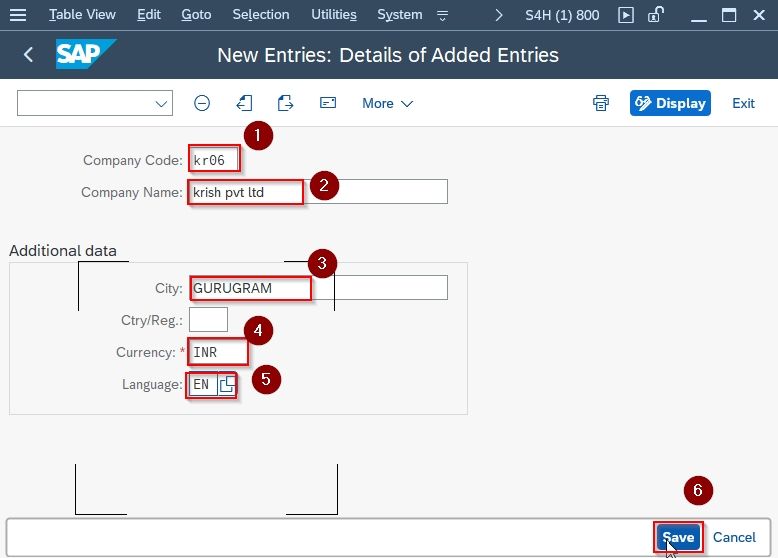
Step 8: On the New Entries: Details of the added Entries screen fill the required information about your company and press the Save button
- Company Code: Type here the code for your company. For e.g kr06
- Company Name: Type the name of the company.
- City
- Currency
- Language
Now to Assign company code to the company follow the below steps:
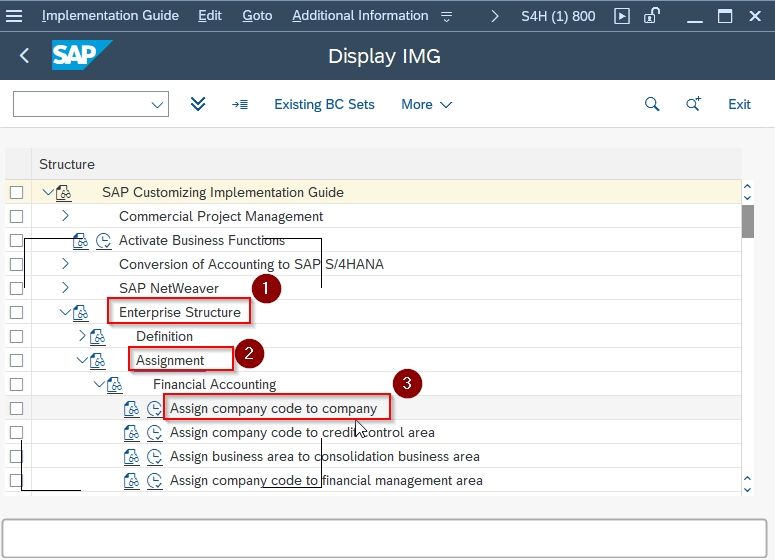
Step 1: Goto SPRO >> SAP IMG >> Enterprise Structure >> Assignment >> Assign company code to company
Step 2: On the Change View “Assign Company code >> Company”:Overview screen click on the Position button and type the Company Code KRO6 in the Another Entry screen.
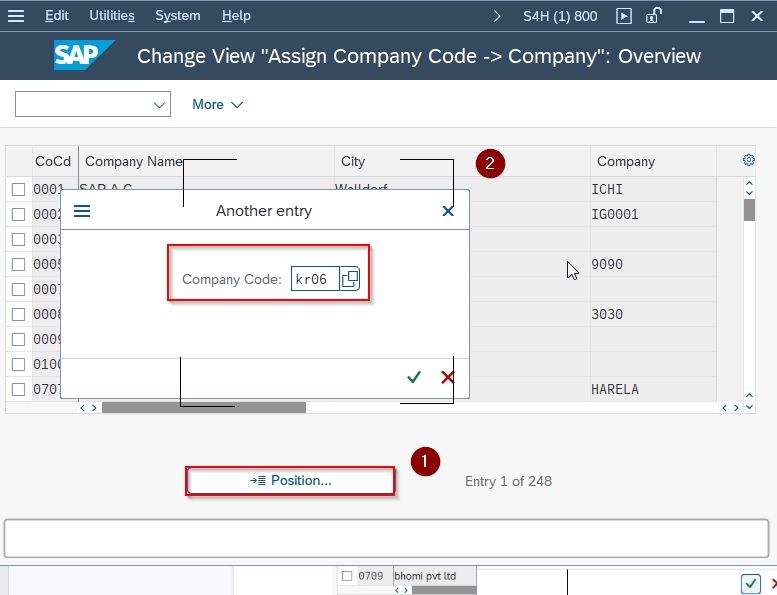
Step 3: On the Change View “Assign Company code >> Company”:Overview screen on the Company field type the company code of your company for e.g 6469 which you want to assign it and press the Save button.
.jpg)
2. Create Fiscal Year Variant
Steps to create Fiscal Year Variant:
T.code OB29 is used to create the Fiscal Year Variant.
Step 1: SAP IMG >> Financial Accounting >> Financial Accounting Global Settings >> Ledgers >> Fiscal Year and Posting Periods
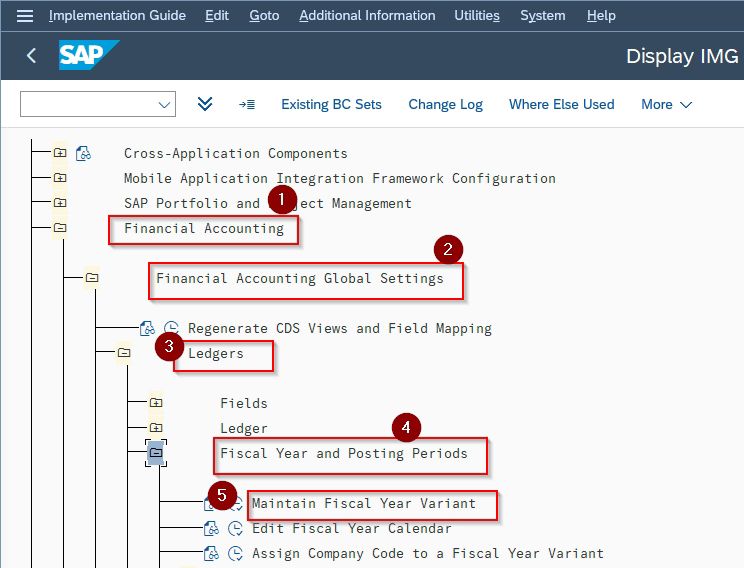
Step 2: On the Change View Fiscal year variants”:Overview screen select New Entries button
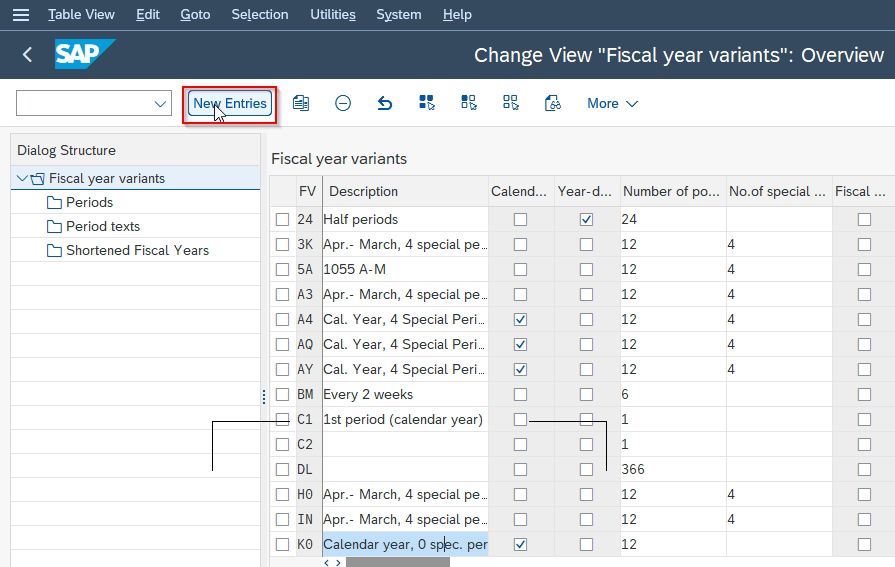
Step 3: On the New Entries: Overview of Added Entries screen update the required field
- FV: Type the name of the Fiscal Year Variant. For e.g N1.
- Description: Describe about the Fiscal Year.
- Number of posting period: Type here the number of calendar years for posting for e.g 12.
- Number of special periods: Number of special periods are maxim upto 4.
.jpg)
Then press the Save button and your Fiscal Year Variant N1 is created.
Step 4: On New Entries: Overview of Added Entries screen click on the Periods button and make entries in the following field
- Month: Type here the number of month
- Day: Type here the number of days in a month of posting period
- Period: Here we define the posting period for e.g according to the posting period April is the 1st month and so on.
- Year shift: As April is the first month of the current year it means March of the next year is the last month. So the year shift for April to December is 0 and from January to March is-1.
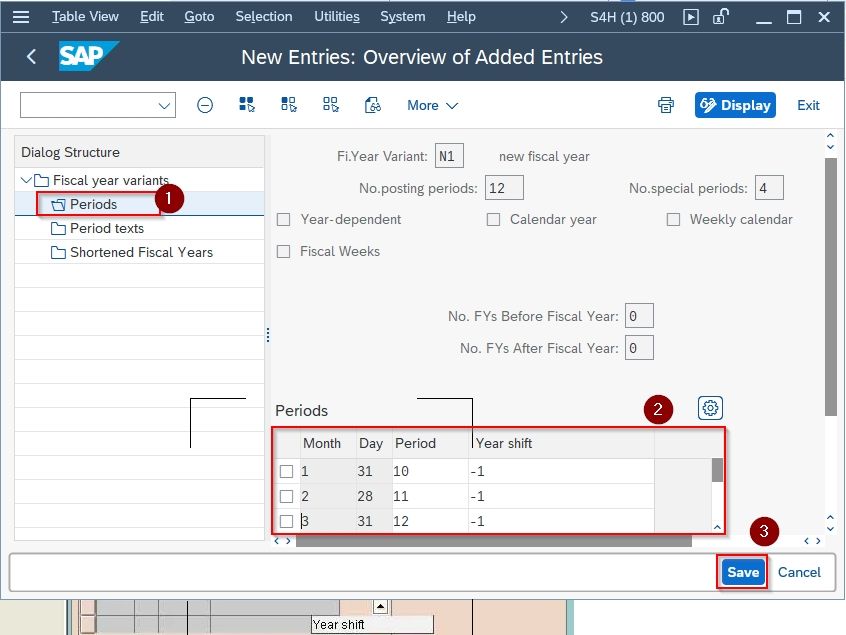
And press the Save button. Now the period is defined for your Fiscal year variant N1.
Steps to Assign the Company Code to Fiscal Year Variant
Step 1: Goto SPRO >> SAP IMG >> Financial Accounting >> Assign Company Code to Fiscal Year Variant
.jpg)
Step 2: On the Change View”Assign Comp.Code >> Fiscal Year Variant”:Overview select Position button and then enter the Company Code kr06 and Save it. Now the company code is assigned to the Fiscal Year Variant N1.
.jpg)
3. Create Chart of Account
Steps to create Chart of Accounts:
T.code OB13 is used to create a Chart of Accounts.
Step 1: Goto SPRO >> SAP IMG >> Financial Accounting >> Master Data >> G/L Accounts >> Preparations >> Edit Chart of Account List
.jpg)
Step 2: On the Change View ”List of All Chart of Accounts”:Overview screen select New Entries button
.jpg)
Step 3: On the New Entries: Details of Added Entries screen update the following field and press the Save button.
- Chart of Accts: Type the name of the Chart of Accounts for e.g k01.
- Description: Type the description about the chart of accounts
- Maint. Language: Type the language of maintenance.
.jpg)
Chart of Account k01 is created successfully now you can assign it to the company code.
Steps to Assign company code to the Chart of Accounts
Step 1: Goto SPRO >> SAP IMG >> Financial Accounting >> Master Data >> G/L Accounts >> Preparations >>Assign Company Code to Chart of Accounts
.jpg)
Step 2: On the Change View: Assign Company Code >> Chart of Accounts”: Overview screen click on the Position button then Another entry window appears type in the Company Code field kr06 and press the tick button.
.jpg)
Step 3: On the Change View: Assign Company Code >> Chart of Accounts”: Overview screen on the Chrt/Accts field type K01 and press Save button. Now the company code kr06 is successfully assigned to the Chart of Accounts K01.
.jpg)
4. Define Standard Hierarchy
Steps to create Standard Hierarchy
Step 1: Goto SPRO >> Sap IMG >> Controlling >> CostCentre Accounting >> Master Data >> Cost Centres >> Define Hierarchy Versions.
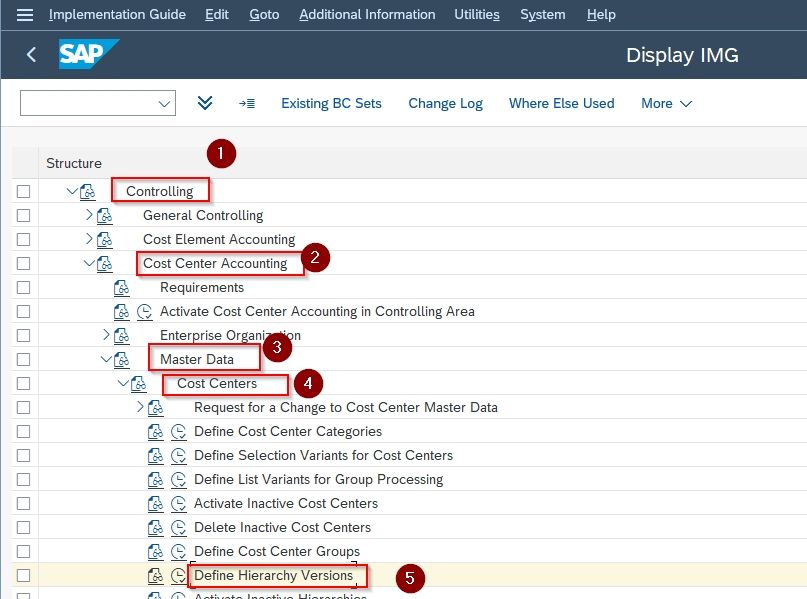
Step 2: On the Change View “Define Hierarchy Versions”: Overview screen select New Entries button

Step 3: On the New Entries: Overview of Added screen update the following fields
- Versions: Type here the number of the version.
- ValidFrom: Type here the validity date.
- Description: Type here the name of the standard hierarchy.
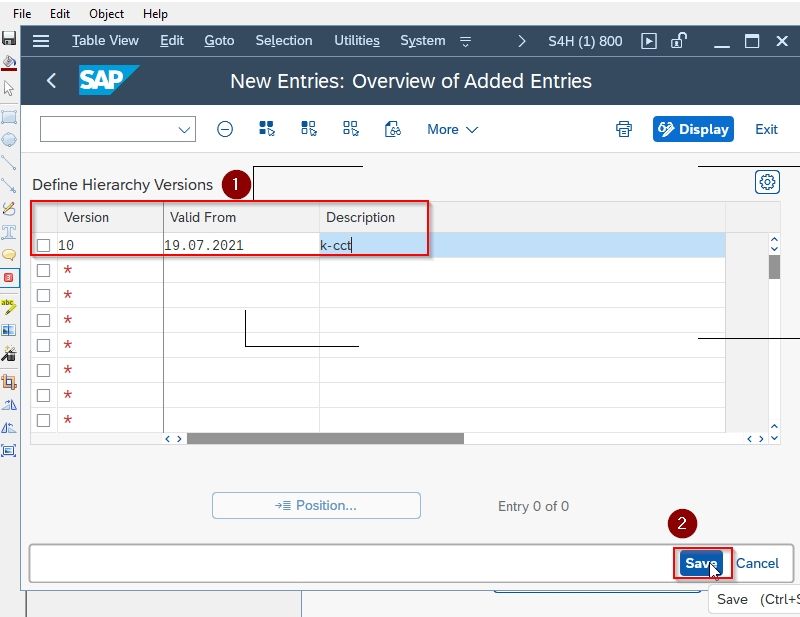
Then press the Save button and Standard Hierarchy k-cct is created.
5. Create Controlling Area
Steps to create Controlling Area:
T.code OKKP is used to create a Controlling Area.
Step 1: Goto SPRO >> SAP IMG >> Controlling >> General Controlling >> Organization >> Maintain Controlling Area
.jpg)
Step 2: Select Maintain Controlling Area tab from the popup window.
.jpg)
Step 3: On the Change View “Basic data”:Overview screen select New Entries button
.jpg)
Step 4: On the New Entries: Details of the Added Entries screen update the following fields:
- Controlling Area:Type here the name of the controlling area for e.g KCR1.
- Name: Type here the name of the concerned person.
- Cocd -> CO Area: Select cross company code cost accounting
- Currency Type: Select currency type as 20 controlling area currency.
- Currency: Select currency as INR (Indian Rupees)
- Chart of Accts: Select the chart of accounts you created for your company for e.g K01.
- Fiscal Year Variant: Select the Fiscal year variant as N1.
- CCtr. Std. Hierarchy: Select the standard hierarchy as k-cct.
.jpg)
Then press the Save button and your Controlling Area KCR1 is created successfully. Now Assign the Company Code to the Controlling Area
Steps to Assign the Company Code to the Controlling Area
Step 1: On the Change View ”Assignment of company code(s)”: Overview screen click on the Assignment of company code(s) button and then press the New Entries button
.jpg)
Step 2: On the New Entries: Overview of Added Entries screen update the following fields:
- CoCd: Type here the company code for e.g KR06
- Company Name: Type here the name of the company krish pvt ltd.
.jpg)
Then press the Save button. Controlling Area KCR1 is successfully assigned to the company code KR06
6. Define Cost Centre Groups
Steps to create Cost Centre Groups:
T.code KSH1 is used to create Cost Centre Group
OR
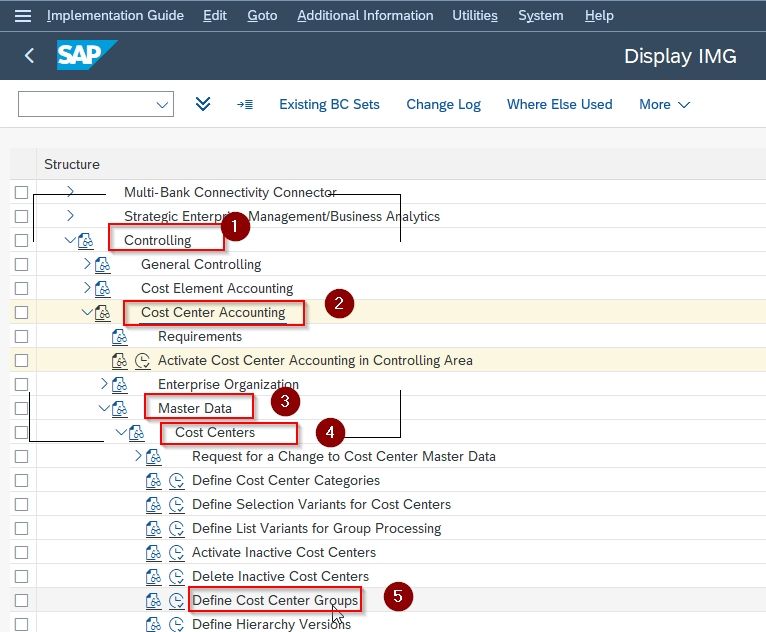
Step 1: Goto SPRO >> SAP IMG >> Controlling >> Cost Centre Accounting >> Master Data >> Cost Centres >> Define Cost Centre Groups
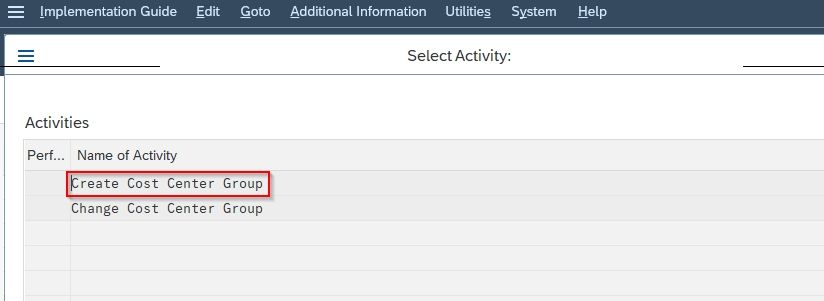
Step 2: On the popup window select the Create Cost Centre Group option.
Step 3: On the Create Cost Centre Group: Initial Screen update the following fields:
- Controlling Area: Type the name of the Controlling Area KCR1 which you created
- Cost Centre Group: Type the name of the Cost Centre Group which you want to create here we are creating a production group
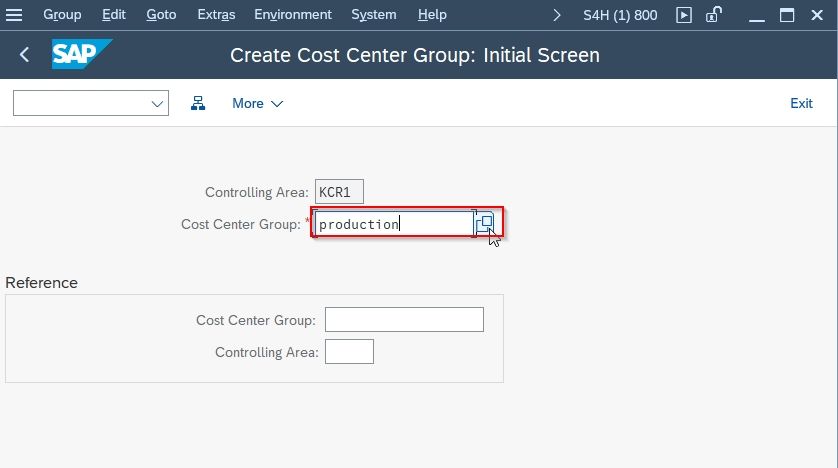
Then select the Cost Centre Group by double-clicking it.
Step 4: On the Change Cost Centre Group: Structure screen type the name for the Cost Centre Group Production for e.g P1.
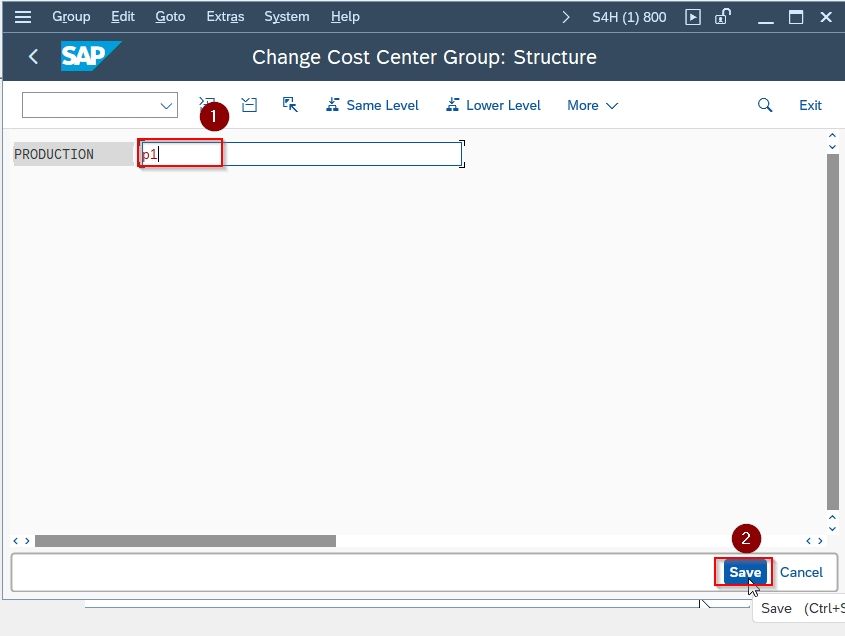
And press the Save button now your Cost Centre Group Production P1 is created.
7. Steps to create Cost Centre
T.Code KS01 is used to Create Cost Centre.
OR
Step 1: Goto SPRO >> SAP IMG >> Controlling >> Cost Center Accounting >> Master Data >> Create Cost center >> Individual Processing >> Create (KS01)

Step 2: On the Create Cost Centre: Initial Screen update the following fields:
- Cost Centre: Type the name of the Cost Centre which you want to create here we are giving it c1.
- ValidFrom: Select the time period upto which your cost centre is valid.
.jpg)
Step 3: On the Create Cost Centre: Basic Screen update the following fields:
- Name: Type here the name of the cost centre.
- Description:Here give the details about the cost centre.
- Person Responsible: Type here the name of the responsible person.
- Cost Centre Category: Here select the cost centre category for e.g here we are creating a service cost centre so we are selecting the option H.
- Hierarchy Area: Type the name of standard hierarchy k-cct.
- Currency: Here we are taking currency as Indian rupees.
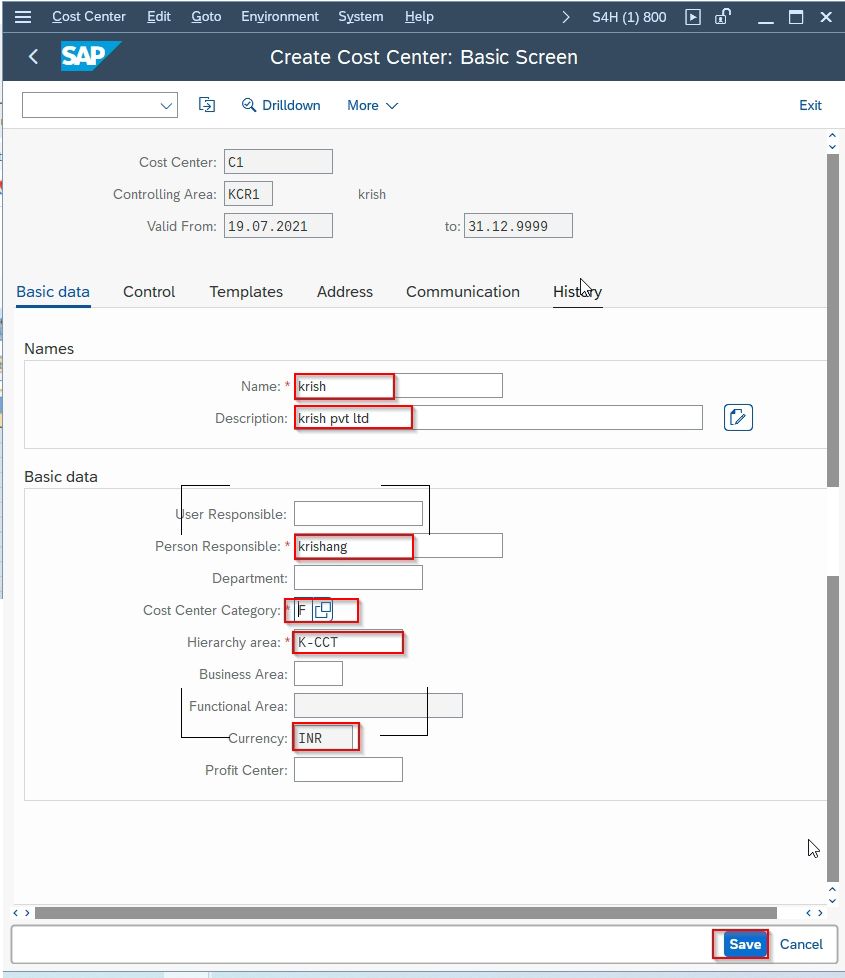
And press the Save button now your Cost Centre B1 is created successfully.
.jpg)
T.code KS13 is used to display the cost centre
.jpg)
.jpg)